
A4 Mk3
| Exploded view - motor for rear lid |

| 1 - | Motor in rear lid control unit -V375- (left-side) for rear lid |
| q | Roof end trim removed → Rep. gr.70. |
| q | Unfasten D-pillar trim in area of drive unit and, if necessary, push carefully to the side. |
 Note
Note| t | Drive unit must only be removed and installed with rear lid fully open. |
| t | Unfasten lock nut at eccentric pin before removing drive unit. |
| q | Unplug electrical connector -2-. |
| q | Unfasten lock nut at drive unit → Anchor. |
Note| The eccentric pin → Item must be seated loosely in the hole in the hinge arm. |
| q | If necessary, slacken the tension on the eccentric pin by turning it slightly clockwise. |
| q | Unscrew bolt -5- at bracket -4-. |
| q | Unscrew bolt at hinge arm → Item and detach drive unit -1- by pulling it to the side. |
| 2 - | Electrical connector |
| q | Unplug before removing drive unit. |
| 3 - | Bolt |
| q | 21 Nm |
| 4 - | Bracket |
Note| t | The bracket has been positioned at the factory using a special device and must not be moved out of this position. |
| t | If the bracket has to be renewed, e.g. in the case of accident repairs, proceed as follows: |
| q | Rear lid must be installed together with gas struts. |
| q | First attach bracket -4- loosely to drive unit using bolt -5-. |
| q | It must still be possible to move the bracket. |
| q | Push the drive unit parallel with the rear lid hinge pin until it makes full contact with the drive unit bush. |
 Caution
|
| q | Use bolt -3- to fasten bracket -4- on body and tighten bolt to 21 Nm. |
| q | Tighten bolt -5- to 8 Nm. |
| q | Secure eccentric pin to drive unit with lock nut (tightening torque → Anchor). |
Note| t | When the lock nut is tightened, the eccentric pin in the hinge is tensioned so that it is free of play. |
| t | You must therefore not use an open-ended spanner to counterhold the hexagon flats of the eccentric pin while you are tightening the lock nut. |
| t | When removing the drive unit, this tension can be slackened by turning the hexagon flats at the eccentric pin slightly clockwise after you have loosened the lock nut. |
| q | Tighten bolt at drive fork → Item to specified torque. |
| 5 - | Bolt |
| q | 8 Nm |
| Installing motor in rear lid control unit -V375- in hinge |
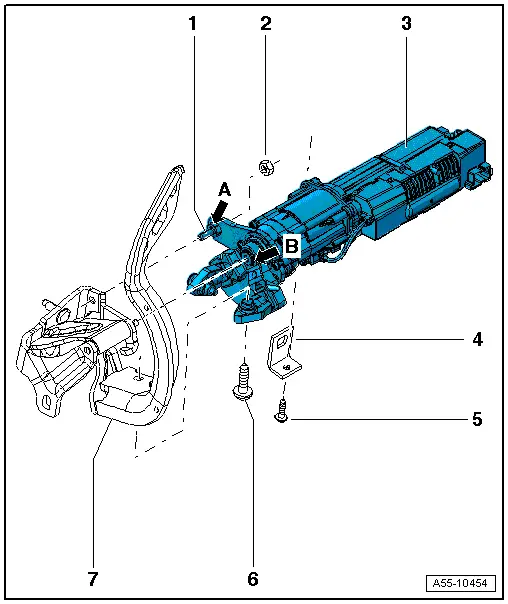
| 1 - | Eccentric pin with hexagon flats |
Note| t | When the lock nut is tightened, the eccentric pin in the hinge is tensioned so that it is free of play. |
| t | You must therefore not use an open-ended spanner to counterhold the hexagon flats of the eccentric pin while you are tightening the lock nut. |
| t | When removing the drive unit, this tension can be slackened by turning the hexagon flats at the eccentric pin slightly clockwise after you have loosened the lock nut. |
| 2 - | Lock nut |
| q | Loosen lock nut at eccentric pin before removing drive unit. |
| q | If necessary, slacken tension on eccentric pin in the hinge arm by turning hexagon flats slightly clockwise. |
| q | Self-locking |
| q | 6 Nm |
| 3 - | Drive for rear lid |
| q | When installing, slide side of drive with bush -arrow B- and loose eccentric pin -arrow A- onto hinge. |
Note| Drive unit bush must make full contact with hinge pin collar. |
| q | This causes arm of drive unit to move into correct position on hinge arm of rear lid hinge -7-. |
| q | Tighten bolt -5- to torque to secure drive unit to bracket -4-. |
| q | Tighten lock nut -2- to torque. |
| q | Tighten bolt -6- to torque. |
| 4 - | Bracket |
Note| t | The bracket has been positioned at the factory using a special fixture and should not be moved out of this position. |
| t | If the bracket has to be renewed, e.g. in the case of accident repairs, proceed as described → Item. |
| 5 - | Bolt |
| q | 8 Nm |
| 6 - | Bolt |
| q | Self-tapping |
| q | 21 Nm |
| 7 - | Hinge for rear lid |