
A4 Mk3
 Note
Note
|
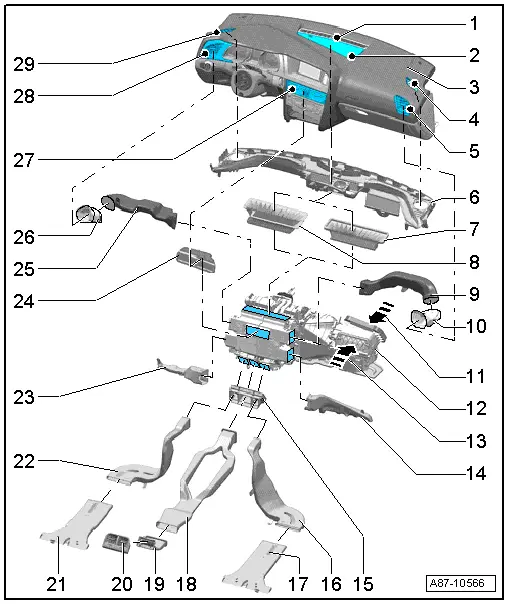
| 1 - | Defroster vent / windscreen |
| q | Air duct to windscreen |
| q | Removing and installing → General body repairs, interior; Rep. gr.70 |
| q | Crushing or squashing of the air duct / defrost intermediate piece ( → Item and → Item) on installing the dash panel will result in uneven or inadequate air routing to the windscreen. → General body repairs, interior; Rep. gr.70 |
| 2 - | Indirect ventilation vent |
| q | Only fitted on vehicles with air conditioner of „Deluxe“ type |
| q | On vehicles with an air conditioner of the „Deluxe“ type, air emerges via this vent. On vehicles with an air conditioner of the „Basic“ type, the opening in the air conditioning unit is sealed off (different air conditioning unit versions). |
| 3 - | Dash panel |
| q | With air ducts to the defroster vents and the various dash panel vents |
| q | Different versions depending on air conditioner model („Deluxe“ and „Basic“) → Electronic parts catalogue |
| q | Removing and installing → General body repairs, interior; Rep. gr.70 |
| 4 - | Defroster vent / right side window |
| q | Removing and installing → General body repairs, interior; Rep. gr.70 |
| 5 - | Right dash panel vent |
| q | Removing and installing dash panel vents → Chapter and → General body repairs, interior; Rep. gr.70 |
| 6 - | Air duct / dash panel |
| q | With air ducts to the defroster vents and the various dash panel vents |
| q | Different versions depending on air conditioner model („Deluxe“ and „Basic“) → Electronic parts catalogue |
| q | The air duct forms part of the dash panel → Item and cannot be replaced separately → General body repairs, interior; Rep. gr.70. |
| q | Removing and installing dash panel → General body repairs, interior; Rep. gr.70 |
| 7 - | Air duct / defrost intermediate piece („Basic“ version) |
| q | Different versions depending on air conditioner model („Deluxe“ and „Basic“) → Electronic parts catalogue |
| q | Removing and installing → General body repairs, interior; Rep. gr.70 |
| q | Crushing or squashing of the air duct / defrost intermediate piece on installing the dash panel will result in uneven or inadequate air routing to the windscreen → General body repairs, interior; Rep. gr.70. |
| 8 - | Air duct / defrost intermediate piece („Deluxe“ version) |
| q | Different versions depending on air conditioner model („Deluxe“ and „Basic“) → Electronic parts catalogue |
| q | Removing and installing → General body repairs, interior; Rep. gr.70 |
| q | Crushing or squashing of the air duct / defrost intermediate piece on installing the dash panel will result in uneven or inadequate air routing to the windscreen → General body repairs, interior; Rep. gr.70. |
| 9 - | Air duct to right dash panel vent |
| q | Removing and installing → Chapter (removing and installing air intake box of air conditioning unit) |
| 10 - | Air duct to right dash panel vent |
| q | Removing and installing → General body repairs, interior; Rep. gr.70 |
| 11 - | Fresh air intake |
| q | The air is drawn in from the plenum chamber → Chapter. |
| 12 - | Air conditioning unit with air intake box |
| q | Different versions depending on air conditioner model („Deluxe“ and „Basic“) → Chapter and → Electronic parts catalogue |
| q | Removing and installing air conditioning unit → Chapter |
| q | Removing and installing air intake box → Chapter |
| q | Air intake, air outlet and air routing in air conditioning unit → Chapter |
| 13 - | Intake for air from passenger compartment (in air recirculation mode) |
| q | The air is drawn in under the glove compartment from the passenger's footwell. |
| 14 - | Front right footwell vent |
| q | Removing and installing → Chapter |
| 15 - | Air duct to rear vents |
| q | Different versions depending on air conditioner model („Deluxe“ and „Basic“) → Electronic parts catalogue |
| q | Vehicles with an air conditioner of the „Basic“ type have no air duct and no vent in the rear centre console. |
Note| This air duct is engaged at the air outlet openings of the air conditioning unit. The air duct is provided with slits for this purpose. Given an unfavourable flap position, a whistling noise may occur at these slits in certain settings, particularly on vehicles with an air conditioner of the „Deluxe“ type. For this reason the upper slits are covered over with adhesive tape at the factory (gradual introduction of adhesive strip as of Febr. 2009) → Chapter. |
| 16 - | Air duct to rear right footwell vent |
| q | Removing and installing, removing floor covering → General body repairs, interior; Rep. gr.70 |
| 17 - | Rear right footwell vent |
| q | The air emerges beneath the passenger's seat. |
| q | Removing and installing, removing floor covering → General body repairs, interior; Rep. gr.70. |
Note| The rear right footwell vent can be removed to the rear without taking out the floor covering. It is only necessary to sever the connecting web at the floor covering. After fitting the footwell vent, re-attach the connecting web using a suitable adhesive. |
| 18 - | Air duct to vent in rear centre console |
| q | Removing and installing, removing rear centre console → General body repairs, interior; Rep. gr.70. |
| q | Only fitted with air conditioner of „Deluxe“ type |
| 19 - | Air duct to vent in rear centre console |
| q | Removing and installing, removing rear centre console → General body repairs, interior; Rep. gr.70. |
| q | Only fitted with air conditioner of „Deluxe“ type |
| 20 - | Vent in rear centre console |
| q | Removing and installing → Chapter and → General body repairs, interior; Rep. gr.70 |
| q | Only fitted with an air conditioner of „Deluxe“ type (the opening in the centre console is sealed off in the case of an air conditioner of „Basic“ type). |
| q | With potentiometer for rear temperature selection -G538- |
| q | The potentiometer for rear temperature selection -G538- forms part of the vent and cannot be replaced separately → Electronic parts catalogue. |
| 21 - | Rear left footwell vent |
| q | The air emerges beneath the driver's seat. |
| q | Removing and installing, removing floor covering → General body repairs, interior; Rep. gr.70 |
Note| The rear left footwell vent can be removed to the rear without taking out the floor covering. It is only necessary to sever the connecting web at the floor covering. After fitting the footwell vent, re-attach the connecting web using a suitable adhesive. |
| 22 - | Air duct to rear left footwell vent |
| q | Removing and installing, removing floor covering → General body repairs, interior; Rep. gr.70. |
| 23 - | Front left footwell vent |
| q | Removing and installing → Chapter. |
| 24 - | Air duct to „centre“ dash panel vent |
| q | On vehicles with an air conditioner of the „Basic“ type, the centre vent temperature sender -G191- is fitted in this air duct → Chapter. |
| q | On vehicles with an air conditioner of the „Deluxe“ type, the opening for the centre vent temperature sender -G191- in the air duct is sealed off (-G191- is not fitted in this case) → Electronic parts catalogue. |
Note| This air duct is provided with an opening. A whistling noise may occur in certain settings at this opening. For this reason this opening is sealed with a plug at the factory (gradual introduction as of Febr. 2009) → Chapter. |
| 25 - | Air duct to left dash panel vent |
| q | Removing and installing → General body repairs, interior; Rep. gr.70 |
| 26 - | Air duct to left dash panel vent |
| q | Removing and installing → General body repairs, interior; Rep. gr.70 |
| 27 - | Centre dash panel vent |
| q | Removing and installing dash panel vents → Chapter and → General body repairs, interior; Rep. gr.70 |
| 28 - | Left dash panel vent |
| q | Removing and installing dash panel vents → Chapter and → General body repairs, interior; Rep. gr.70 |
| 29 - | Defroster vent / left side window |
| q | Removing and installing → General body repairs, interior; Rep. gr.70 |