audi Workshop Repair Guides

Audi Workshop Service and Repair Manuals

Notes on dust and pollen filter with activated charcoal filter element > < Removing and installing dash panel temperature sensor blowerV42
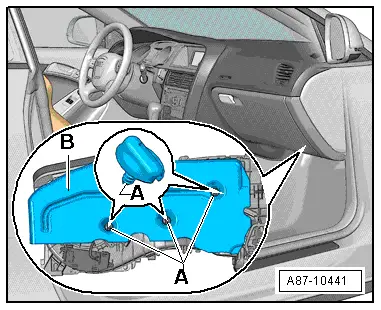
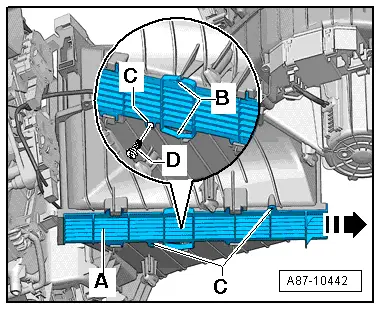
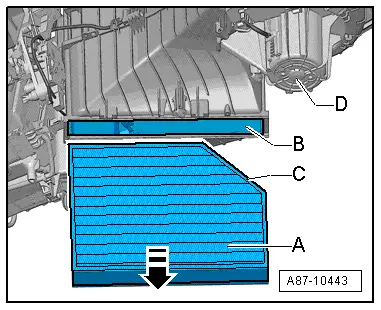
Removing and installing dust and pollen filter
  Note
t  Replacement interval for dust and pollen filter → Maintenance tables
t  There are different versions of the dust and pollen filter (without and with activated charcoal filter element). Vehicles with an air conditioner of the „Deluxe“ type are currently fitted with a dust and pollen filter with an activated charcoal filter element, whereas vehicles with an air conditioner of the „Basic“ type currently have a dust and pollen filter with no activated charcoal element → Electronic parts catalogue.
t  Clean the area around the dust and pollen filter in the slot for the air conditioning unit before fitting a new filter.
t  It may be necessary to remove the driving instructor's pedals on driving school vehicles (depending on version, the driving instructor's pedals may be provided with service disconnection points) → Heed fitting instructions for driving school equipment.
t  In Model Year 2012, a modified dust and pollen filter with ACF element is to be gradually introduced on vehicles with an air conditioner of the „Deluxe“ type. This filter with an enhanced fine dust separation rate has roughly the same air resistance values as the filter fitted prior to conversion and can thus also be installed on vehicles manufactured prior to conversion → Electronic parts catalogue.
t  If so requested by the customer, vehicles with an air conditioner of the „Basic“ type fitted at the factory with a dust and pollen filter with no ACF element can also be provided with a dust and pollen filter with ACF element → Electronic parts catalogue.
Removing
–  Move the front passenger's seat to the rearmost position.
–  Switch off the ignition.
   
–  Remove the screw-type clips -A- and detach the insulating mat -B-.
–  Protect the floor covering with paper in the area beneath the dust and pollen filter.
  A87-10441
–  Release the fasteners -B-, slide the cover -A- in arrow direction -arrow- and detach the cover.
  Note
If the fasteners -B- are no longer strong enough, the cover -A- may have been or can be secured with the bolts -D- at the attachment points -C-.
  A87-10442
–  Pull the dust and pollen filter -A- out of the slot -B- of the air conditioning unit.
Installing
Install in reverse order; paying attention to the following:
–  Clean the air conditioning unit by way of the slot -B- (e.g. with a vacuum cleaner) after removing the dust and pollen filter -A-.
–  Insert the dust and pollen filter -A- correctly with the bevel -C- on the side facing the fresh air blower -D-.
  Note
t  The through-flow direction is not specified for the dust and pollen filter -A- available for this vehicle (left and right-hand drive vehicles are fitted with the same filter).
t  There are different versions of the dust and pollen filter, without and with an activated charcoal filter element; pay attention to the correct version (with and without activated charcoal filter element) → Electronic parts catalogue.
  A87-10443

Notes on dust and pollen filter with activated charcoal filter element > < Removing and installing dash panel temperature sensor blowerV42