audi Workshop Repair Guides

Audi Workshop Service and Repair Manuals

Starting up air conditioner after charging refrigerant circuit > < Detaching refrigerant lines at air conditioner compressor/attaching (vehicles with 6-cyl. engine)
Detaching refrigerant lines at air conditioner compressor/attaching (vehicles with 8-cyl. FSI engine)
Detaching
–  Switch off the ignition.
–  Drain the refrigerant circuit → Air conditioner with refrigerant R134a.
  Note
Depending on the position of the service connection at the refrigerant line and the vehicle model, it may be necessary to remove the additional body brace stiffener on the left to permit connection of the service coupling of the air conditioner service station (e.g. on the Audi Q5) → Running gear; Rep. gr.40 and → Air conditioner with refrigerant R134a
–  Remove the front left wheel housing liner → General body repairs, exterior; Rep. gr.66.
   
–  Disconnect the vacuum hose -1- and lay bare the hydraulic fluid hose -arrow- at the holder.
–  Unscrew the nuts -2- and detach the vacuum reservoir.
  A10-10841
  Caution
Danger of damaging refrigerant lines and hoses.
Take care not to strain, kink or bend refrigerant lines and hoses.
–  Screw out the bolts -1- and -2-.
–  Detaching refrigerant lines from air conditioner compressor.
  Note
Seal open lines and the connections at the air conditioner compressor with suitable caps (to prevent the ingress of dirt and moisture).
  A10-10842
Attaching
Install in reverse order, paying attention to the following:
–  Replace the O-rings -D- and -E-; for version refer to → Electronic parts catalogue.
  Note
t  Use is not to be made of the O-rings from the caps of the replacement air conditioner compressor connections.
t  Heed the fitting instructions for O-rings → Chapter.
–  Check the guide ring -F- at the connections of both refrigerant lines -B- and -C- for damage.
–  Clean the connections of the refrigerant lines and the connections at the air conditioner compressor and check for damage.
–  Moisten the O-rings slightly with refrigeration oil before fitting → Chapter.
–  Insert the appropriate O-ring -D- and -E- in the groove -G- at the connections of both refrigerant lines -B- and -C-.
  A87-10053
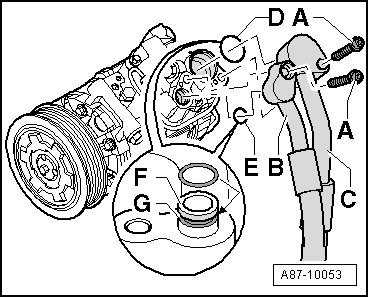
–  Insert both refrigerant lines in the corresponding connection at the air conditioner compressor.
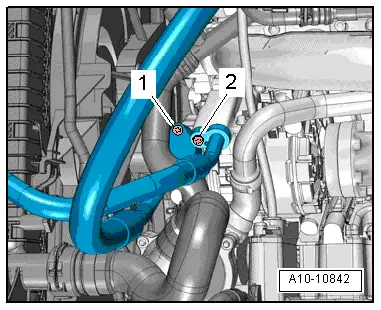
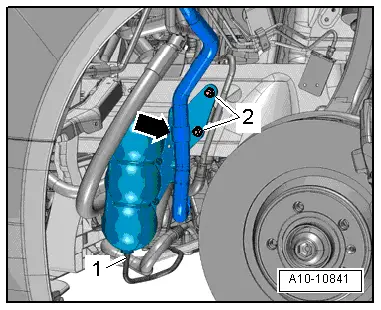
–  Finish-tighten the bolts -1- and -2-.
l  Tightening torque: 9 Nm (for bolts with M6 thread) / 25 Nm (for bolts with M8 thread).
  Note
Following attachment of the refrigerant lines to the air conditioner compressor (and after installing the air conditioner compressor) check the routing of the lines. They must be inserted in the holders provided and not make contact with other components.
–  Install the front left wheel housing liner → General body repairs, exterior; Rep. gr.66.
–  Evacuate and charge the refrigerant circuit → Air conditioner with refrigerant R134a.
–  Re-install the remaining components removed.
–  Switch on the ignition.
–  Interrogate the event recorder of the operating and display unit, Climatronic control unit -J255- and erase any faults displayed → "Guided fault-finding" function of vehicle diagnostic, testing and information system VAS 5051.
–  Start up the air conditioner after charging the refrigerant circuit → Chapter.
  Note
Also heed the notes on start-up of the air conditioner after charging → Air conditioner with refrigerant R134a.
  A10-10842

Starting up air conditioner after charging refrigerant circuit > < Detaching refrigerant lines at air conditioner compressor/attaching (vehicles with 6-cyl. engine)