| –
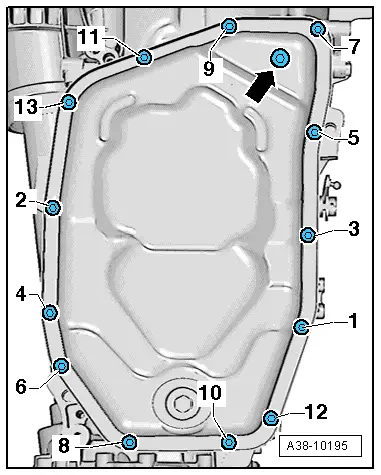
| Unscrew bolts for ATF oil pan in sequence -13 to 1- (opposite to tightening sequence). |
| Installation is carried out in reverse sequence; note the following: |

Note | t
| Renew seals and gaskets. |
| t
| Bolts for ATF oil pan must be renewed. |
| t
| If the vehicle mileage is high, it is recommended to renew the ATF strainer when removing the ATF oil pan → Chapter. Otherwise the ATF strainer only has to be renewed if it has been damaged. |
| –
| Clean all magnets in recesses on ATF oil pan. Ensure that magnets make full contact with ATF oil pan. |
| –
| Clean sealing surface thoroughly; remaining material from the previous gasket must be removed completely. |
| –
| Screw four guide pins -T40199- into items -10, 11, 12 and 13- with ATF oil pan removed. |
Note | The guide pins -T40199- hold the gasket and the ATF oil pan in position. Without them the ATF oil pan will not be properly sealed. |
| –
| Guide new gasket and ATF oil pan over guide pins -T40199-. |
| –
| Tighten new bolts for ATF oil pan in the sequence -1 to 9-. |
| –
| Remove the four guide pins -T40199-. |
| –
| Fit remaining bolts -10, 11, 12 and 13- one by one. |
|
|
|