
A4 Mk3
| Sump, oil pump - exploded view |

| 1 - | Oil level and oil temperature sender -G266- |
| 2 - | Seal |
| q | Renew |
| 3 - | Bolt |
| q | Renew |
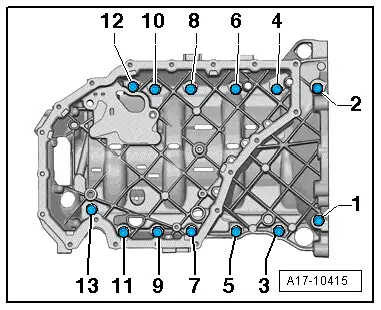
| q | Tightening sequence → Fig. |
| 4 - | Sump (bottom section) |
| q | Removing and installing → Chapter |
| 5 - | Baffle plate |
| q | Renew |
| 6 - | Suction pipe |
| q | Clean strainer if dirty |
| 7 - | Bolt |
| q | 9 Nm |
| 8 - | O-ring |
| q | Renew |
| q | Lubricate |
| 9 - | Oil pump |
| q | Removing and installing → Chapter |
| 10 - | Centring sleeve |
| 11 - | O-ring |
| q | Renew |
| 12 - | Valve for oil pressure control -N428- |
| q | Removing and installing → Chapter |
| 13 - | Bolt |
| q | 9 Nm |
| 14 - | Chain tensioner |
| 15 - | Drive chain for oil pump |
| q | Mark direction of rotation before removing |
| 16 - | Bolt |
| q | 9 Nm |
| 17 - | Gasket |
| q | Renew |
| 18 - | Coarse oil separator |
| q | Removing and installing → Chapter |
| 19 - | Bolt |
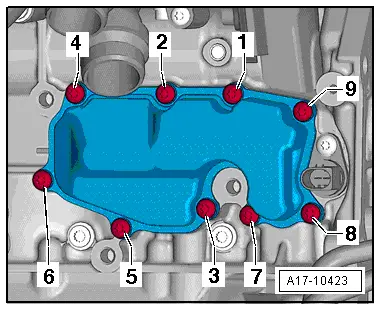
| q | Tightening sequence → Fig. |
| 20 - | Sump (top section) |
| q | Removing and installing → Chapter |
| 21 - | Bolt |
| q | Renew |
| q | Tightening sequence → Fig. |
| 22 - | Bolt |
| q | Renew |
| q | Tightening sequence → Fig. |
| 23 - | Bolt |
| q | 20 Nm |
| 24 - | Seal |
| 25 - | Bolt |
| q | 9 Nm |
| 26 - | Seal |
| 27 - | Non-return valve |
| 28 - | Oil drain plug |
| q | Renew |
| q | 30 Nm |
| 29 - | Nut |
| q | 9 Nm |
|

|
|
|
|
|