A4 Mk3
| Radiator and radiator fans - exploded view |
| Radiator, water radiator (front) for charge air cooling circuit, radiator cowl and radiator fans - version 1 |

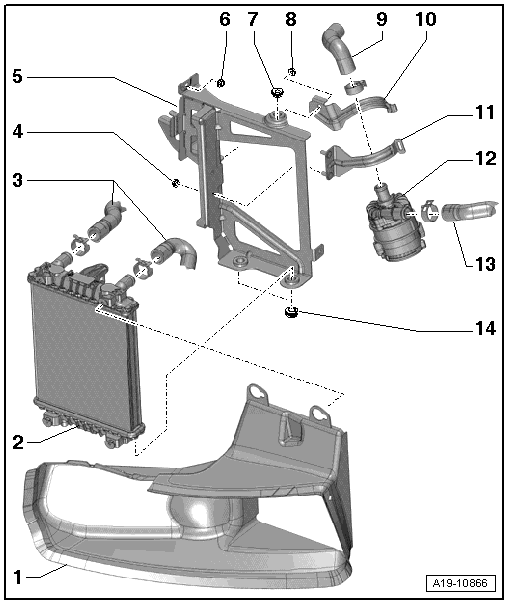
| 1 - | Bolt |
| q | 4.5 Nm |
| 2 - | Radiator cowl |
| q | Remove and install together with radiator → Chapter |
| q | A5 → Chapter |
| 3 - | Radiator fan -V7- |
| q | With radiator fan control unit -J293- |
| q | Removing and installing → Chapter |
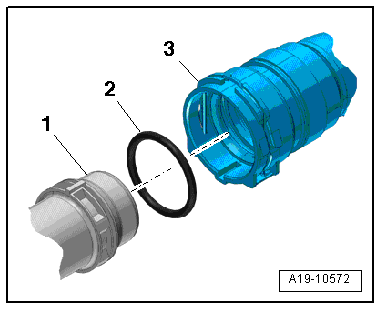
| 4 - | Coolant hose |
| q | Lift retaining clip to detach |
| q | Connecting to radiator → Fig. |
| 5 - | O-ring |
| q | Renew |
| 6 - | Washer |
| 7 - | Radiator bracket |
| 8 - | Coolant hose |
| q | Lift retaining clip to detach |
| q | Connecting to radiator → Fig. |
| 9 - | O-ring |
| q | Renew |
| 10 - | O-ring |
| q | Renew |
| 11 - | Coolant hose |
| q | Lift retaining clip to detach |
| q | Connecting to radiator → Fig. |
| 12 - | Coolant hose |
| q | Lift retaining clip to detach |
| q | Connecting to radiator → Fig. |
| 13 - | O-ring |
| q | Renew |
| 14 - | Retaining pin |
| q | Use screwdriver to release and pull off |
| 15 - | Rubber mounting |
| q | For radiator |
| 16 - | Radiator |
| q | Remove and install together with radiator cowl → Chapter |
| q | If renewed, refill system with fresh coolant |
| 17 - | Coolant hose |
| 18 - | Bolt |
| q | 4.5 Nm |
| 19 - | Water radiator (front) for charge air cooling circuit |
| q | Removing and installing → Chapter |
| 20 - | Coolant hose |
| 21 - | Rubber mounting |
| q | For radiator |
| 22 - | Bolt |
| q | 5 Nm |
| 23 - | Bolt |
| q | 4.5 Nm |
| 24 - | Radiator fan 2 -V177- |
| q | Removing and installing → Chapter |
| Radiator cowl and radiator fans - version 2 |
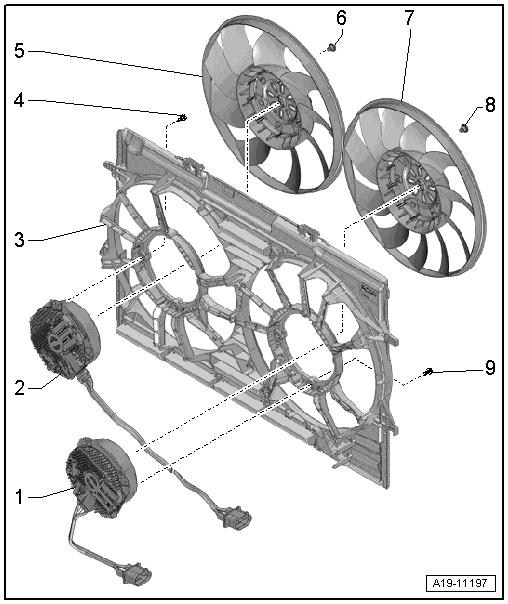
| 1 - | Radiator fan -V7- |
| q | With radiator fan control unit -J293- |
| q | Removing and installing → Chapter |
| 2 - | Radiator fan 2 -V177- |
| q | With radiator fan control unit 2 -J671- |
| q | Removing and installing → Chapter |
| 3 - | Radiator cowl |
| q | Removing and installing → Chapter |
| 4 - | Bolt |
| q | 3.5 Nm |
| 5 - | Fan wheel |
| q | Pin must engage in hole |
| 6 - | Bolt |
| q | 5 Nm |
| 7 - | Fan wheel |
| q | Pin must engage in hole |
| 8 - | Bolt |
| q | 5 Nm |
| 9 - | Bolt |
| q | 3.5 Nm |
| Water radiator (left-side) for charge air cooling circuit |
| 1 - | Air duct |
| 2 - | Water radiator (left-side) for charge air cooling circuit |
| q | Removing and installing → Chapter |
| 3 - | Coolant hoses |
| 4 - | Nut |
| q | 9 Nm |
| 5 - | Bracket |
| 6 - | Nut |
| q | 9 Nm |
| 7 - | Rubber mounting |
| q | For radiator |
| 8 - | Nut |
| q | 9 Nm |
| 9 - | Coolant hose |
| 10 - | Bracket |
| 11 - | Bracket |
| 12 - | Charge air cooling pump -V188- |
| q | Removing and installing → Chapter |
| 13 - | Coolant hose |
| 14 - | Rubber mounting |
| q | For radiator |