audi Workshop Repair Guides

Audi Workshop Service and Repair Manuals

Removing and installing radiator cowl - Audi A5 > < Radiator, radiator cowl and radiator fans - exploded view
Removing and installing radiator with radiator cowl
  Note
Radiator and radiator cowl can only be removed and installed together as one unit.
Special tools and workshop equipment required
   
t  Used oil collection and extraction unit -V.A.G 1782- for vehicles with multitronic gearbox 0AW/dual clutch gearbox 0B5
  W00-10211
t  Engine bung set -VAS 6122- for vehicles with multitronic gearbox 0AW/dual clutch gearbox 0B5
  W00-10435
t  Drip tray for workshop hoist -VAS 6208-
  W00-10228
Removing
–  Remove front noise insulation -1- → Rep. gr.66.
  A10-11071
–  Remove impact bar -5- → Rep. gr.63.
–  Remove charge air cooler → Chapter.
  A63-10213
–  Remove condenser → Rep. gr.87.
  A87-10374
–  Audi A4: Remove bracket for mounting for headlight housing → Electrical system; Rep. gr.94.
  A94-11328
–  Place drip tray for workshop hoist -VAS 6208- beneath engine.
–  Remove drain plug -arrow- at connection and drain off coolant.
–  Then detach connection from radiator (lift retaining clip).
  A19-10525
–  Detach connection from radiator (lift retaining clip -arrow-).
  A19-10541
–  Unplug electrical connector -1- and, if fitted, -2- for radiator fan (push retainer to the rear -arrow- and press down release catch).
  A19-10529
Vehicles with multitronic gearbox 0AW/dual clutch gearbox 0B5:
–  Position used oil collection and extraction unit -V.A.G 1782- below connection point.
  Note
Observe rules for cleanliness when working on gearbox → Rep. gr.00.
–  Unscrew bolts -arrows- and detach ATF lines from radiator.
  Note
Tie ATF lines up onto longitudinal member to prevent fluid escaping.
–  Seal off open pipes/lines and connections with clean plugs from engine bung set -VAS 6122-.
  A19-10444
All vehicles (continued):
–  Lift retaining clips -1- and -2- and detach connection from radiator.
  A19-10542
–  Remove bolts -arrows-.
–  Detach air duct -1- from intermediate flange -2- for air cleaner housing.
  A24-10507
–  Release catches -arrows A- and detach air duct -1- on left and right -arrow B-.
  A19-10441
–  Release retaining pins for radiator on both sides and pull out upwards -arrows-.
  A19-0050
–  Remove bolts -1- on both sides and detach radiator bracket with radiator from lock carrier -arrow-.
–  Slightly lower radiator and detach.
  A19-10543
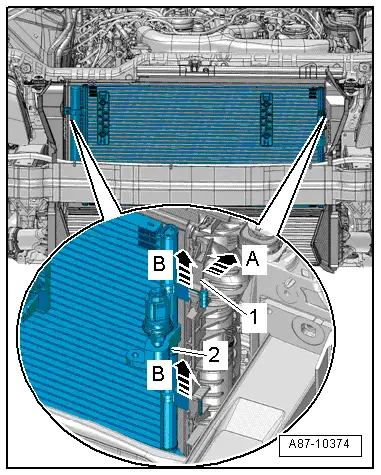
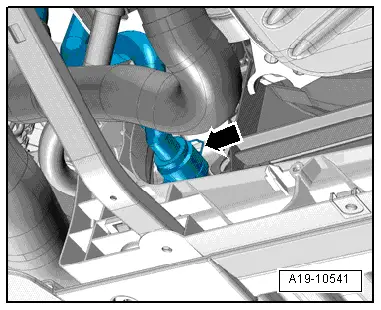
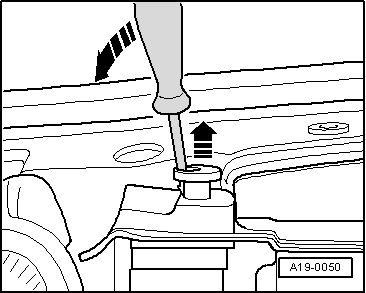
–  Press locking tabs on left and right sides of radiator cowl -arrow- and at the same time lift radiator cowl off radiator.
Installing
Installation is carried out in the reverse order; note the following:
l  Tightening torque → Chapter „Radiator, radiator cowl and radiator fans - exploded view“
  Note
If there are slight impressions on the fins, refer to → Chapter.
–  Attach air duct to intermediate flange for air cleaner housing → Rep. gr.23.
–  Vehicles with multitronic gearbox 0AW: Secure ATF lines → Rep. gr.37.
–  Vehicles with dual clutch gearbox 0B5: Secure ATF-lines → Rep. gr.34.
–  Install charge air cooler → Chapter.
–  Audi A4: Install bracket for mounting for headlight → Electrical system; Rep. gr.94.
–  Install condenser → Rep. gr.87.
–  Install impact bar → Rep. gr.63.
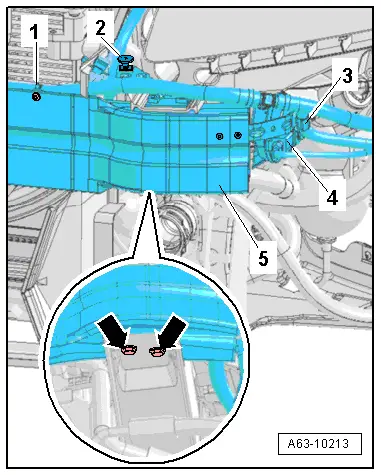
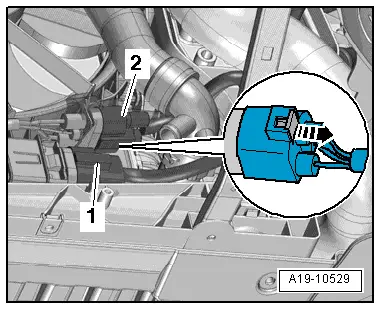
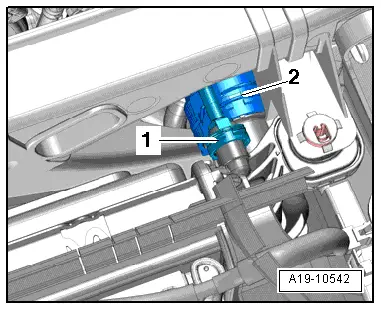
–  Connect coolant hose with plug-in connector → Fig..
–  Fill up with coolant → Anchor.
  Note
The coolant in the entire system must be changed if the radiator is renewed.
–  Vehicles with multitronic gearbox 0AW: Check ATF level → Rep. gr.37.
–  Vehicles with dual clutch gearbox 0B5: Check ATF level → Rep. gr.34.
  A19-10445

Removing and installing radiator cowl - Audi A5 > < Radiator, radiator cowl and radiator fans - exploded view