audi Workshop Repair Guides

Audi Workshop Service and Repair Manuals

Diagram of connections for activated charcoal filter and tank leak diagnostic system - vehicles with 4-cylinder engine > < Activated charcoal filter system and tank leak diagnostic system - exploded view
Removing and installing activated charcoal filter
  Note
Checking for leaks → Chapter „Performing tank leak diagnosis“
Removing
–  Observe safety precautions → Chapter.
–  Observe rules for cleanliness → Chapter.
–  Remove underbody trim (rear left) → Rep. gr.66.
   
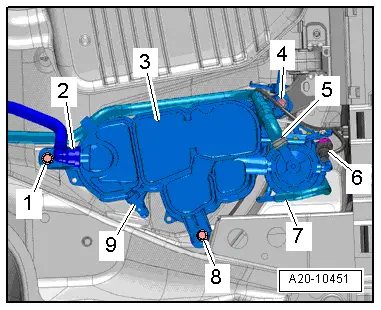
–  Unplug electrical connector -6-.
–  Detach vent pipe -5-.
–  Detach breather pipe -7-.
–  Disconnect breather pipe -9- leading to solenoid valve 1 for activated charcoal filter system -N80- by pressing release tab.
–  Disconnect breather pipe -2- leading to fuel tank by pressing release tab.
–  Unscrew bolts -1, 4, 8- and remove activated charcoal filter -3-.
Installing
l  Tightening torque → Chapter
Installation is carried out in the reverse order; note the following:
–  Connect vent and breather pipes so they engage audibly.
  A20-10451

Diagram of connections for activated charcoal filter and tank leak diagnostic system - vehicles with 4-cylinder engine > < Activated charcoal filter system and tank leak diagnostic system - exploded view