audi Workshop Repair Guides

Audi Workshop Service and Repair Manuals

Removing and installing injectors > < High-pressure pump - exploded view
Removing and installing high-pressure pump
Special tools and workshop equipment required
   
t  Torque wrench -V.A.G 1331-
  W00-0427
t  Ratchet -V.A.G 1331/1-
  W00-10045
t  Socket, 14 mm -3150-
Removing
  WARNING
The fuel system operates at extremely high pressure. This can cause injury.
t  
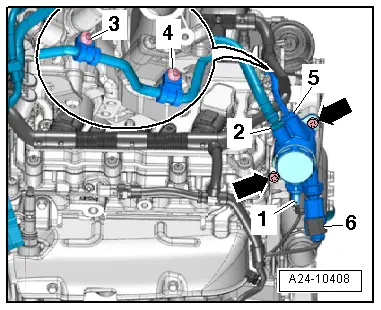
The fuel pressure in the high-pressure section of the injection system must be reduced to a residual pressure prior to opening the system → Chapter.
t  Wrap a clean cloth around the connection and carefully loosen the connection to allow the residual pressure to dissipate.
  Note
t  The high-pressure pump should only be removed and installed when the engine is cold.
t  When installing the high-pressure fuel pump, it is essential to ensure that no dirt enters the fuel system.
t  Use a cloth to catch escaping fuel.
t  The O-ring must always be renewed.
t  Always ensure that the high-pressure fuel pipes are free of tension when tightening the connections.
–  Remove air cleaner (bottom section) → Chapter.
  W00-0282
–  Unscrew bolts -arrows- and remove guard plate -1-.
  A24-10411
–  Unplug electrical connectors -1- and -6-.
–  Detach fuel supply hose -2- and unscrew connection -5-.
–  Remove bolts -3- and -4- from retaining clips.
–  Remove bolts -arrows- and lift high-pressure pipe carefully.
  Note
t  Do not bend fuel pipes to a different shape.
t  Do NOT bend open retaining clamps for fuel pipe.
t  If one of the retaining clamps has been bent open or the fuel pipe has to be renewed, the retaining clamps must also be renewed.
–  Carefully pull out high-pressure pump.
  A24-10408
–  Pull roller tappet -1- out of housing.
Installing
Installation is carried out in the reverse order; note the following:
  Note
t  The connections of the high-pressure pipe must not be damaged.
t  Do not bend fuel pipes to a different shape.
t  Do NOT bend open retaining clamps for fuel pipe.
t  If one of the retaining clamps has been bent open or the fuel pipe has to be renewed, the retaining clamps must also be renewed.
–  Renew O-ring for high-pressure pump.
  A24-10413
–  Check roller tappet -1- for damage and renew if necessary.
–  Lightly lubricate roller tappet with oil and insert it so that lug -arrow A- slides into guide notch -arrow B-.
  Note
The roller tappet must be positioned at the lowest point when installing the high-pressure pump.
–  Rotate crankshaft in direction of engine rotation by turning bolt for vibration damper, and at the same time press roller tappet into cylinder head until it reaches its lowest point.
–  Only lift high-pressure pipe slightly to fit high-pressure pump.
–  Insert high-pressure pump into housing.
  A24-10413
–  Hand-tighten the bolts -arrows- as far as the flange.
–  Now tighten bolts in diagonal sequence to specified torque (approx 1 turn each until high-pressure pump makes contact).
  Note
The pump can be damaged if it is tightened too much on one side (keep it straight).
t  Tightening torque: refer to exploded view of high-pressure pump → Chapter.
–  Tighten union nut -5- on fuel supply line hand-tight. Align so that parts are free of tension.
–  Connect fuel supply hose -2- again.
  A24-10408
–  Tighten bolts -3- and -4- on retaining clips.
–  Plug in electrical connectors -1- and -6-.
  A24-10408
–  Tighten high-pressure pipe to specified torque → Fig..
  A23-0225
–  Install guard plate -1-.
–  Install air cleaner (bottom section) → Chapter.
  Note
Check fuel system for leaks.
  A24-10411

Removing and installing injectors > < High-pressure pump - exploded view