audi Workshop Repair Guides

Audi Workshop Service and Repair Manuals

Checking pressure retention valve in fuel return line > < Removing and installing air mass meterG70
Installing high-pressure pipes
Special tools and workshop equipment required
   
t  Torque wrench -V.A.G 1331-
  W00-0427
t  Ratchet -V.A.G 1331/1-
  W00-10045
t  Socket -T40055-
Procedure
  Note
t  
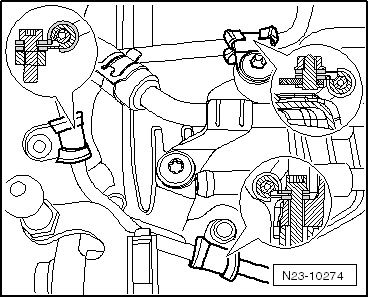
Note identification marks for cylinder allocation when re-installing high-pressure pipes.
t  The high-pressure pipes can be re-used after performing the following checks:
t  Check taper seats of high-pressure pipes for deformation and cracks.
t  The bore of the pipe must not be distorted, restricted or otherwise damaged.
t  Corroded pipes must not be used again.
Installing individual injector pipes (cylinders 1...4, between fuel rail and injectors)
–  Use vacuum cleaner to remove dirt from taper seat at fuel rail.
–  Clean fuel pipe and end of pipe using cleaning solution and dry with compressed air.
–  Lubricate threads of union nuts with fuel.
–  If necessary, the fuel rail can be slackened and moved slightly so that the injector pipes are not installed under tension. Never bend the injector pipes or subject them to tension. This would ultimately cause the injector pipes to fracture.
–  Take new injector pipe out of packaging, remove sealing plugs and immediately install injector pipe between fuel rail and injector.
–  Initially hand-tighten union nuts of injector pipe (do not use a tool). Make sure that injector pipe is correctly seated.
Sequence for tightening injector pipes:
1 - First tighten union nut to specified torque at injector.
2 - Tighten union nut at fuel rail to specified torque.
–  Follow the same procedure to install any further injector pipes.
–  Tighten fuel rail again if it was slackened earlier.
l  Tightening torque for fuel rail: refer to exploded view of fuel system → Chapter
  W00-10099
–  Tighten union nuts of all installed injector pipes using torque wrench -V.A.G 1331- with ratchet -V.A.G 1331/1- and socket -T40055-.
l  Tightening torque for injector pipes: refer to exploded view of fuel system → Chapter
Installing fuel pipe between high-pressure pump and fuel rail
–  Loosen bolts securing fuel rail and check that rail can be moved.
–  Then take new fuel pipe out of packaging, remove sealing plugs and immediately install fuel pipe between high-pressure pump and fuel rail without setting it down before installing it.
–  Initially hand-tighten union nuts of fuel pipe (do not use a tool). Make sure that fuel pipe is correctly seated.
  A13-10038
–  Fit all three securing clips to fuel pipe, making sure they are aligned correctly.
–  Screw in bolts on securing clips approx. 3 turns.
–  Secure fuel rail again.
l  Tightening torque for fuel rail: refer to exploded view of fuel system → Chapter
–  Tighten securing clip (top) on intake manifold to 8 Nm.
  N23-10274
–  Tighten union nuts of fuel line using torque wrench -V.A.G 1331- with ratchet -V.A.G 1331/1- and socket -T40055-.
Tightening sequence for securing fuel line:
1 - First tighten union nut to specified torque at high-pressure pump.
2 - Tighten union nut at fuel rail to specified torque.
l  Tightening torque for fuel line: refer to exploded view of fuel system → Chapter
–  Now tighten remaining two securing clips to 8 Nm.
–  Fill fuel system → Chapter.
–  Check fuel system for leaks → Chapter.
  A13-10038

Checking pressure retention valve in fuel return line > < Removing and installing air mass meterG70