| –
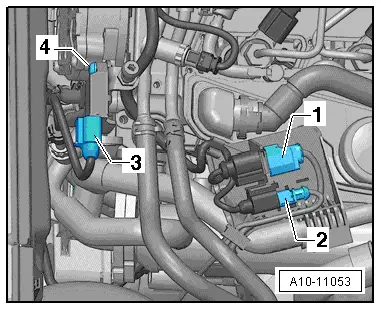
| Detach electrical connector -3- from exhaust gas pressure sensor 1 -G450-. |
| –
| Carefully pull hoses off connections (take care to keep the hoses straight; the connections can easily break off exhaust gas pressure sensor 1 -G450-). |
| –
| Unscrew bolt -4- and remove exhaust gas pressure sensor 1 -G450-. |
| –
| When installing, note the following: |
| l
| Tightening torque for bolt for exhaust gas pressure sensor 1 -G450-: refer to Lambda probe - exploded view → Chapter. |

Note | t
| Before installing, blow out hoses leading from exhaust gas pressure sensor 1 -G450- to particulate filter towards particulate filter with compressed air (hoses can become obstructed or may ice up due to condensation). |
| t
| Make sure that hoses are securely fitted and seal properly. |
| t
| If pressure connections are detached from particulate filter, tighten to 45 Nm. |
| After renewing exhaust gas pressure sensor 1 -G450- and/or particulate filter, adaption must be performed in order to reset learnt values. The adaption procedure is described in the Guided Functions; use → Vehicle diagnostic tester. |
|
|
|
