
A4 Mk3
| Intake manifold - exploded view |
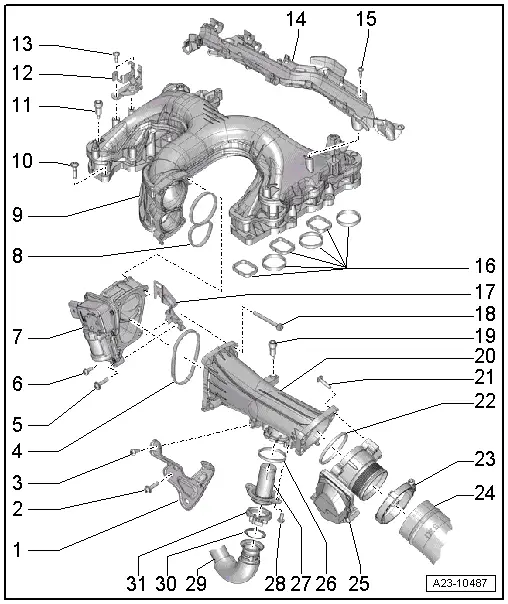
| 1 - | Bracket |
| q | For air pipe |
| 2 - | Bolt |
| q | 9 Nm |
| 3 - | Bolt |
| q | 9 Nm |
| 4 - | Gasket |
| q | Renew |
| 5 - | Bolt |
| q | 9 Nm |
| 6 - | Bolt |
| q | 9 Nm |
| 7 - | Intake manifold flap motor -V157- |
| q | Removing and installing → Chapter |
| 8 - | Gasket |
| q | Renew |
| 9 - | Intake manifold |
| q | Removing and installing → Chapter |
| 10 - | Bolt |
| q | Tightening torque and sequence → Fig. |
| 11 - | Mounting pin |
| q | For engine cover |
| q | 5 Nm |
| 12 - | Bracket |
| q | For electrical connector |
| 13 - | Bolt |
| q | 4 Nm |
| 14 - | Cable guide |
| 15 - | Bolt |
| q | 4 Nm |
| 16 - | Gaskets |
| q | Renew |
| 17 - | Bracket |
| q | For exhaust gas recirculation cooler change-over valve -N345- |
| 18 - | Bolt |
| q | 9 Nm |
| 19 - | Mounting pin |
| q | For engine cover |
| q | 5 Nm |
| 20 - | Air pipe |
| 21 - | Bolt |
| q | 9 Nm |
| 22 - | Seal |
| q | Renew |
| 23 - | Screw-type clip |
| q | Tightening torque → Rep. gr.21 |
| 24 - | Air hose |
| 25 - | Throttle valve module -J338- |
| q | Removing and installing → Chapter |
| 26 - | Seal |
| q | Renew |
| 27 - | Pipe |
| q | For exhaust gas recirculation |
| 28 - | Bolt |
| q | 9 Nm |
| 29 - | Pipe |
| q | For exhaust gas recirculation |
| 30 - | Seal |
| q | Renew |
| 31 - | Screw-type clip |
| q | Tightening torque → Rep. gr.26 |
|
|
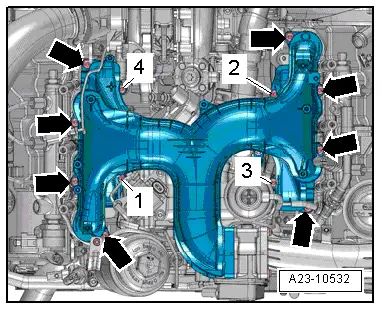
| Stage | Bolts | Tightening torque |
| 1. | -1 … 4-, -arrows- | Screw in bolts by hand until they make contact |
| 2. | -1 … 4- | 9 Nm, in sequence indicated |
| 3. | -arrows- | 9 Nm, in any sequence |