
A4 Mk3
| Exploded view of instrument cluster and radio-controlled clock receiver |
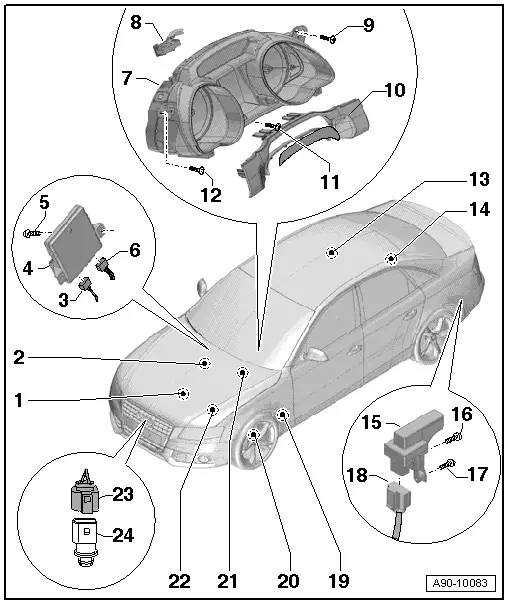
| 1 - | Oil level and oil temperature sender -G266- |
| q | Removing and installing → Rep. gr.17 |
| 2 - | Oil pressure switch -F1- |
| q | Removing and installing → Rep. gr.17 |
| 3 - | Electrical connector |
| q | For data bus diagnostic interface -J533- |
| 4 - | Data bus diagnostic interface -J533- |
| q | Exploded view → Chapter |
| 5 - | Bolt |
| q | Tightening torque → Chapter |
| 6 - | Connector for fibre optic cable |
| q | Cover with protective cap for wiring harness connector -VAS 6223/9-. |
| 7 - | Instrument cluster |
| q | With control unit in dash panel insert -J285- |
| q | Removing and installing → Chapter |
| q | Assignment of contacts at multi-pin connectors → Chapter |
| 8 - | Electrical connector |
| q | For instrument cluster |
| 9 - | Bolt |
| q | 2.5 Nm |
| 10 - | Trim cover |
| q | Removing and installing → Rep. gr.68 |
| 11 - | Bolt |
| q | 2.5 Nm |
| 12 - | Bolt |
| q | 2.5 Nm |
| 13 - | Fuel gauge sender -G- |
| q | Pin assignment → Chapter |
| q | Removing and installing → Rep. gr.20 |
| 14 - | Fuel gauge sender 2 -G169- |
| q | Pin assignment → Chapter |
| q | Removing and installing → Rep. gr.20 |
| 15 - | Radio-controlled clock receiver -J489- |
| q | Removing and installing → Chapter |
| 16 - | Bolt |
| q | 2.5 Nm |
| 17 - | Bolt |
| q | 2.5 Nm |
| 18 - | Electrical connector |
| q | For radio-controlled clock receiver -J489- |
| 19 - | Washer fluid level sender -G33- |
| q | Removing and installing → Chapter |
| 20 - | Brake pad wear sender |
| q | Front left -G34- |
| q | Removing and installing → Rep. gr.46 |
| 21 - | Brake fluid level warning contact -F34- |
| q | Removing and installing → Rep. gr.47 |
| 22 - | Coolant shortage indicator switch -F66- |
| 23 - | Electrical connector |
| q | For ambient temperature sensor -G17- |
| 24 - | Ambient temperature sensor -G17- |
| q | Removing and installing: |
| t | Vehicles up to model year 2012 → Chapter |
| t | Vehicles from model year 2013 onwards → Chapter |