audi Workshop Repair Guides

Audi Workshop Service and Repair Manuals

Checking battery > < Removing and installing earth cable with battery monitor control unitJ367
Removing and installing battery
Removing
–  Switch off ignition and take out ignition key.
  Caution
Vehicles with TDI engine (SCR)
t  After the ignition is switched off, the reducing agent is automatically drawn back into the active tank for reducing agent from the metering line going to the injector for reducing agent -N474-.
t  Before working in this area, you must therefore wait until the reducing agent has been completely drawn out of the metering line; this can take up to 10 minutes after the ignition has been switched off.
t  For the same reason, it is important to wait until the reducing agent has been drawn back (i.e. 10 minutes) before disconnecting the battery.
   
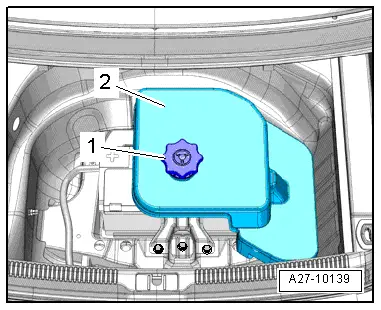
Saloon:
–  Lift luggage compartment floor panel and hook onto body.
–  Remove nut -1- and detach cover -2- for tool kit.
  A27-10139
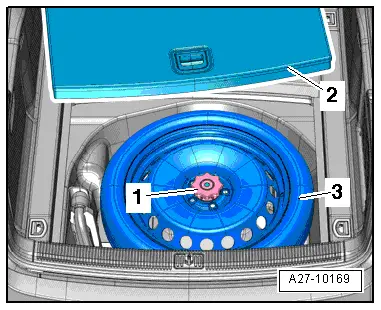
Avant:
–  Take out luggage compartment floor -2-.
–  Unscrew nut -1- and take out temporary spare wheel -3- (if fitted).
  A27-10169
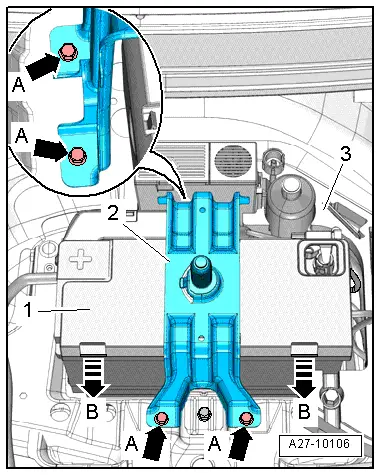
Cover for negative terminal (version 1):
–  Remove mounting -3- for tool kit.
–  Remove bolts -arrows A-.
–  Remove retainer -2- for cover over tool kit.
–  Release the retaining clips -arrows B- using a screwdriver and remove the cover -1- for the negative terminal.
–  Connect battery charger to provide back-up power supply → Electrical system; General information; Rep. gr.27.
  A27-10106
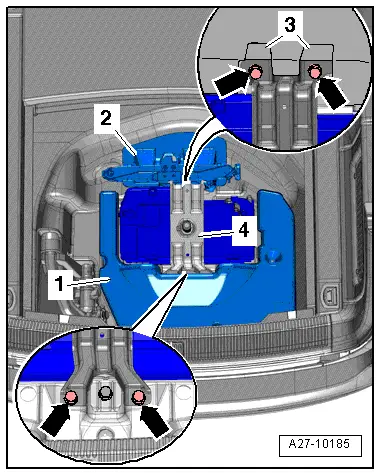
Cover for negative terminal (version 2):
–  If fitted, remove subwoofer -1- → Rep. gr.91.
–  Remove mounting -2- for tool kit.
–  Remove bolts -arrows-.
–  Remove retainer -4- for temporary spare wheel.
–  Connect battery charger to provide back-up power supply → Electrical system; General information; Rep. gr.27.
  A27-10185
All vehicles (continued):
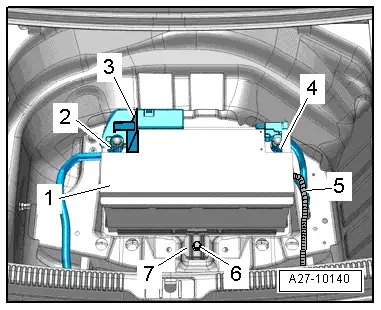
–  Loosen nut -4- a few turns and disconnect battery clamp of earth cable from battery terminal.
–  Open cover -3- over positive battery terminal.
–  Loosen nut -2- several turns and disconnect battery clamp of positive cable together with fuse holder A -SA- from battery terminal.
–  Pull off hose -5- for central gas venting system.
–  Remove bolt -6- on battery retainer plate -7-.
–  Pull battery -1- out of battery retainer.
–  Lift battery out of luggage compartment.
  WARNING
Observe environmental requirements.
When disposing of used batteries, always observe the required disposal procedures for batteries and sulphuric acid → Electrical system; General information; Rep. gr.27.
Installing
l  Tightening torque: Saloon → Chapter, Avant → Chapter.
  Note
t  Only install maintenance-free batteries with the specifications „TL82506“ (from December 1997 onwards) and „VW75073“ (from August 2001 onwards).
t  Batteries from the Audi parts range feature a base strip adapter for matching to different retainer flanges. The battery operating instructions give details of when and how to use the base strip adapter.
  A27-10140
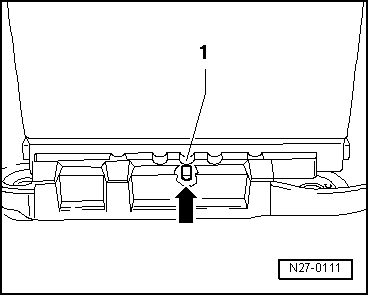
–  Insert battery in battery mounting; the battery base strip must engage in the retainer flanges of the battery mounting -arrow-.
l  It should no longer be possible to move the battery.
  N27-0111
–  Place battery retainer plate -7- in position.
l  Lug on battery retainer plate must engage in recess on battery base strip.
–  Tighten bolt -6- for battery retainer plate.
–  Connect hose -5- for central gas venting system. Observe notes in → Electrical system; General information; Rep. gr.27.
Connect up battery -1- in the following sequence with ignition and electrical equipment switched off:
–  First connect battery clamp -2- of positive cable by hand to positive battery terminal „+“ and tighten nut.
–  Close cover -3- over positive battery terminal.
  Note
Disregard -item 4-.
  A27-10140
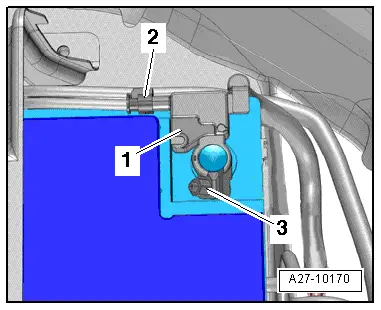
–  Unplug electrical connector -2- at battery monitor control unit -J367--item 1-.
–  When connecting battery, attach battery clamp of earth cable to negative battery terminal „–“ by hand and tighten nut -3-.
–  Reconnect connector at battery monitor control unit -J367-.
–  After installation, check that battery is securely attached → Electrical system; General information; Rep. gr.27.
  A27-10170
Cover for negative terminal (version 1):
–  Press cover -1- for negative terminal onto battery.
All vehicles (continued):
–  Fit retainer -2- and tighten bolts -arrows A-.
–  After renewing the battery, it must be adapted in „Guided Fault Finding“ or „Guided Functions“ mode → Vehicle diagnostic tester.
The following measures are required after re-connecting the battery:
t  Activate automatic open/close function of electric window regulators - see → Owner's Manual.
t  Interrogate event memories of all control units and erase „Low voltage“ fault display → Vehicle diagnostic tester.
  Note
After reconnecting the voltage supply, it is possible that the ESP warning lamp will not go out until the vehicle has been driven several metres.
  A27-10106

Checking battery > < Removing and installing earth cable with battery monitor control unitJ367