audi Workshop Repair Guides

Audi A5 Service and Repair Manuals - Workshop Guides

Renewing oil seals for flange shafts (rear final drive removed) > < Exploded view - propshaft with bolted connection at gearbox end
Removing and installing propshaft with splines on gearbox end
Special tools and workshop equipment required
   
t  Retaining tool -VW 785/1 B-
  W00-0803
t  Counterhold tool -T10172-
t  Adapter -T10172/5-
  W00-10637
t  Hose clip pliers -V.A.G 1275-
t  High-temperature grease -G 000 633-
Removing
  Note
t  The propshaft of the type with splines on the gearbox end can only be separated from the gearbox by removing it completely.
t  Repairs on the propshaft should preferably be carried out on a two-pillar hoist.
t  After unbolting propshaft from rear final drive, tie up or support end of propshaft.
t  The propshaft can be bent as far as the stop at the centre joint, but must not be subjected to any kind of force. The centre joint or the protective boot can be damaged if the joint is forced against its stop.
t  Always keep the propshaft horizontal while pulling it off or fitting it on the rear splined shaft of the gearbox.
  W00-0451
  Caution
The flexible joints in the exhaust system can be damaged.
t  The flexible joint must not be bent further than 10°.
t  Do not subject flexible joint to tensile load.
t  Take care not to damage wire mesh on flexible joint.
–  Loosen clamps -1- and -2- and move towards the rear.
–  Tie up front silencers or front exhaust pipes (left and right) on vehicle underside.
  A26-10899
–  If fitted, remove bolts -arrows- and detach heat shield -1- for propshaft.
  A10-10859
–  Cut open hose clip -1- for protective boot on propshaft and remove hose clip.
  Note
-Item 2- can be disregarded.
  A39-10413
–  If fitted, remove front cross member -2- and rear cross member -3-.
–  Remove heat shield -1-.
  A66-10497
–  Lower rear section of exhaust system at the front and support using retaining tool -VW 785/1 B- as shown in illustration.
  A39-10417
–  Check whether there is a factory marking (coloured dot) -arrow A- and -arrow B- on the propshaft and on the rear final drive flange.
–  If one of these markings is no longer visible, make a new paint marking accordingly.
l  The markings on the propshaft -arrow A- and on the rear final drive -arrow B- should be aligned.
  A39-10085
–  Remove bolts -1- securing propshaft to rear final drive.
–  To do so, use counterhold tool -T10172- and adapters -T10172/5-.
  A39-10243
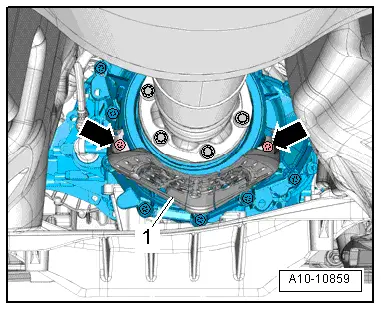
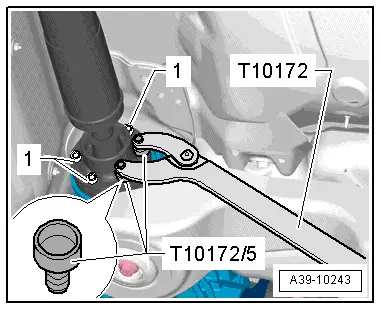
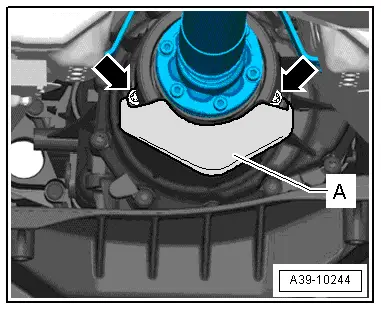
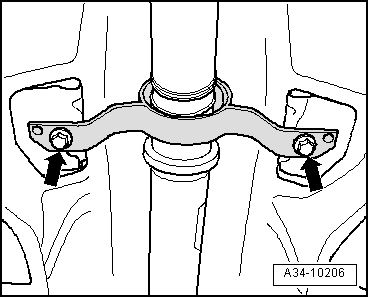
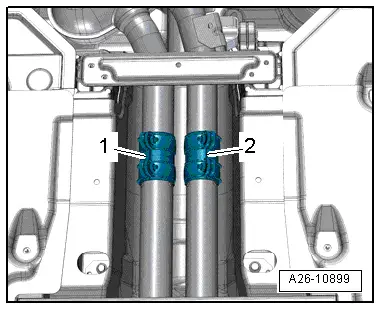
–  Remove bolts -arrows- securing centre propshaft bearing.
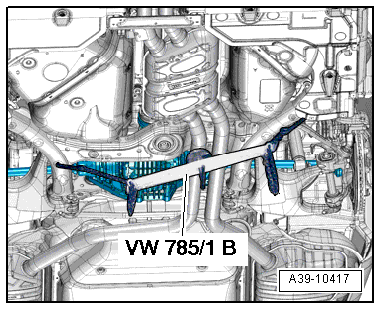
–  Guide propshaft downwards at rear, past fuel tank and rear subframe, and detach from gearbox.
Installing
l  Tightening torques → Chapter, → Fig.
  Note
t  
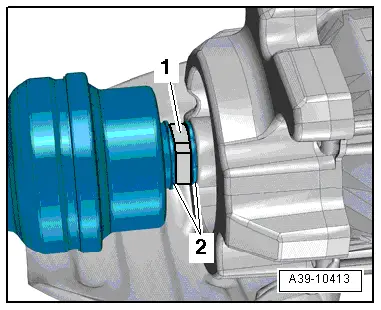
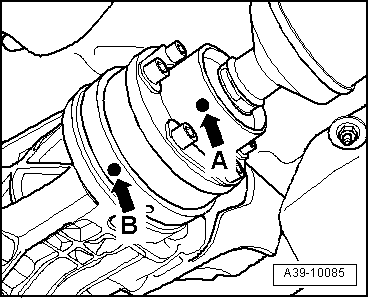
Remove old, dried-out high-temperature grease from CV joint and flange for propshaft. Put in exactly the same quantity of fresh high-temperature grease -G 000 633-.
t  Clean remaining locking fluid out of tapped holes in flange shaft on rear final drive. The threads can be cleaned with a thread tap. Otherwise the securing bolts can shear off when they are screwed in.
t  Renew self-locking bolts for propshaft.
  A34-10206
t  Renew hose clip -1- for protective boot -2- on propshaft.
t  Check for damage to gasket for propshaft on rear final drive flange (kinked gasket or partially detached rubber coating). A damaged gasket must be renewed.
t  Wipe off splines of rear splined shaft on gearbox with a cloth before sliding on propshaft. Do not apply grease to splines.
–  Fit propshaft onto gearbox first.
l  Do not bend further than 10° when fitting propshaft on splines.
l  After sliding the propshaft approx. 50 mm onto the rear splined shaft of the gearbox, turn it slightly to ensure that the splines on the shaft engage in the internal splines of the propshaft.
l  Push propshaft onto splines of rear splined shaft as far as stop.
  A39-10413
–  Screw in securing bolts -arrows- so that centre bearing can still be moved.
  A34-10206
–  Fit propshaft on rear final drive, paying attention to installation position:
l  The markings on the propshaft -arrow A- and on the rear final drive -arrow B- should be aligned.
l  Maximum misalignment of markings: 30°.
–  Screw in new bolts by hand until they make contact, but do not tighten.
  A39-10085
–  Align hose clip -1- for protective boot on propshaft with shaped sections -2- and tighten using hose clip pliers -V.A.G 1275- or similar.
  Note
Push the propshaft slightly towards the rear in order to be able to apply the hose clip pliers -V.A.G 1275- properly.
  A39-10413
–  Tighten bolts for propshaft -1-. Follow correct tightening sequence → Fig..
  A39-10243
–  Secure centre propshaft bearing to body so it is free of stress and tighten. Tightening torque → Item
  A34-10206
The remaining installation steps are carried out in reverse sequence; note the following:
–  If fitted, bolt heat shield -A- onto gearbox -arrows-. Tightening torque → Fig.
  A39-10244
–  Install heat shield -1- → General body repairs, exterior; Rep. gr.66.
–  If fitted, install front cross member -2- and rear cross member -3- → Rep. gr.66.
–  Install exhaust system so it is free of stress → Engine, mechanics; Rep. gr.26.
  A66-10497

Renewing oil seals for flange shafts (rear final drive removed) > < Exploded view - propshaft with bolted connection at gearbox end