audi Workshop Repair Guides

Audi Workshop Service and Repair Manuals

Servicing bearings for spur gear and centre differential > < Exploded view - input shaft
Assembly sequence - dismantling and assembling input shaft
   
Assembly sequence - dismantling and assembling input shaft
Special tools and workshop equipment required
t  Thrust plate -VW 401-
t  Thrust plate -VW 402-
t  Press tool -VW 407-
t  Press tool -VW 408 A-
t  Press tool -VW 412-
t  Thrust piece -VW 454-

   
t  Tube -VW 415 A-
t  Tube -2040-
t  Press tool -3118-
t  Tube -3296-
t  Separating tool -T40213-
t  Workshop press -V.A.G 1290A-

   
t  Inductive heater -VAS 6414-
  W00-10814
t  -3-Splitter 22...115 mm, e.g. -Kukko 17/2-
t  Feeler gauge
Dismantling input shaft
l  Input shaft has been detached from output shaft and bearing mounting → Chapter.
  W00-0633
–  First remove circlip -A- and shim -B- behind ball bearing on removed input shaft.
  A35-10174
–  Clamp splitter-A- underneath driving teeth on 4th speed selector gear and press off ball bearing.
A - Splitter 22...115 mm, e.g. -Kukko 17/2-
–  Remove synchro-rings and needle bearing for 4th speed selector gear.
  A35-10175
–  Clamp splitter-A- underneath driving teeth on 6th speed selector gear and press off synchronising hub for 3rd/4th gear together with needle bearing inner races for 3rd and 4th speed selector gears.
A - Splitter 22...115 mm, e.g. -Kukko 17/2-
–  Remove synchro-rings and needle bearing for 6th speed selector gear.
  A35-10176
–  Press off 5th speed selector gear together with synchronising hub for 5th/6th gear and needle bearing inner race for 6th speed selector gear.
  A35-10177
–  Press roller bearing off input shaft.
A - Splitter 22...115 mm, e.g. -Kukko 17/2-
  Note
t  Apply splitter-A- beneath bearing cage -B-.
t  Position bearing mounting -C- over input shaft roller bearing to prevent the rollers from being pressed out of the bearing cage -B-.
t  To press off the roller bearing, you can also break open the cage of the bearing using a screwdriver or similar and then apply the splitter-A- to the inner race.
Assembling input shaft
  Note
t  Lubricate all needle bearings and synchro-rings with gear oil before fitting.
t  Heat needle bearing inner races to 100 °C (max.) before pressing on (wear protective gloves).
t  Heat synchronising hubs to 100 °C (max.) before pressing on (wear protective gloves).
t  Always press on roller bearing, needle bearing inner races and synchronising hubs as far as stop to make sure the axial clearance of the selector gears meets the specification.
  A35-10178
Checking 3rd to 6th gear synchro-rings for wear
–  Check outer friction surface of inner ring for grooves or scoring and renew if necessary.
–  Check inner friction surface of synchro-ring for grooves or scoring and renew if necessary.
–  Fit inner ring, intermediate ring and synchro-ring onto cone of selector gear and rotate to achieve proper seating.
  Note
To achieve proper seating, rotate synchro-rings approx. one turn while pressing down rings simultaneously.
–  Then measure gap -a- using a feeler gauge.
  A35-0087
Gap -a-Wear limit
3rd to 6th gear0.7 mm

  Note
Renew inner ring, intermediate ring and synchro-ring for the corresponding gear together.
   
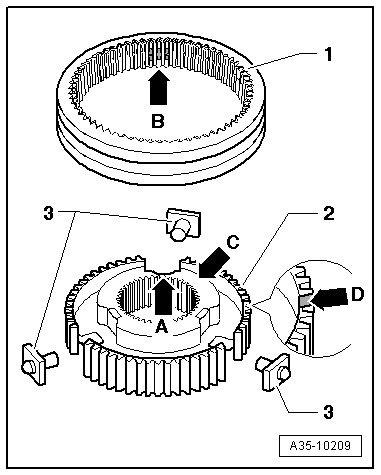
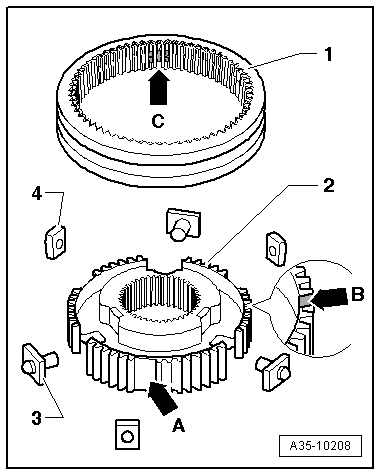
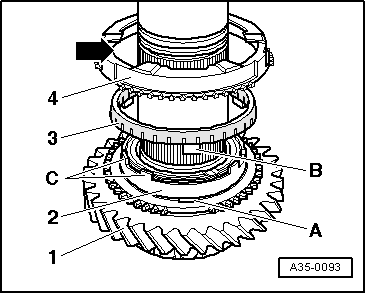
Installation position of synchro-rings for 3rd to 6th gear
  Note
If components are not being renewed, make sure they are re-installed on the same gear.
–  Fit inner ring -2- onto selector gear -1-.
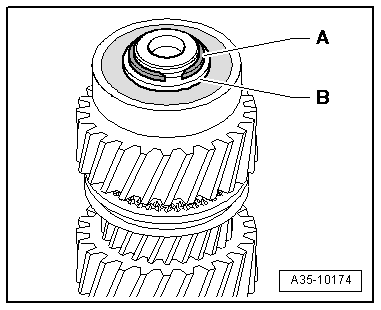
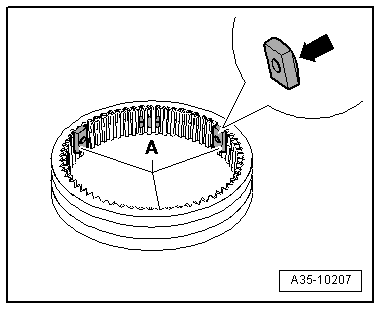
–  Fit intermediate ring -3-. Lug -B- must be inserted into recess -A-.
–  Fit synchro-ring -4-. Guide lugs -C- through recess -arrow-.
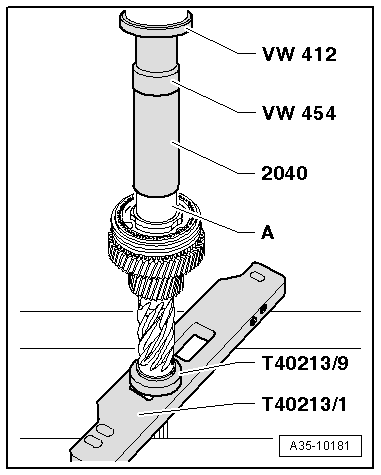
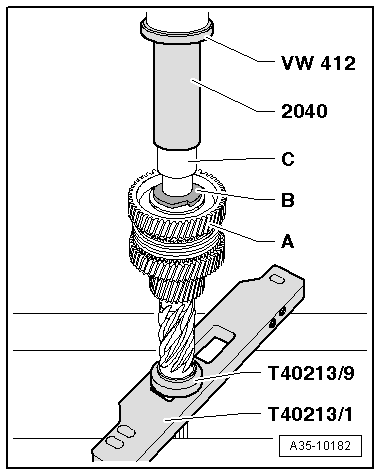
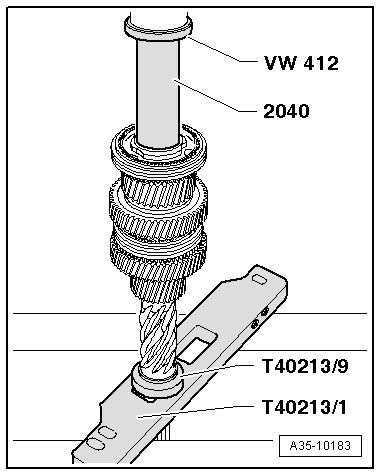
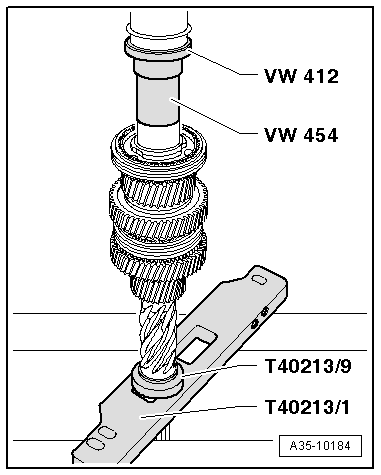
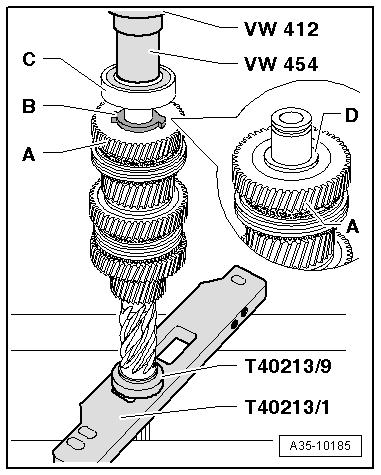
Note the following when performing the following steps:
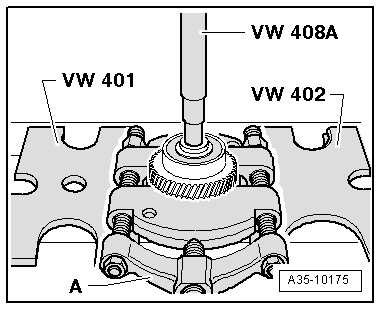
–  Position drift sleeves on centre of heated components (synchronising hub and needle bearing inner races).
–  First press on components just briefly, then stop exerting pressure and check whether drift sleeves are still positioned properly and press on as far as stop.
When pressing on, lugs on synchro-rings must line up with recesses in synchronising hub. To do so, lift corresponding selector gear with synchro-rings slightly so that it engages in the slots in the synchronising hub.
  A35-0093
–  Place plate -T40213/1- with adapter -T40213/9- on work table of workshop press -V.A.G 1290A-.
–  Insert input shaft in adapter -T40213/9-.
–  Press roller bearing onto input shaft as far as stop.
–  Install 5th speed selector gear with needle bearing and synchro-rings.
  A35-10179
Assembling 5th and 6th gear locking collar/synchronising hub
–  Slide locking collar -1- over synchronising hub -2-.
l  The recesses -arrow A- for the thrust blocks -3- in the synchronising hub must align with the recesses -arrow B- in the locking collar.
l  Installation position: high inside collar -arrow C- / notch -arrow D- of synchronising hub should face 5th speed selector gear.
–  Then fit thrust blocks -3- in synchronising hub and press them into recesses -arrow B- in locking collar.
  A35-10209
Pressing on 5th and 6th gear synchronising hub with locking collar
  A35-10180
Pressing on needle bearing inner race -A- for 6th speed selector gear
  A35-10181
–  Fit 6th speed selector gear -A- with needle bearing and synchro-rings.
–  Place thrust washer -B- on 6th speed selector gear.
–  Press on needle bearing inner race -C- for 3rd speed selector gear.
–  Install 3rd speed selector gear with needle bearing and synchro-rings.
  A35-10182
Fitting locking pieces -A- in locking collar.
–  Apply a small amount of grease to convex side -arrow- of each of the three locking pieces -A-.
–  Fit the three locking pieces with convex side first into recesses in locking collar.
  A35-10207
Assembling 3rd and and 4th gear locking collar/synchronising hub
l  Fit the three locking pieces -4- in their installation position (in recesses in locking collar -1-) → Fig..
l  Installation position of synchronising hub: Notch -arrow B- / lettering should face towards 4th speed selector gear.
–  Position locking collar -1- over synchronising hub -2- so that recesses in synchronising hub -arrow A- align with locking pieces inserted in locking collar.
–  Then fit thrust blocks -3- in synchronising hub and press them into recesses -arrow C- in locking collar.
  A35-10208
Pressing on 3rd and 4th gear synchronising hub with locking collar
  A35-10183
Pressing on needle bearing inner race for 4th speed selector gear
  A35-10184
–  Fit 4th speed selector gear -A- with needle bearing and synchro-rings.
–  Fit thrust washer -B-.
l  Check that needle bearing inner race -D- for 4th speed selector gear is higher than 4th gear selector gear -A-.
–  Press on ball bearing -C- as far as stop.
–  Then check all selector gears for freedom of movement and axial play.
l  The axial play of the selector gears must be at least 0.15 mm.
  A35-10185
Determine thickness of shim -B- as follows:
–  Select the thickest shim -B- that can still just be fitted from those available as replacement parts → Electronic parts catalogue.
l  The circlip -A- must be properly seated in the base of the groove when determining the shim.
  A35-10174

Servicing bearings for spur gear and centre differential > < Exploded view - input shaft