
A5
 Note
Note
|

| 1 - | Bolt |
| q | Aluminium bolts |
| q | 11x |
| q | Renew |
| q | Tightening torque and sequence → Fig. |
| 2 - | Housing |
| q | For centre differential |
| q | → Chapter „Removing and installing centre differential housing and centre differential - bolted propshaft“ |
| 3 - | Ball bearing |
| q | For flange shaft |
| q | → Chapter „Removing and installing rear flange shaft, oil seal and ball bearing for rear flange shaft“ |
| 4 - | Spacer sleeve |
| q | Pressing out and pressing in → Chapter „Removing and installing rear flange shaft, oil seal and ball bearing for rear flange shaft“ |
| 5 - | Bearing plate |
| q | Installation position: shoulder must engage in recess in intermediate gearbox housing |
| 6 - | Spacer sleeve |
| 7 - | Shim |
| 8 - | Ball bearing |
| q | For centre differential |
| 9 - | Centre differential |
| 10 - | Ball bearing |
| q | For centre differential |
| 11 - | Spring |
| 12 - | Shim |
| 13 - | Dished spring |
| q | Installation position: convex side (which curves outwards) faces oil seal -item 17- |
| 14 - | Circlip |
| q | For flange shaft |
| q | Removing and installing → Chapter „Removing and installing rear flange shaft, oil seal and ball bearing for rear flange shaft“ |
| 15 - | Bolt |
| q | Steel bolts |
| q | 2x |
| q | Renew |
| q | Tightening torque and sequence → Fig. |
| 16 - | Damper weight |
| q | Depending on version |
| 17 - | Oil seal |
| q | → Chapter „Removing and installing rear flange shaft, oil seal and ball bearing for rear flange shaft“ |
| 18 - | Flange shaft (rear) |
| q | Without vibration damper |
| q | For correct version, refer to → Electronic parts catalogue |
| q | Pressing out and pressing in → Chapter „Removing and installing rear flange shaft, oil seal and ball bearing for rear flange shaft“ |
| 19 - | Flange shaft (rear) |
| q | With vibration damper |
| q | For correct version, refer to → Electronic parts catalogue |
| q | Pressing out and pressing in → Chapter „Removing and installing rear flange shaft, oil seal and ball bearing for rear flange shaft“ |
| 20 - | Bolt |
| q | Renew |
| q | 20 Nm +90° |
|
|
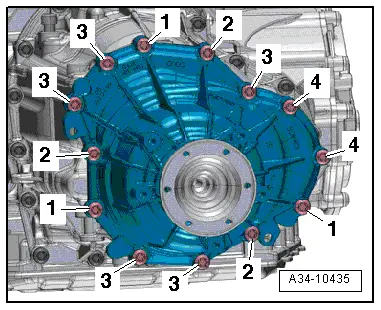
| Stage | Bolts | Tightening torque/tightening angle |
| 1. | Aluminium bolts -1- | 8 Nm |
| 2. | Aluminium bolts -2- | Screw in bolts by hand until they make contact |
| 3. | Aluminium bolts -1- | Slacken bolts again and screw in by hand until they make contact |
| 4. | Aluminium bolts -3- | Screw in bolts by hand until they make contact |
| 5. | Steel bolts -4- | Screw in bolts by hand until they make contact |
| 6. | -1, 2, 3, 4- | 10 Nm in diagonal sequence |
| 7. | Steel bolts -4- | 15 Nm |
| 8. | -1, 2, 3, 4- | Turn 90° further in diagonal sequence |