
Astro Van L AWD V6-262 4.3L VIN Z (1994)
-
Verify the rear brake clearance/adjustment, including the park brake.
-
Inspect all the rear brake components and replace only if necessary.
B). Alignment Preparation
B). ALIGNMENT PREPARATION
1. Remove the frame bracket knockouts using the following steps:
-
Remove the tire and wheel assembly.
-
Note the position of the adjusting cams (lobes down) and the adjusting cam bolts.
-
Remove the upper control arm nuts and the adjusting cams.
-
Remove the upper control arm bolts and the adjusting cams.
-
Reposition the upper control arm in order to access the frame brackets.
-
Remove the frame bracket knockouts using a pry bar or knockout tool.
-
Clean up the slots and elongate the slots even past the ends (as the slots may not be in the center of the brackets and in order to obtain
maximum adjustment).
-
Clean any weld that may prevent the cams from fully seating against the brackets.
-
Install the upper control arm to the frame brackets.
-
Install the adjusting cams with the lobes down.
-
Install the upper control bolts and nuts. Hand tighten only at this time.
-
Install the tire and wheel assembly.
-
Repeat for the opposite side.
2. Replace both of the steering idler arms with a low lash idler kit, P/N 12471302. Refer to the Steering Linkage subsection of the appropriate
Service Manual.
3. Adjust the rear cams so that the upper control arms are all the way in. Then adjust the front cams so that the cams are all the way out.
TIGHTEN
Tighten the cam nuts to 145 N.m (107 lb ft).
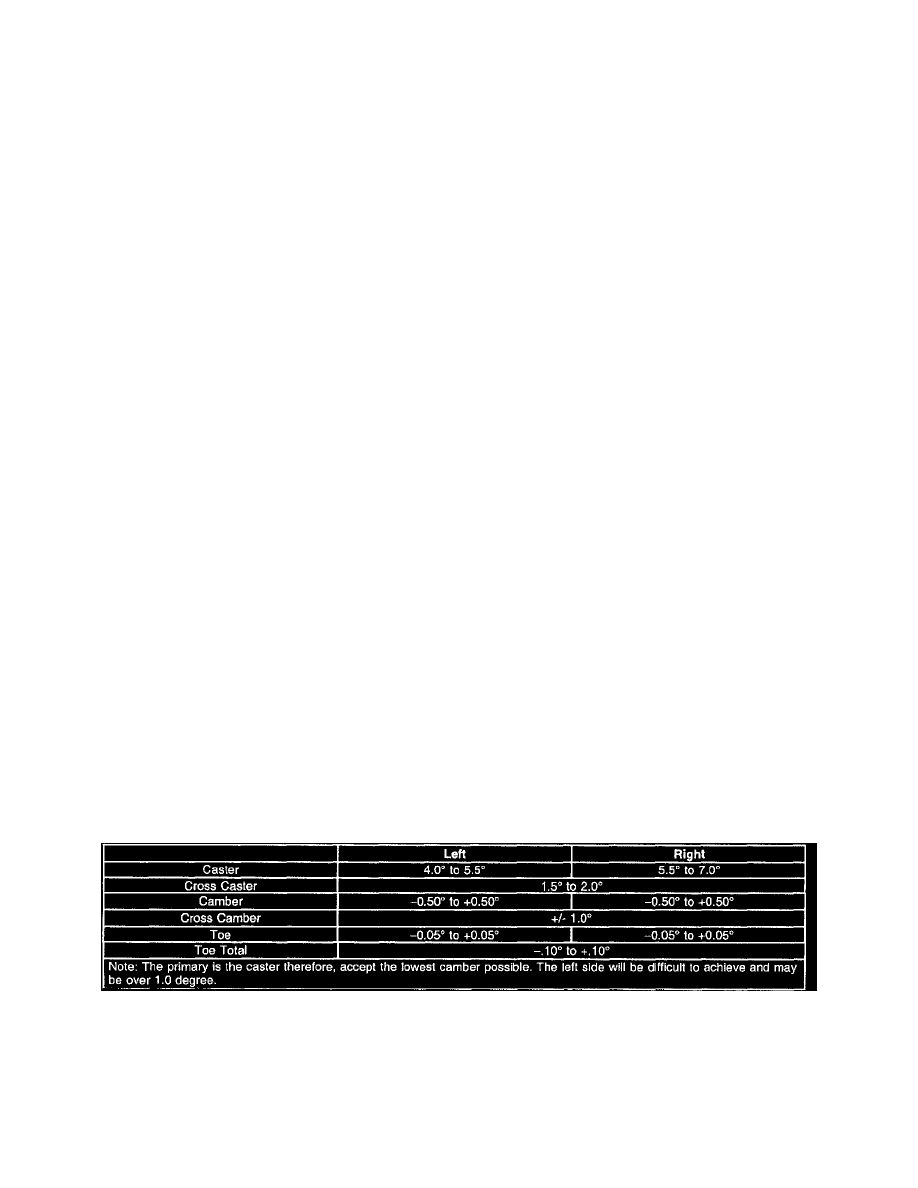
C). Alignment
Alignment Specifications
C). ALIGNMENT
1. Loosen the lower control arm bolts, ensuring that the arms are free.
2. Adjust the vehicle trim "Z" height, one side at a time in small 1/2 turn increments, to 136-140 mm (5.375-5.5 in). Maintain the left front higher
than the right. The reason for this is that the left front side is heavier than the right, and when the driver is added the left settles more.