Cavalier/Z24 L4-144 2.4L DOHC VIN T SFI (1996)

Fuel Rail: Service and Repair
Resonator
Fuel Rail Assembly
REMOVAL PROCEDURE
1. Perform the Fuel Pressure Relief Procedure.
2. Remove the negative battery cable.
3. Loosen the air cleaner outlet duct clamp.
4. Remove the air cleaner outlet duct from air cleaner resonator.
5. Loosen the air cleaner resonator clamp at the throttle body.
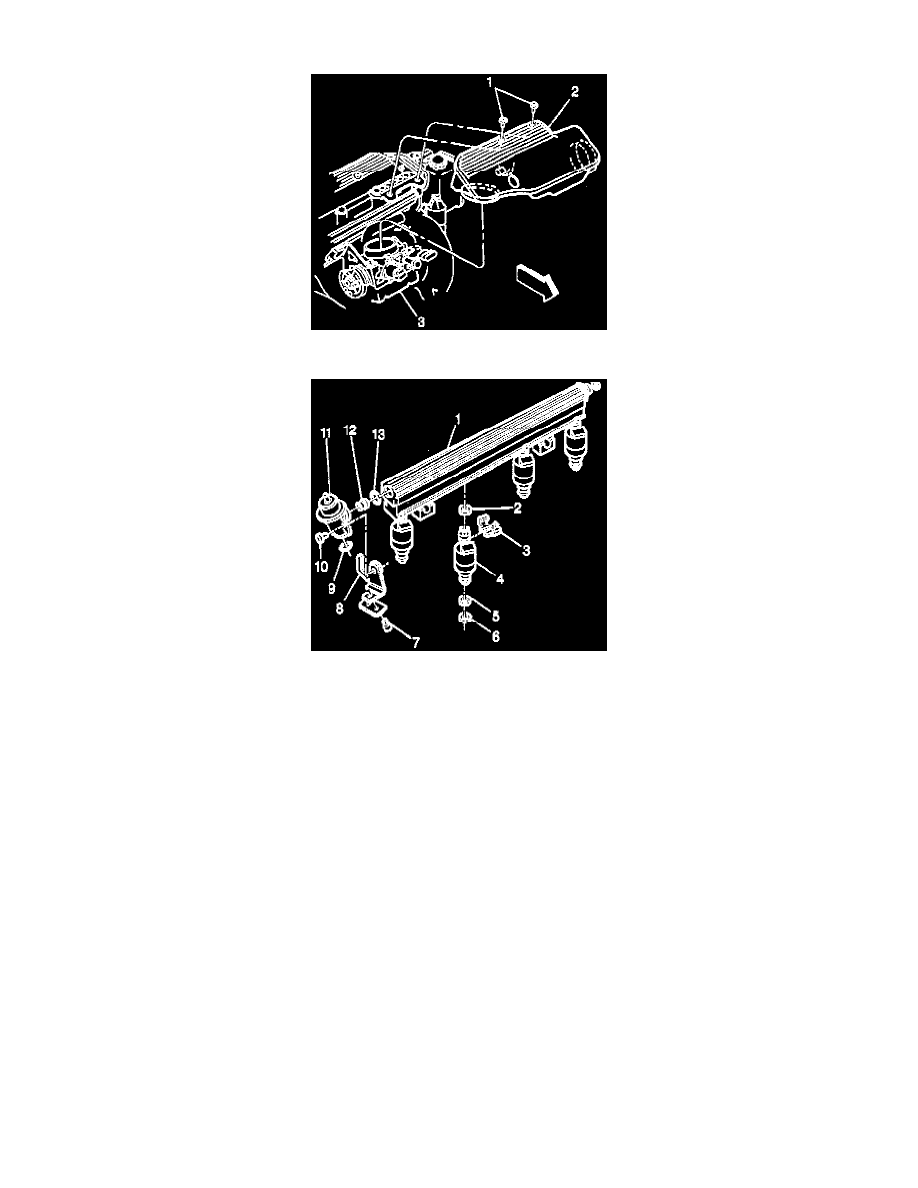
6. Remove the bolts (1) attaching the resonator.
7. Remove the air cleaner resonator (2) from the throttle body (3).
8. Remove the crankcase vent hose to bottom of resonator, then remove the resonator.
9. Remove the fuel pipe clamp bolt.
10. Remove the vacuum hose at pressure regulator.
11. Remove the fuel rail attaching bolts.
12. Remove the fuel rail assembly (1) from cylinder head.
13. Remove the injector electrical connectors. Push in wire connector clip, while pulling connector away from fuel injector.
14. Remove the fuel inlet pipe at fuel rail. (Use a backup wrench on the fuel rail inlet fitting to prevent it from turning).
15. Loosen fuel return pipe retaining bracket attaching screw (7). (Rotate retaining bracket (8) to allow fuel pipe to be removed).
16. Remove the fuel return pipe from pressure regulator (11).
17. Remove the fuel rail assembly.
18. Remove the inlet and return pipe to fuel feed and return line connections.
19. Remove the inlet and return pipe assemblies. Discard O-rings (9).
INSTALLATION PROCEDURE
NOTE:
-
Apply a few drops of clean engine oil to the male end of the fuel pipes before installing.
-
Whenever there is not enough thread-locking material on the threads of the fuel outlet pipe bracket screw, apply Loctite® 262 to insure proper
