
HHR L4-2.4L (2010)
Ignition Switch Lock Cylinder: Procedures
Key and Lock Cylinder Coding (1st Design)
Key and Lock Cylinder Coding (1st Design)
Ignition Lock Cylinder
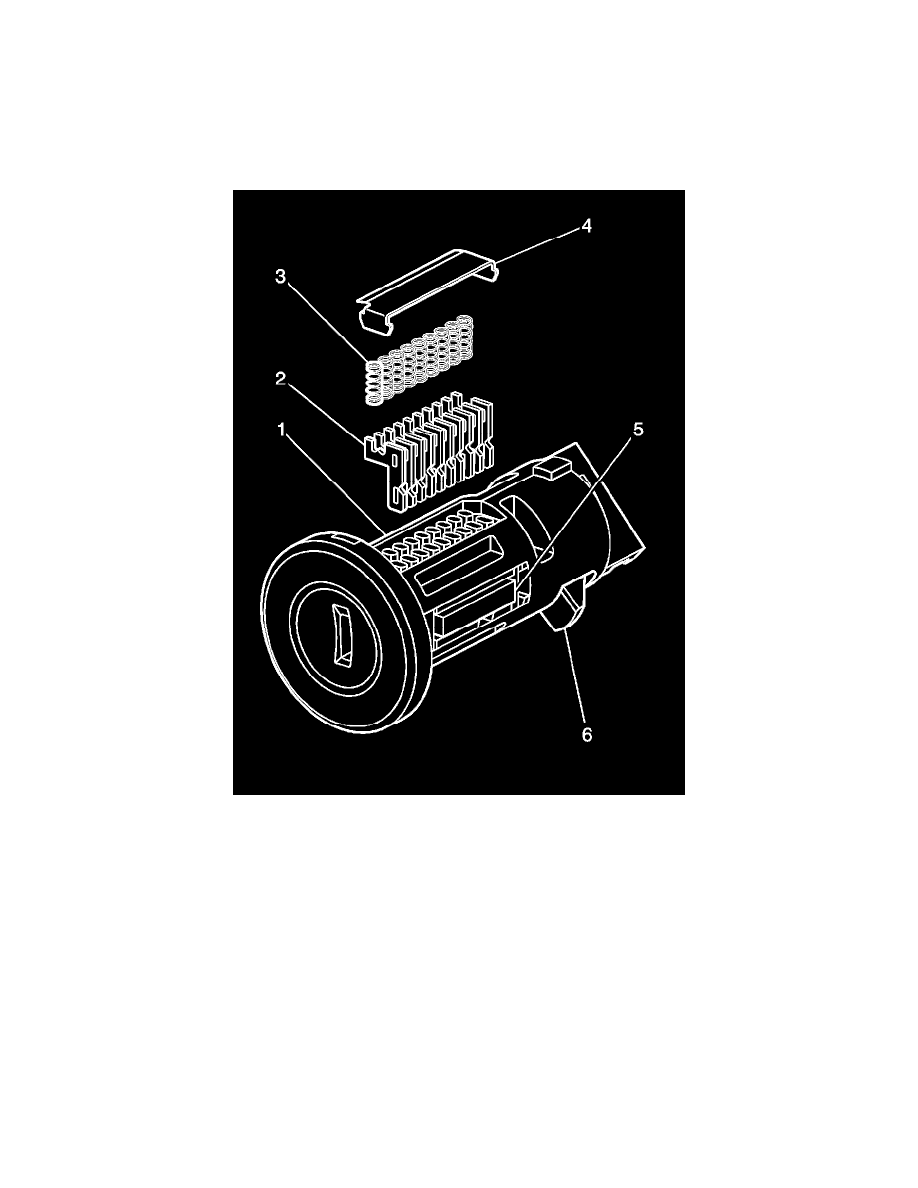
The ignition lock cylinder uses only 9 of the 10 cut positions, 2-9. The ignition cylinder tumblers (2) are all located on one side of the cylinder (1) and
not self-retaining. A retainer (4) secures the tumblers. It follows the key code with the first tumbler being the first depth of the key code.
1. Hold the ignition cylinder (1) so that the side with the tumbler spring wells is facing up.
2. The first tumbler (2) to be loaded will be the second key cut position, the second number in the key code. Install the first tumbler in the slot nearest
the head of the lock cylinder. Install the remaining tumblers following the key code.
3. Insert tumbler springs (3) into the wells on top of the tumblers.
4. Assemble the retainer (4) over springs. Secure by moving cylinder material over edges of the retainer with either a flat head screwdriver or a
center punch on each of the four corners over the ends of the retainer.
5. Inspect for correct loading of the tumblers by inserting the key into the cylinder. The side bar (5) should drop flush with the lock cylinder body
diameter.
6. Lightly lubricate the outside surfaces in the tumbler area of the lock body and down the key slot using the supplied grease. Insert and extract the
key 5 times to lubricate the keyway.
7. Line-up the lock to the run position. Insert lock in steering column making sure the retainer (6) is seated properly. Rotate lock to key out position
and remove the key. Insert the key and rotate the lock 3 times to distribute the grease from the lock to column housing inside diameter.
Front Side Door Lock Cylinder