Concorde V6-2.7L VIN R (1998)

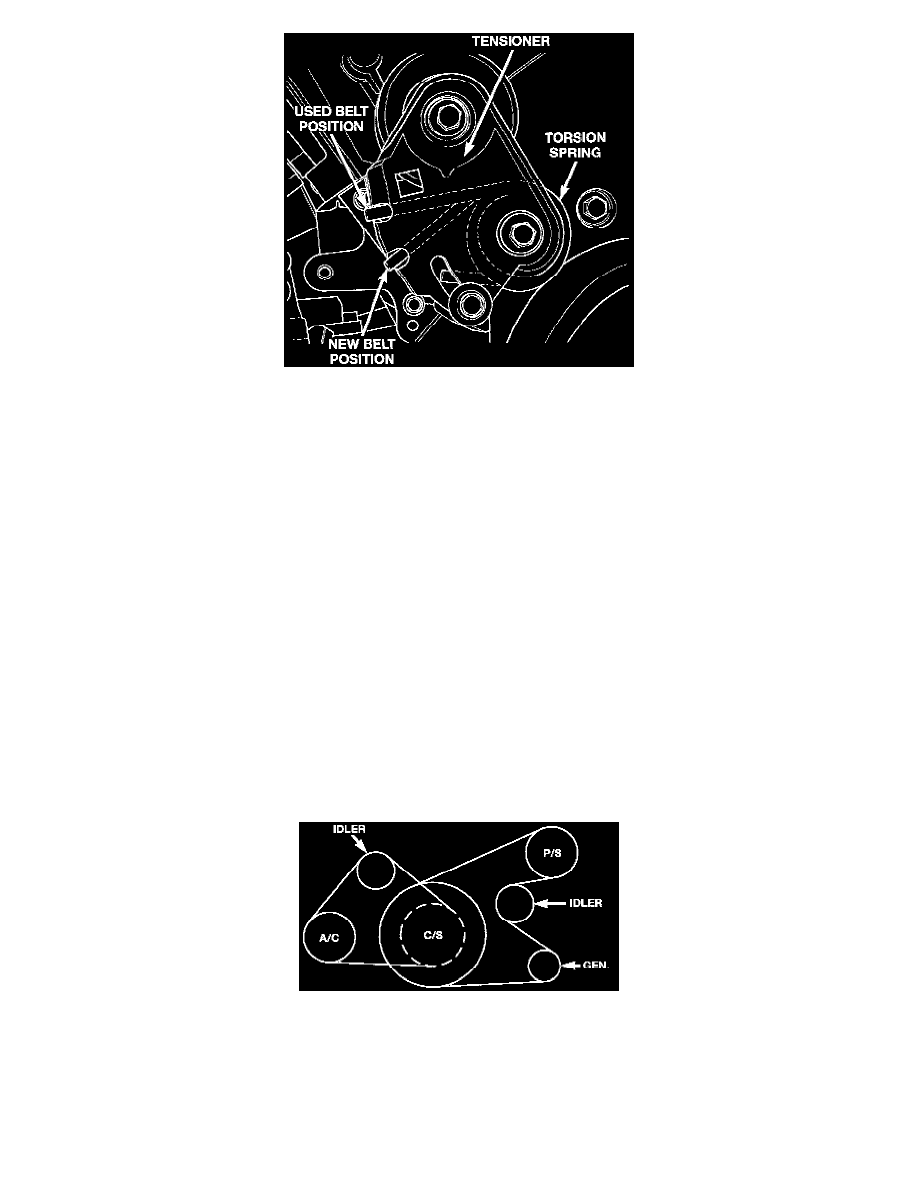
Figure 30-Air Conditioning Belt Tensioner Spring Position
4. Insert spring arm into the NEW belt position on the tensioner.
5. Install torsion spring, tensioner, and pivot bolt.
6. Tighten pivot bolt to 28 Nm (250 inch lbs.).
7. Using a 1/2" drive breaker bar, apply counterclockwise pressure until locking bolt can be installed.
8. Rotate tensioner counterclockwise until the NEW belt can be installed on pulleys.
9. Release tensioner and remove socket wrench. Belt is automatically adjusted with the tensioner's torsion spring.
10. Tighten tensioner locking bolt to 28 Nm (250 inch lbs.).
11. Install accessory drive belt.
Used Belt
NOTE:
^
A "used belt" is considered having more than 500 miles of service use.
^
Perform steps 1 - 7 to change the tensioner spring from the NEW belt position, to the USED belt position.
1. Insert a 1/2" drive breaker bar into the square opening on tensioner. Hold counterclockwise pressure on tensioner, while removing tensioner
locking bolt.
2. Carefully release the tension of spring on tensioner.
3. Remove pivot bolt, tensioner, and spring from front cover.
4. Insert spring into the used belt position on tensioner bracket.
5. Install spring, tensioner bracket, and pivot bolt.
6. Tighten pivot bolt to 28 Nm (250 inch lbs.).
7. Using a 1/2" drive breaker bar, apply counterclockwise pressure until locking bolt can be installed.
Figure 31-Belt Routing-2.7L Engine
8. Install the USED belt by rotating tensioner counterclockwise until belt can be installed on pulleys.
9. Tighten tensioner locking bolt to 28 Nm (250 inch lbs.)
10. Install accessory drive belt.
Accessory Drive Belt
