
Pacifica V6-3.8L VIN L (2005)
Seat Heater: Testing and Inspection
Heated Seat System
FRONT SEAT HEATED SEAT SYSTEM DIAGNOSIS
In order to obtain conclusive testing of the front seat heated seat system, the Programmable Communications Interface (PCI) data bus circuit must be
checked.
The most reliable, efficient, and accurate means to diagnose the front seat heated seat system requires the use of a DRB III(R) scan tool and the
Appropriate Diagnostic Information. The DRB III(R) scan tool can provide vital information to the technician trying to find a problem with the heated
seat system. Diagnostic logic is built into the Memory Heated Seat Adjustable Pedal Module (MHSAPM) and both door modules to help locate the
problem by the most efficient means possible. Anytime a problem is suspected, a DRB III(R) scan tool should be obtained and used to retrieve any
stored fault codes in the MHSAPM and door modules. If the front heated seat lights blink the MHSAPM did not respond to the door modules command
to turn on the heated seats.
If diagnostic fault codes are present in the module, record them on a piece of paper immediately before proceeding any further. Then, use these fault
codes to identify the problem by verifying the fault code. Example, If the module records "DRIVER SEAT HEAT OUTPUT OPEN" fault code, locate
the diagnostic procedure for this code in the Appropriate Diagnostic Information and follow the flow chart until the specific problem is located and
resolved. Once the problem is thought to be corrected, erase the stored fault code using the DRB III(R) scan tool and verify correct system operation. If
the front seat heated seat system is functioning correctly, verify that there are no other stored codes in the module and return the vehicle to service.
If the fault code could not be verified, this is a good indication that a INTERMITTENT problem may be present. You must than attempt to find the
intermittent problem, such as moving the heating element within the seat while testing continuity or wiggling the wire harness/electrical connectors under
the seat while testing continuity. Always, eliminate all other potential problems before attempting to replace the MHSAPM or door modules.
For complete circuit diagrams, refer to the appropriate wiring information. The wiring information includes wiring diagrams, proper wire and connector
repair procedures, details of wire harness routing and retention, connector pin-out information and location views for the various wire harness
connectors, splices and grounds.
PRELIMINARY TEST
Before testing the individual components in the heated seat system, check the following:
-
Using the DRB III(R) scan tool, check the memory heated seat adjustable pedal module (MHSAPM) for any stored fault codes. Record these
codes on paper for reference and resolve using the Appropriate Diagnostic Information.
-
Check the vehicles battery open-circuit voltage and charging system performance. If the vehicles electrical system is defective or weak it may not
be suppling sufficient energy to operate the heated seat system.
-
If the heated seat switch backlighting does not light with the ignition switch in the On position, check the fused ignition switch fuse in the
integrated power module. If OK, refer to Heated Seat Switch Diagnosis and Testing. If not OK, repair the shorted circuit or component as required
and replace the faulty fuse or repair the open ground circuit as required.
-
If the heated seat switch HI/LO LED indicators do not light with the ignition switch in the On position and the heated seat switch in the Low or
High position, check the fused ignition switch fuse in the integrated power module. If OK, refer to Heated Seat Switch Diagnosis and Testing. If
not OK, repair the shorted circuit or component as required and replace the faulty fuse.
2ND ROW HEATED SEAT SYSTEM DIAGNOSIS
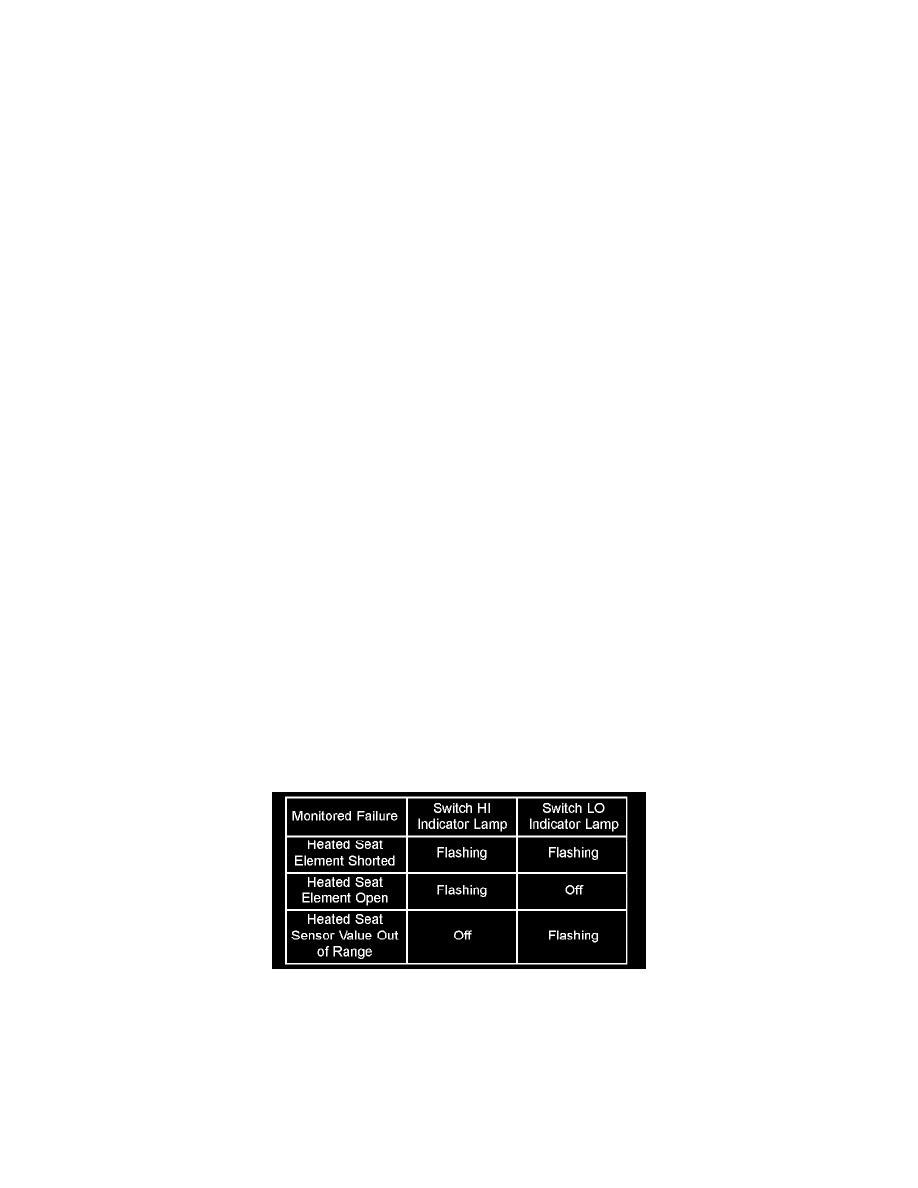
Heated Seat System Self-Diagnosis
The 2nd row heated seat system is capable of performing some self-diagnostics. The following table depicts the various monitored faults which will be
reported to the vehicle operator or technician by flashing the individual heated seat switch Light Emitting Diode (LED) indicator lamps. Refer to the
HEATED SEAT SYSTEM SELF-DIAGNOSIS table for failure identification. The left side heated seat switch indicator lamps will flash if a failure
occurs in the left rear heated seat, and the right side heated seat switch indicator lamps will flash for a right rear heated seat failure. If a monitored heated
seat system fault occurs, the switch indicator lamps will flash at a pulse rate of one-half second on, followed by one-half second off for a duration of
one minute after the switch for the faulty heated seat is depressed in either the Low or High direction. This process will repeat every time the faulty
heated seat switch is actuated until the problem has been corrected.