
Charger V6-3.5L (2009)
Headliner: Service and Repair
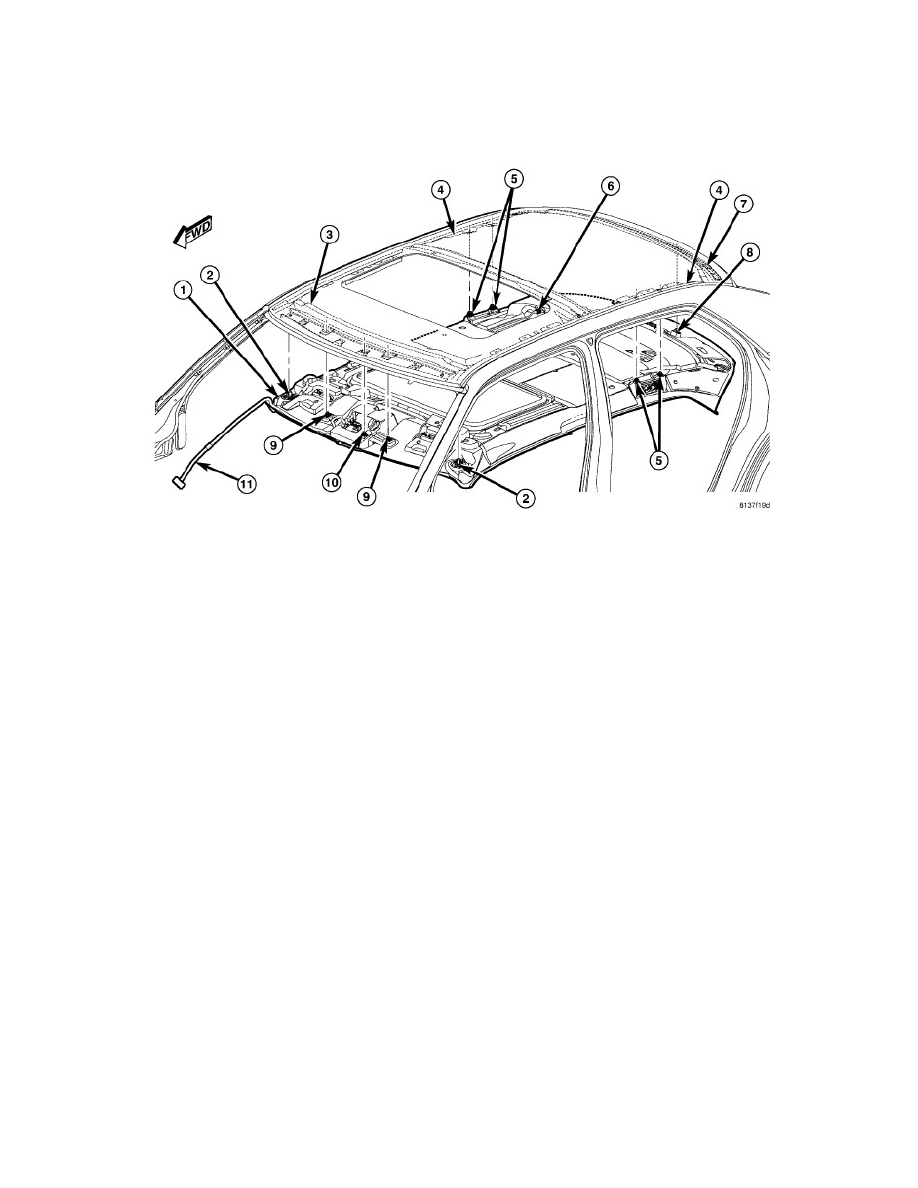
Headliner - Installation
SEDAN
WITH SUNROOF
1. Carefully insert the headliner through the windshield opening.
2. Reach between the headliner and the roof panel from the right rear door opening to access and reconnect the sunroof jumper wire connector to the
headliner wire harness sunroof take out and connector (6).
NOTE: In order to ease installation and ensure proper headliner positioning it is important to install the headliner spring clip retainers in the
correct sequence as follows.
3. Position the spring clip at the right visor receptacle location (9) to the appropriate hole in the windshield header (3) and press firmly and evenly
upward on the headliner over the retainer location until it snaps into place.
4. Position the rear spring clip retainer (8) to the appropriate hole near the center of the rear roof header (7) and press firmly and evenly upward on
the headliner over the retainer location until it snaps into place.
5. Position the two spring clip retainers at each grab handle location (5) to the appropriate holes in the inner rear roof side rails (4) and press firmly
and evenly upward on the headliner over each retainer location until it snaps into place.
6. Position the spring clip retainers at each sun visor mounting location (2), at the left visor receptacle location (9), and at the overhead console
location (10) to the appropriate holes in the windshield header and press firmly and evenly upward on the headliner over each retainer location
until it snaps into place.
7. Reinstall the trim welt onto the headliner sunroof opening.
8. Reinstall both grab handle/coat hook/rear dome/reading lamp units into the headliner at the inner rear roof side rails.
9. Reinstall both sun visors and both visor receptacles onto the headliner near the windshield header.
10. If the vehicle is so equipped, reconnect the electrochromic (automatic dimming) and/or the telematic (hands-free phone) mirror takeout and
connector of the headliner wire harness to the connector receptacle(s) on the back (windshield side) of the inside rear view mirror housing.
11. If the vehicle is so equipped, reinstall the overhead console to the center of the headliner near the windshield header. See: Console/Service and
Repair/Overhead Console - Installation.
12. Reinstall the trim onto both upper C-pillars. See: Trim Panel/Service and Repair/Pillar Trim/C-Pillar Trim Panel-Installation.
13. Reinstall the trim onto both upper B-pillars. See: Trim Panel/Service and Repair/Pillar Trim/B-Pillar Trim Panel-Installation.
14. Engage the headliner wire harnesses into the retainers on each inner A-pillar and reconnect the connectors (11) to the body wire harness
connectors near the base of each A-pillar. Be certain the harnesses are not twisted and that the connectors are both fully engaged.
15. Reinstall the trim onto both upper A-pillars. See: Trim Panel/Service and Repair/Pillar Trim/A-Pillar Trim Panel-Installation.
16. Install the windshield. See: Windows and Glass/Windshield/Service and Repair/Windshield - Installation.
17. Reconnect the battery negative cable.
WITHOUT SUNROOF
1. Carefully bow the headliner longitudinally as necessary to position the unit into the vehicle through the right rear door opening.
NOTE: In order to ease installation and ensure proper headliner positioning it is important to install the headliner spring clip retainers in the