
Durango 4WD V8-5.9L VIN Z (1998)
Housing Assembly HVAC: Service and Repair
Heater - A/C Housing Removal and Installation
The heater-A/C housing assembly must be removed from the vehicle and
disassembled for service access of the blower motor, blower motor wheel, heater core, evaporator coil, blend-air door, and each of the various mode
control doors.
WARNING: ON VEHICLES EQUIPPED WITH AIR-BAGS, FAILURE TO TAKE THE PROPER PRECAUTIONS COULD RESULT IN
ACCIDENTAL AIR-BAG DEPLOYMENT AND POSSIBLE PERSONAL INJURY.
REMOVAL
1. Disconnect and isolate the battery negative cable.
2. Remove the instrument panel from the vehicle. Refer to: Body and Frame, Interior Trim, Dashboard/Instrument Panel, Service and Repair,
Instrument Panel Replacement, See: Body and Frame/Interior Moulding / Trim/Dashboard / Instrument Panel/Service and
Repair/Procedures/Instrument Panel Assembly Replacement
3. Recover the refrigerant from the refrigerant system. Refer to: Heating and Air Conditioning, Service and Repair, Refrigerant Recovery, See:
Service and Repair/Refrigerant Recovery
4. Remove the front expansion valve from the evaporator tube mounting flange. Install plugs in, or tape over all of the opened refrigerant line fittings.
Refer to: Heating and Air Conditioning, Expansion Valve, Service and Repair, Expansion Valve Removal and Installation, See: Expansion
Valve/Service and Repair
5. Drain the engine cooling system.
6. Disconnect the heater hoses from the heater core tubes.
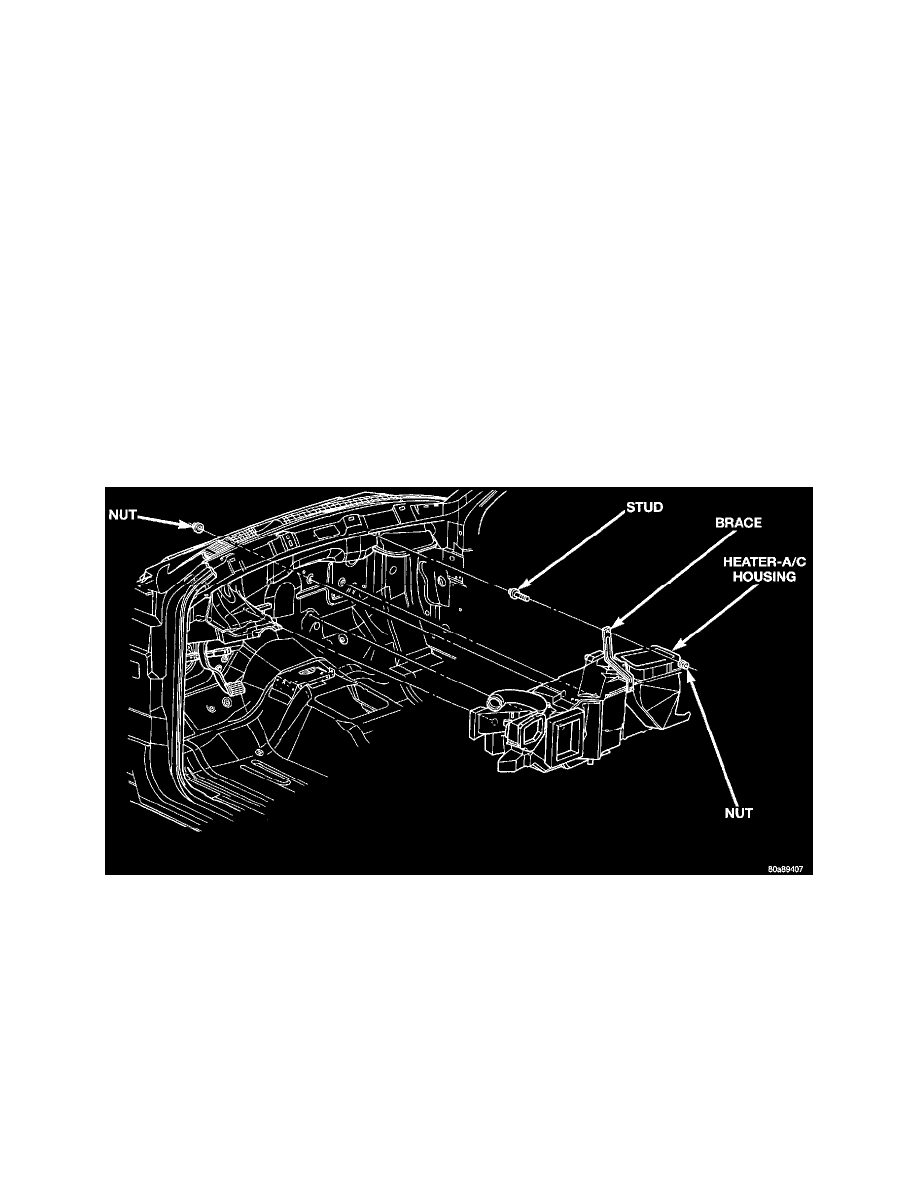
Heater-A/C Housing Remove/Install
7. Remove the four nuts from the heater-A/C housing mounting studs on the engine compartment side of the dash panel.
8. Disengage the front floor panel transmission tunnel duct from the adapter on the heater-A/C housing.
9. Remove the nut that secures the heater-A/C housing mounting brace to the stud on the passenger compartment side of the dash panel.
10. Pull the heater-A/C housing rearward far enough for the mounting studs and the evaporator condensate drain tube to clear the dash panel holes.
11. Remove the heater-A/C housing from the vehicle.
INSTALLATION
1. Position the heater-A/C housing to the dash panel. Be certain that the evaporator condensate drain tube and the housing mounting studs are
inserted into their correct mounting holes.
2. Install the nut that secures the heater-A/C housing mounting brace to the stud on the passenger compartment side of the dash panel. Tighten the nut
to 11 Nm (95 in. lbs.).
3. Engage the front floor panel transmission tunnel duct with the adapter on the heater-A/C housing.
4. Install and tighten the four nuts onto the heater-A/C housing mounting studs on the engine compartment side of the dash panel. Tighten the nuts to