
RAM 1500 Truck 4WD V8-5.7L VIN D (2005)
DAIMLER-CHRYSLER-TRAINED AND AUTHORIZED DEALER SERVICE TECHNICIANS. FAILURE TO TAKE THE PROPER
PRECAUTIONS OR TO FOLLOW THE PROPER PROCEDURES COULD RESULT IN ACCIDENTAL, INCOMPLETE, OR IMPROPER
AIRBAG DEPLOYMENT AND POSSIBLE OCCUPANT INJURIES.
-
TO AVOID PERSONAL INJURY OR DEATH, USE EXTREME CARE TO PREVENT ANY FOREIGN MATERIAL FROM ENTERING
THE DRIVER AIRBAG, OR BECOMING ENTRAPPED BETWEEN THE DRIVER AIRBAG CUSHION AND THE DRIVER AIRBAG
TRIM COVER. FAILURE TO OBSERVE THIS WARNING COULD RESULT IN OCCUPANT INJURIES UPON AIRBAG DEPLOYMENT.
-
TO AVOID PERSONAL INJURY OR DEATH, THE DRIVER AIRBAG TRIM COVER MUST NEVER BE PAINTED. REPLACEMENT
TRIM COVERS ARE SERVICED IN THE ORIGINAL COLORS. PAINT MAY CHANGE THE WAY IN WHICH THE MATERIAL OF THE
TRIM COVER RESPONDS TO AN AIRBAG DEPLOYMENT. FAILURE TO OBSERVE THIS WARNING COULD RESULT IN
OCCUPANT INJURIES UPON AIRBAG DEPLOYMENT.
NOTE: The following procedures can be used to replace the driver airbag trim cover and horn switch unit for service. If the driver airbag is faulty or
deployed, the entire driver airbag, trim cover and horn switch must be replaced as a unit.
DISASSEMBLY
1. Disconnect and isolate the battery negative cable. Wait two minutes for the system capacitor to discharge before further service.
2. Remove the driver airbag from the steering wheel.
3. Place the driver airbag on a suitable clean and dry work surface with the trim cover facing down. If the trim cover will be reused, be certain to take
the proper precautions to prevent the trim cover from receiving cosmetic damage during the following procedures.
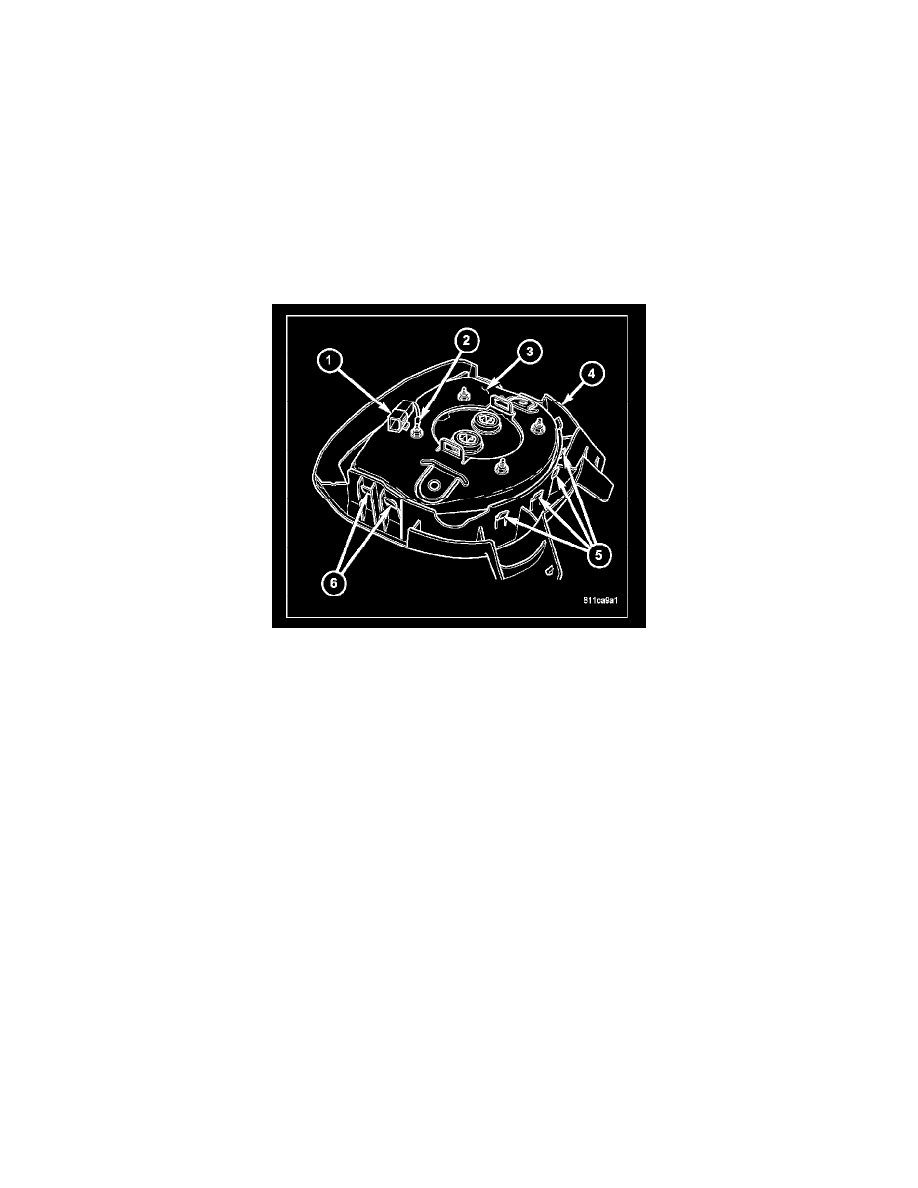
4. Carefully pry the horn switch feed pigtail wire connector (1) away from the back of the driver airbag housing (3) far enough to disengage the
integral connector retainer from the locator hole just above the upper right inflator mounting stud.
5. Remove the nut that secures the horn switch ground pigtail wire eyelet terminal (2) to the upper right inflator stud on the back of the driver airbag
housing.
6. Remove the horn switch ground pigtail wire eyelet terminal from the upper right inflator stud on the back of the driver airbag housing.
7. Disengage each of the twelve hooks (5 and 6) of the airbag housing from the twelve windows in the vertical walls of the trim cover (4), one wall at
a time. Start by disengaging the upper wall, then do each of the two side walls, and finish with the lower wall. To disengage the hooks, use hand
pressure to push the adjacent edge of the airbag housing firmly and evenly downward into the trim cover receptacle, while at the same time
pushing outward on the upper edge of the receptacle wall.
8. With all of the hooks disengaged, lift the housing, inflator, and cushion as a unit from the receptacle on the back of the driver airbag trim cover.
ASSEMBLY