
Rampage L4-135 2.2L (1983)
Brake Shoe: Service and Repair
Models W/12.12 Inch Drums
Removal
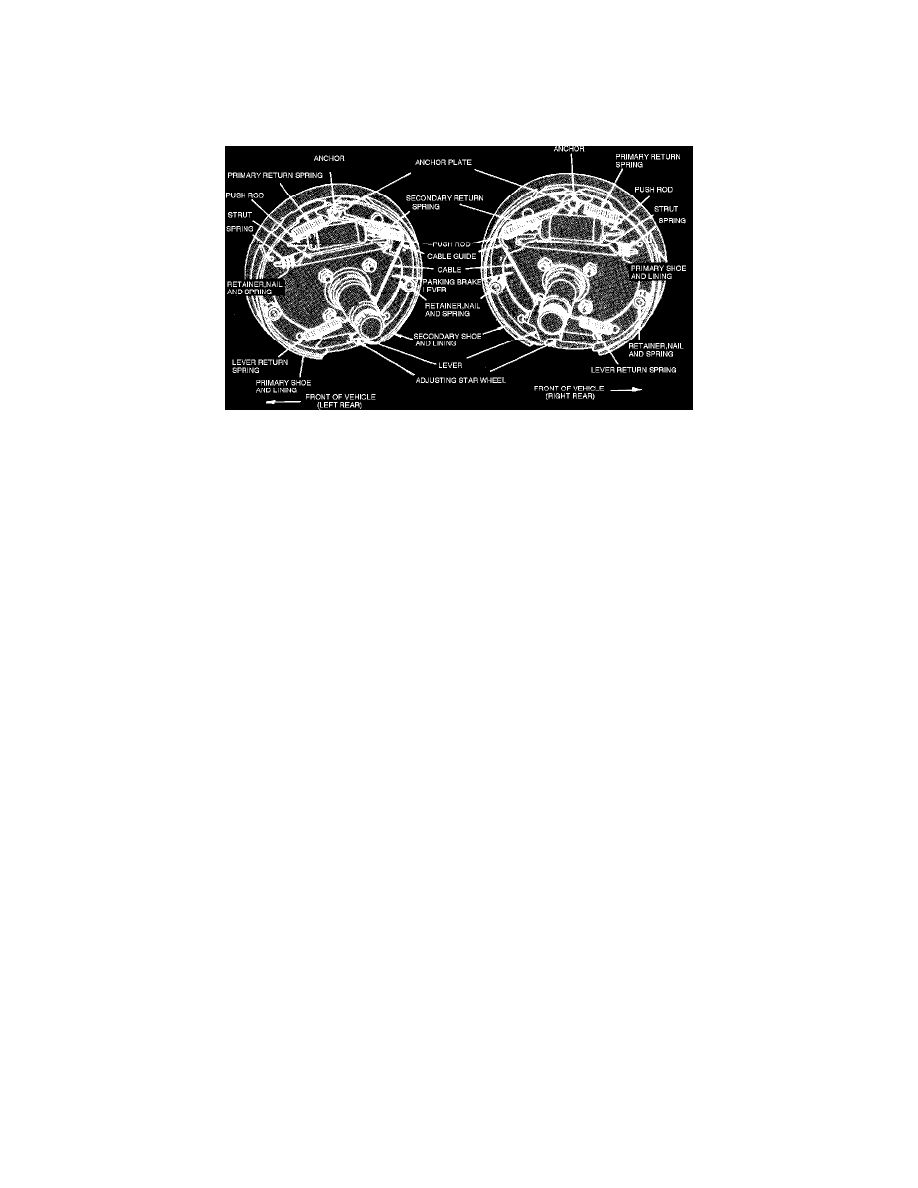
Fig. 1 Drum brake assembly. Models w/12.12 inch drums
1.
Raise and support vehicle.
2.
Remove wheel and tire assemblies.
3.
Remove axle shaft nuts, washers, and cones, then the axle shaft. If cones do not release, rap axle shaft sharply at center.
4.
Using suitable tool, remove outer hub nut.
5.
Straighten lock washer and remove lock washer, inner nut, and bearing, then the drum. If brake lining is dragging on brake drum, back off brake
adjustment by rotating adjusting screw.
6.
Using suitable tool, remove brake shoe return springs.
7.
Remove brake shoe retainers, springs, and nails.
8.
Remove end of automatic adjuster cable from anchor, then other end from lever.
9.
Remove automatic adjuster cable, cable guide, and anchor plate.
10.
Disengage lever spring at both ends, then remove spring and lever.
11.
Spread anchor ends of shoes and remove parking brake strut with spring.
12.
Disconnect parking brake cable from parking brake lever and remove brake assembly.
13.
Remove brake shoes with adjusting star wheel from support.
Installation
1.
Apply thin coat of suitable lubricant to shoe contact area of support platforms.
2.
Attach parking brake lever to back side of secondary shoe.
3.
Place brake shoes in their relative position on workbench.
4.
Lubricate threads of adjusting screw and install screw between shoes with star wheel toward secondary shoe. Star wheels are stamped with an
"R" or "L" to indicate whether they go on right or left side of vehicle.
5.
Overlap anchor ends of shoes and install adjusting spring and lever.
6.
Hold brake shoes in their relative position and attach parking brake cable to parking brake lever.
7.
Install parking brake strut with spring between parking brake lever and primary shoe.
8.
Position brake shoes on support and install retainer nails, springs, and retainers.
9.
Install anchor plate.
10.
Install end of adjusting cable on anchor, then install return spring between primary shoe and anchor.
11.
Install cable guide in secondary shoe, then install secondary return spring. Ensure that secondary spring overlaps primary spring and that
spring does not slip between adjuster cable end and anchor.
12.
Place adjuster cable in groove of cable guide and engage hook of cable into adjusting lever, ensuring that cable guide lays flat against shoe web.
13.
Position drum on axle housing.
14.
Install bearing and inner nut. Refer to individual truck chapter for bearing adjustment procedure.
15.
Install locking washer and outer nut, bending washer to lock in place.
16.
Place new gasket on hub and install axle shaft, cones, lock washers, and nuts.
17.
Adjust brakes. Refer to individual truck chapter for procedure.
18.
Install tire and wheel assembly.
19.
If any hydraulic connections have been opened, bleed brake system.
20.
Check fluid level in master cylinder, filling as necessary.