
Vision V6-3.5L VIN F (1997)
Brake Bleeding: Service and Repair
Antilock Brake System Bleeding Procedures
GENERAL INFORMATION
The ABS and ABS with traction control must be bled anytime air is permitted to enter the hydraulic system, due to disconnection of brake lines,
hoses or components. If the HCU for either system, is removed from a vehicle, both the base brake system and the ABS or ABS with traction
control system must be bled using the appropriate procedure. It is important to note that excessive air in the brake system will cause a soft or
spongy feeling brake pedal. During bleeding operations, be sure that the brake fluid level in the master cylinder reservoir remains close to the
FULL level. Check the fluid level periodically during the bleeding procedure and add DOT 3 brake fluid as required. The Teves Mark IV-G ABS
or ABS with traction control must be bled as two independent braking systems. The non ABS portion of the brake system is to be bled the same as
any non ABS system. Refer to Brakes Service and Repair for the proper bleeding procedure to be used. This brake system can be either pressure
bled or manually bled. The Antilock portion of brake system MUST be bled separately. This bleeding procedure requires the use of the DRB scan
tool diagnostic tester and the bleeding sequence procedure outlined below.
CAUTION: When bleeding the ABS system, the following bleed sequence MUST be followed to ensure complete and adequate bleeding. The
brake bleeding procedure is a three step process. The first step is a conventional bleeding procedure using a pressure bleeder or manual procedure.
Second step is bleeding HCU assembly using the DRB scan tool. Third step is to repeat the conventional pressure or manual bleeding procedure.
Follow the procedure below to ensure adequate bleeding of the entire hydraulic system.
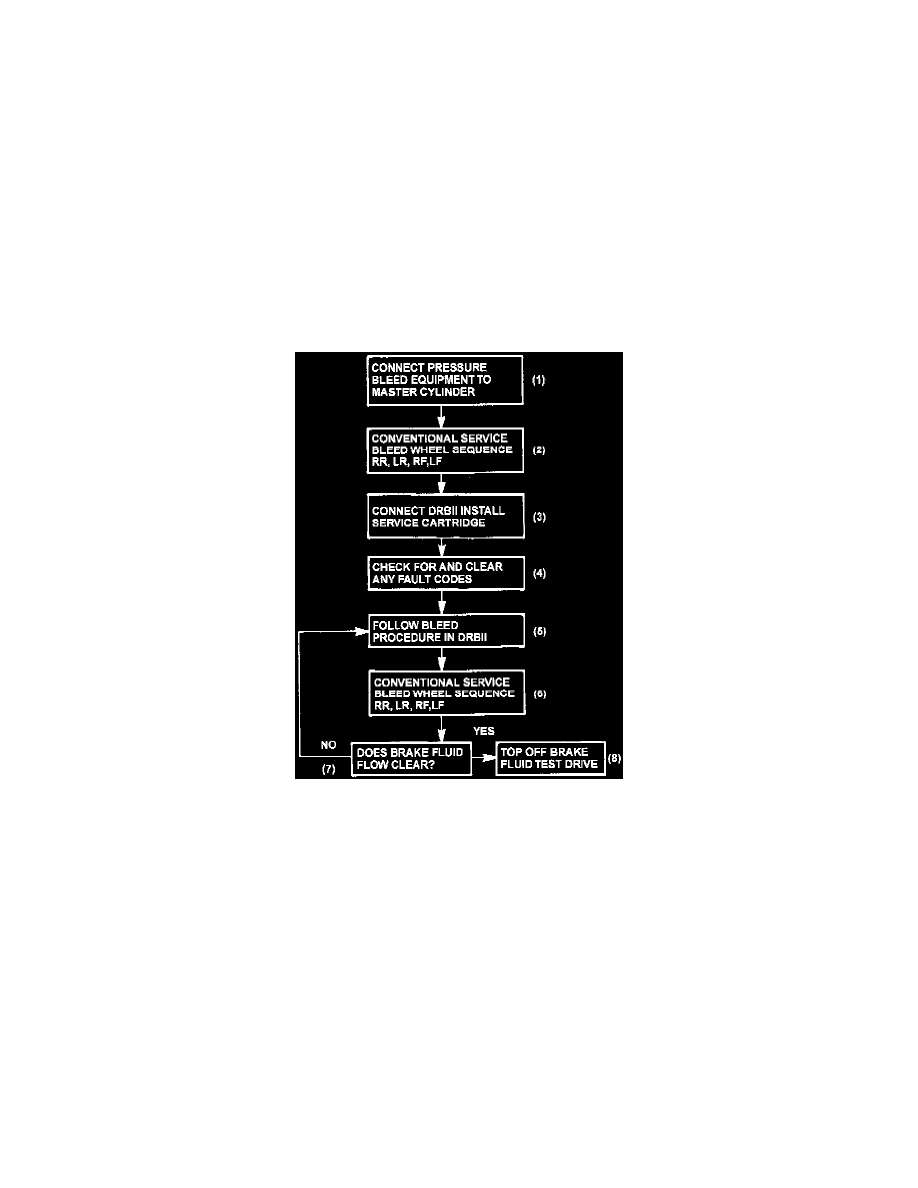
Brake Bleed Procedure Flow Chart
PROCEDURE
1. Connect pressure bleeding equipment to master cylinder. Refer to Brakes Service and Repair.
2. Fully bleed the base brake portion of the brake hydraulic system in the following sequence: right rear wheel, left rear wheel, right front wheel, and
left front wheel.
3. Connect the DRB scan tool to the diagnostic connector under the dash panel to the right of the steering column. Install the required cartridge into
the DRB scan tool.
4. Using the DRB scan tool, check to make sure the CAB does not have any fault codes stored. If it does, remove them using the DRB scan tool.
5. Using the DRB scan tool, go to the "Bleed ABS" routine.
6. Bleed the base brake system again as in step 2.above.
7. Repeat steps 5.and 6.above until brake fluid flows clear and is free of any air bubbles. Check brake fluid level in master cylinder reservoir
periodically and fill to correct fill level to prevent reservoir from running low on brake fluid.
8. Test drive the vehicle to be sure brakes are operating correctly and that brake pedal is solid.