
Bronco L6-300 4.9L VIN Y 1-bbl (1983)
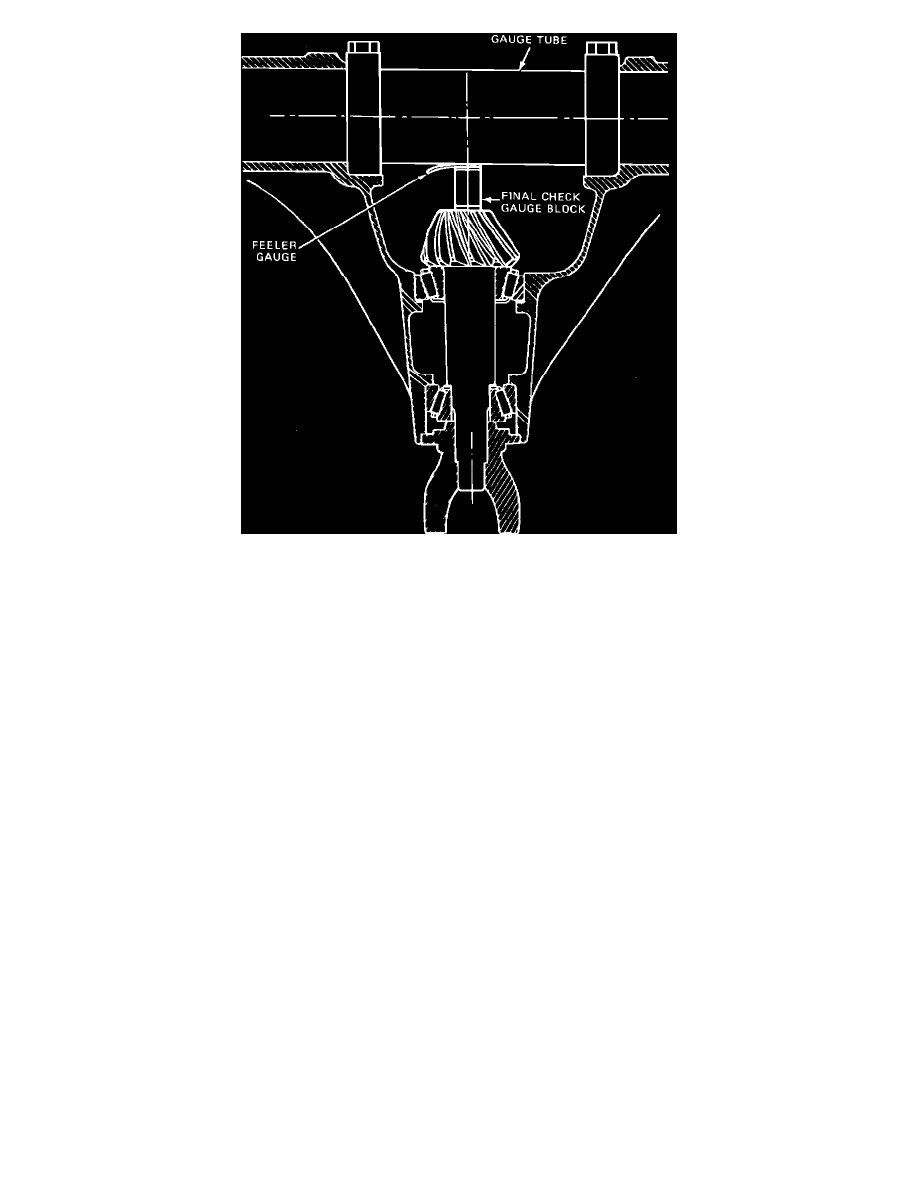
Fig. 5 Final pinion depth check
1.
Install preload shims and slinger, if equipped, onto the pinion.
2.
Install bearing cone assembly using suitable tool.
3.
Install end yoke, washer and new pinion nut. Torque nut to approximately 250 ft. lbs. on except model 30 axle or 200---220 ft. lbs. on model 30
axle.
4.
Rotate pinion using a suitable torque wrench. Rotating torque should be 20---40 inch lbs. To increase preload, remove shims from drive pinion. To
decrease preload, add shims to pinion, Fig. 4.
5.
Install suitable gauge tube in housing, then the bearing caps and cap attaching bolts, Fig. 5. Torque cap attaching bolts to 80---90 ft. lbs. on except
model 30 axle or 35---50 ft. lbs. on model 30 axle.
6.
Insert proper final check gauge block on top of pinion face under the gauge tube, Fig. 5. Place thumb on gauge block to ensure block is level.
7.
Insert feeler gauge or shims between gauge tube and final check gauge block until slight drag is felt.
8.
The reading in step 7 should be .020 inch added to the drive pinion etching, which could be plus (+) or minus ( - ) with a tolerance of .002 inch. If
the distance must be increased, remove shims from beneath the inner pinion bearing cup. If the distance must be decreased, add shims beneath the
inner pinion bearing cup.
9.
With drive pinion at the correct depth, remove the yoke, nut and washer using a suitable tool.
10.
Apply suitable lubricant to oil seal, then install drive pinion oil seal using a suitable installer. Ensure seal spring is properly installed after seal
installation.
11.
Install yoke using suitable tool, then the washer and nut. Torque nut to approximately 250 ft. lbs. on except model 30 axle or 200---220 ft. lbs. on
model 30 axle.