
Bronco L6-300 4.9L VIN Y 1-bbl (1983)
Pinion Gear: Service and Repair
Dana/Spicer, Rear Axle
Depth Gauge Check, Dana/Spicer, Rear Axle
If any of the gauge surfaces become nicked, the high spots should be removed using an oil stone.
1.
Install a new rear pinion bearing over a suitable aligning adapter, then position into the pinion bearing retainer assembly.
2.
Place front of pinion bearing into the bearing cup, then assemble the handle onto the screw and hand tighten. The square drive in the handle of
the tool is to be used for obtaining the proper pinion bearing preload. Set preload to 20---40 inch lbs.
3.
Center suitable gauge tube into the differential bearing bore, then install the differential bearing caps.
4.
Using a feeler gauge tool or shims, select the thickest shim that will enter between the gauge tube and gauge block. Insert feeler gauge directly
along the gauge block to ensure a correct reading. If the service pinion gear is marked with a plus (+) reading, this amount should be
subtracted from the thickness dimension obtained in step 4. If the service pinion gear is marked with a minus ( - ) reading, this amount
should be added to the thickness dimension obtained in step 4.
5.
Remove inner pinion bearing cup and install the correct number of shims in the carrier bore.
6.
Install bearing cup and oil slinger, if equipped, on the pinion, then press on bearing using a suitable tool. If a baffle or slinger is used, replace
with a new one during assembly.
Drive Pinion Depth of Mesh Setting, Dana/Spicer, Rear Axle
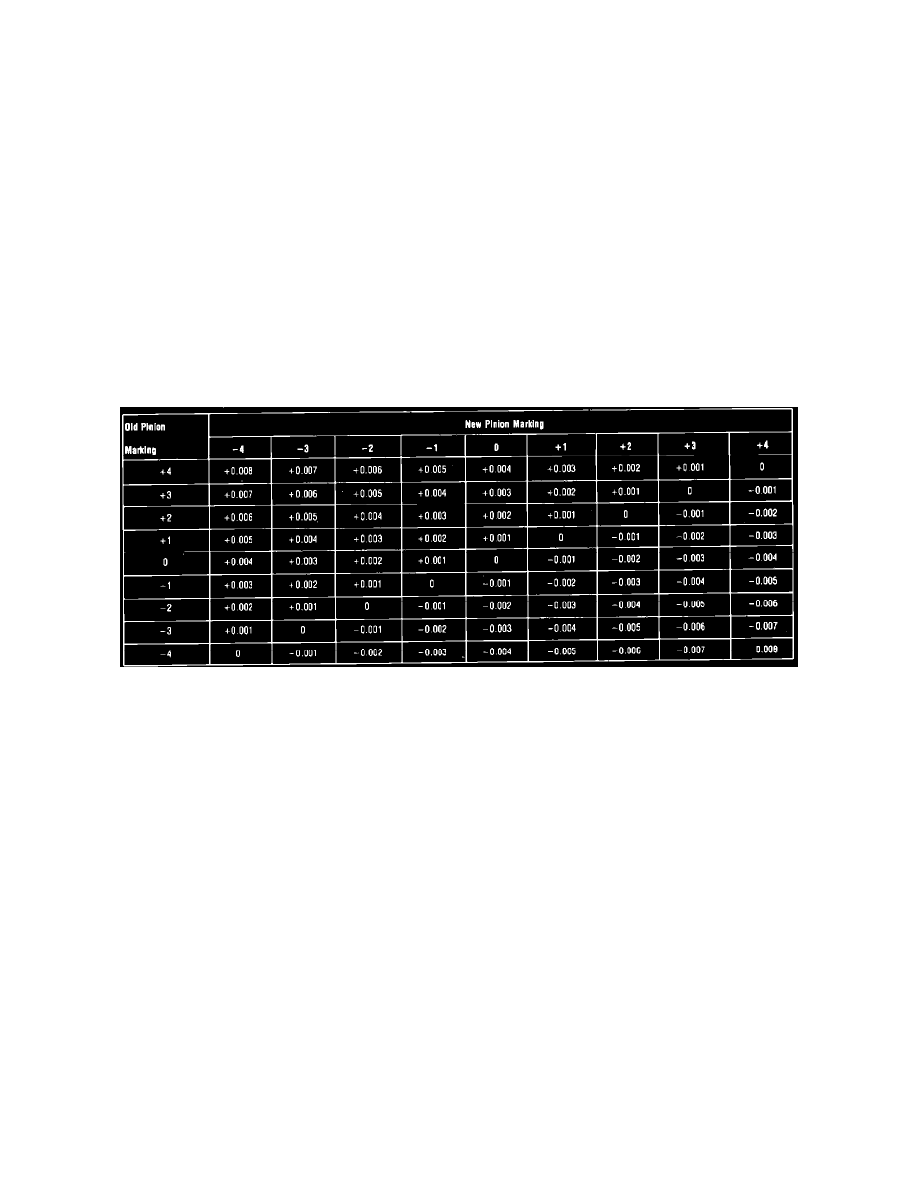
Fig. 3 Shim setting chart
Ring gears and pinions are supplied in matched sets only. Matched numbers on both the pinion and ring gear are etched for verification. On the face of
each pinion there is etched either a plus or a minus number, or ``0,'' which indicates the best running position for each particular gear set. This
dimension is controlled by shimming behind the inner pinion bearing cup. A pinion etched with a +3 would require .003 inch less shims that a pinion
etched ``0.'' A pinion etched - 3 would require .003 inch more shims than a pinion etched ``0.'' If the etched figure is ``0'' the shim pack will remain the
same. Refer to chart, Fig. 3. Shims are available in thicknesses of .003 inch, .005 inch, .010 inch and .030 inch.
If old ring and pinion set is to be reused, measure the old shim pack and build a new shim pack to the same dimension. If a baffle is used in the axle
assembly, it is considered a part of the shim pack. Measure each shim separately with a micrometer and add together to get the total shim pack thickness
from the original build up.
If a new gear set is being used, notice the (+) or ( - ) etching on both the new and old pinion and adjust thickness of new shim pack to compensate for the
difference of these two figures. For example, if the old pinion reads +2 and the new pinion is - 2, add .004 inch shims to the original shim pack.
Pinion Bearing Preload & Final Depth Check, Rear Axle