| Removal and Installation | | -
Disconnect the battery ground cable.
For additional information, refer to: Battery Disconnect and Connect (414-01 Battery, Mounting and Cables, General Procedures).
| | | -
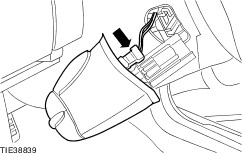
Turn the ignition key to position 1. | 3. Remove the components in the order indicated in the following illustration(s) and table(s). 4 - Ignition switch electrical connector All vehicles | | -
To install, reverse the removal procedure. | Vehicles with global closing | | -
Initialize the door window motors.
For additional information, refer to: Door Window Motor Initialization (501-11 Glass, Frames and Mechanisms, General Procedures).
| Removal Details Item 1 : Remote audio control switch (if equipped) | | -
Using a thin bladed screwdriver, release the locking tang. | | | -
Disconnect the audio control electrical connector. | Item 2 : Steering column upper shroud | | -
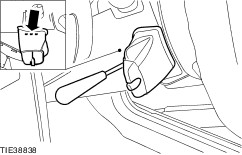
NOTE:Turn the steering wheel to access the steering column upper shroud retaining clips. Detach the steering column upper shroud from the steering column lower shroud (steering wheel shown removed for clarity). - Using a thin bladed screwdriver, release the retaining clips (one each side).
| Item 3 : Steering column lower shroud | | -
To aid the removal of the steering column lower shroud, release the steering column locking lever. | Item 5 : Ignition switch CAUTION:Do not turn the ignition switch lock cylinder from position 1 when the ignition switch has been removed. Installation Details Item 5 : Ignition switch | | -
CAUTION:Do not turn the ignition switch lock cylinder from position 1 when the ignition switch has been removed. Check and turn the ignition switch to position 1. | |