| Removal and Installation WARNING:To avoid accidental deployment, the restraints control module backup power supply must be depleted. Wait at least one minute after disconnecting the battery ground cable(s) before commencing any repair or adjustment to the supplemental restraint system (SRS), or any component(s) adjacent to the SRS sensors. Failure to follow these instructions may result in personal injury. WARNING:To minimize the possibility of premature deployment, do not use radio key code savers when working on the supplemental restraint system. Failure to follow this instruction may result in personal injury. WARNING:Never probe the electrical connectors of air bag modules or any other supplemental restraint system component. Failure to follow this instruction may result in personal injury. | | -
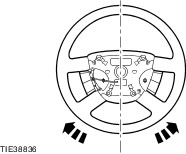
NOTE:Make sure the road wheels are in the straight ahead position. Centralize the steering and lock it in position. | 4. Remove the components in the order indicated in the following illustration(s) and table(s). 3 - Steering wheel retaining bolt 5 - Steering wheel rotation sensor electrical connector (if equipped) 6 - Clockspring electrical connector All vehicles | | -
To install, reverse the removal procedure. | Vehicles with stability assist | | -
WARNING:The electronic stability program must be re-configured. Failure to follow this instruction may result in personal injury. Configure the stability assist program using WDS. | Vehicles with front and rear power windows Removal Details Item 1 : Audio control switch (if equipped) | | -
Detach the audio control switch from the steering column lower shroud. - Using a thin bladed screwdriver, release the locking tang.
| | | -
Remove the audio control switch. - Disconnect the electrical connector.
| Item 2 : Steering column lower shroud | | -
Release the steering column locking lever to aid the removal of the steering column lower shroud. | Item 4 : Steering wheel | | -
CAUTION:Make sure the clockspring rotor is not allowed to rotate. Secure in the central position with a piece of suitable tape. Secure the clockspring rotor to the clockspring outer. | | | -
Disconnect the steering wheel electrical connector, (if equipped). | | | -
CAUTION:Care must be taken not to damage the clockspring pins. Remove the steering wheel. - Feed the driver air bag wiring harness through the steering wheel.
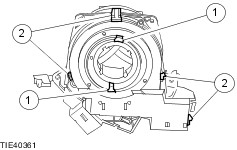
| Item 7 : Clockspring | | -
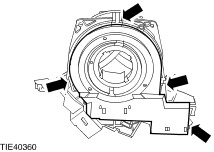
CAUTION:Make sure the clockspring to steering wheel rotation sensor retaining clips do not get damaged. Remove the steering wheel rotation sensor (if equipped). - Release the locking tangs from the clockspring.
| Installation Details Item 7 : Clockspring WARNING:If installing a new clockspring, do not remove the clockspring locking key at this stage. Failure to follow this instruction may result in personal injury. WARNING:If installing the original clockspring, do not remove the tape securing the clockspring at this stage. Failure to follow this instruction may result in personal injury. | | -
CAUTION:Make sure the clockspring to steering wheel rotation sensor retaining clips do not get damaged. Install the Steering wheel rotation sensor (if equipped). - Align the steering wheel rotation sensor locating tangs to the clockspring.
- Make sure the retaining clips lock into position on the steering wheel rotation sensor.
| | | -
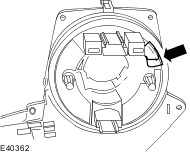
CAUTION:Make sure the road wheels are in the straight ahead position. NOTE:Make sure the turn signal lamp switch is in the off position. Install the clockspring. | | | -
WARNING:If there is a break between installing the clockspring and installing the steering wheel, or the vehicle is left unattended by the technician, the centralizing procedure MUST be carried out. WARNING:Incorrect centralization may result in premature component failure. If in doubt when centralizing the clockspring, repeat the centralizing procedure. Failure to follow this instruction may result in personal injury. CAUTION:The clockspring must not be rotated more than three turns in a clockwise direction after the clockspring has been centralized. CAUTION:Make sure the road wheels are in the straight ahead position. CAUTION:When carrying out the clockspring centralizing procedure, the first turns must be in the couterclockwise direction. Centralize the clockspring. - Turn the clockspring in a counterclockwise direction until a resistance is felt.
- Turn the clockspring in a clockwise direction, until the arrow marked on the rotor of the clockspring aligns with the raised ‘V’ section on the outer cover of the clockspring at approximately the 195 degrees position.
- Turn the clockspring in a clockwise direction three turns.
| | | -
NOTE:When the clockspring is centralized, the U-shaped part of the flat flexible cable will be visible. Check to see if the U-shaped part of the flat flexible cable is visible. - Secure the clockspring rotor to the clockspring outer.
| Item 4 : Steering wheel | | -
CAUTION:Make sure the road wheels are in the straight ahead position. Install the steering wheel. - Remove the clockspring locking key (if necessary).
- Remove the tape securing the clockspring (if necessary).
| |