| Removal and Installation Special Tool(s) | | Installer, Halfshaft 204-161 (14-041) | | | Remover, Halfshaft 308-256 (16-089) | General Equipment Four leg puller Tire Lever Materials Name Specification Manual transmission fluid WSD-M2C200-C Removal WARNING:Refer to the Material Safety Data Sheets for the Automatic Transmission Fluid E-AW. Failure to follow this instruction may result in personal injury. Certain Transmission and Power Steering fluids supplied to Ford contain additives which may cause skin irritation or other skin reactions after contact.
For additional information, refer to: Health and Safety Precautions (100-00 General Information, Description and Operation).
See - Transmission Fluids. All vehicles | | -
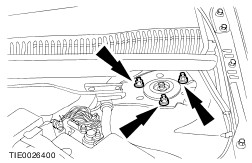
Loosen the strut and spring assembly top mount retaining nuts by three turns. | | | -
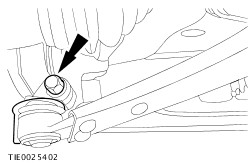
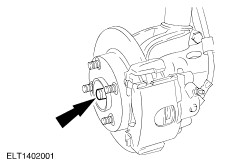
CAUTION:Use a socket to loosen the wheel hub retaining nut to prevent damage. Remove the wheel hub retaining nut. - Discard the wheel hub retaining nut.
| | | -
Remove the wheel and tire.
For additional information, refer to: Wheel and Tire (204-04 Wheels and Tires, Removal and Installation).
| | | -
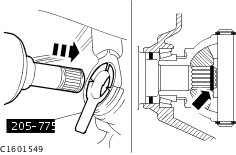
CAUTION:Protect the ball joint seal using a soft cloth to prevent damage. Detach the lower arm ball joint from the wheel knuckle. | | | -
CAUTION:Support the halfshaft. The inner joint must not be bent more than 18 degrees. The outer joint must not be bent more than 45 degrees. - Secure the halfshaft to one side.
| Vehicles with automatic transaxle | | -
CAUTION:Support the halfshaft. The inner joint must not be bent more than 18 degrees. The outer joint must not be bent more than 45 degrees. CAUTION:Do not damage the halfshaft oil seal. NOTE:Plug the transaxle to prevent oil loss or dirt ingress.
For additional information, refer to: Health and Safety Precautions (100-00 General Information, Description and Operation).
See - Transmission Fluids. Using a suitable tire lever, remove the halfshaft. - Allow the oil to drain into a suitable container.
For additional information, refer to: Health and Safety Precautions (100-00 General Information, Description and Operation).
See - Transmission Fluids. | Vehicles with manual transaxle | | -
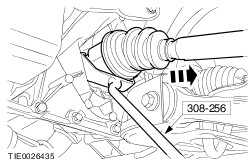
CAUTION:Support the halfshaft. The inner joint must not be bent more than 18 degrees. The outer joint must not be bent more than 45 degrees. CAUTION:Do not damage the halfshaft oil seal. NOTE:Plug the transaxle to prevent oil loss or dirt ingress. Using the special tool, remove the halfshaft. - Allow the oil to drain into a suitable container.
| Installation All vehicles | | -
CAUTION:Support the halfshaft. The inner joint must not be bent more than 18 degrees. The outer joint must not be bent more than 45 degrees. CAUTION:Do not damage the halfshaft oil seal. CAUTION:Make sure the snap ring is correctly seated. NOTE:Install a new snap ring. Attach the left hand halfshaft to the transaxle. | | | -
CAUTION:Make sure the halfshaft is completely installed into the wheel hub. Using the special tool, install the halfshaft. | | | -
NOTE:Install a new wheel hub retaining nut. NOTE:Do not fully tighten the wheel hub retaining nut at this stage. Install the wheel hub retaining nut. | | | -
CAUTION:Make sure that the heat shield is installed to prevent damage to the ball joint. Install the heat shield. | | | -
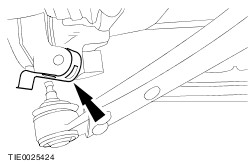
CAUTION:The lower arm pinch bolt must be installed from the rear of the wheel knuckle. Attach the lower arm ball joint to the wheel knuckle. | | | -
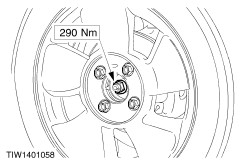
Install the wheel and tire.
For additional information, refer to: Wheel and Tire (204-04 Wheels and Tires, Removal and Installation).
| | | -
CAUTION:Use a socket to tighten the wheel hub retaining nut to prevent damage. Tighten the wheel hub retaining nut. | | | -
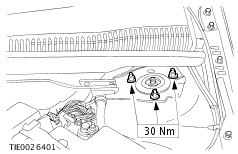
Tighten the strut and spring assembly top mount retaining nuts. | Vehicles with manual transaxle | | -
With the vehicle on a level surface, fill the transaxle with transmission fluid until the oil level is just below the bottom of the filler hole. | Vehicles with automatic transaxle | | -
Check the transmission fluid level and top up with clean automatic transmission oil.
For additional information, refer to: Transmission Fluid Drain and Refill (307-01 Automatic Transmission/Transaxle - Vehicles With: 4-Speed Automatic Transmission (AW81-40), General Procedures).
| |