| In-vehicle Repair Special Tool(s) | | Installer, Wheel Hub 204-148 (14-037) | | | Flange Holding Wrench, Universal 205-072 (15-030A) | | | Locking Tool, Crankshaft 310-085 (23-059) | | | Remove, Crankshaft Vibration Damper 303-338 (21-153B) | Materials Name Specification Engine oil WSS-M2C917-A Sealer Removal | | -
Remove the timing belt. For additional information, refer to Timing Belt - in this section. | | | -
Remove the valve cover (13 bolts). | | | -
Remove the camshaft pulley. - Loosen the camshaft pulley center bolt by two turns.
- Remove the camshaft pulley.
| | | -
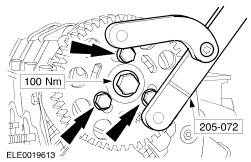
Using the special tool and three M8 x 70 mm bolts, remove the camshaft pulley hub. | | | -
Detach the vacuum and fuel pump from the cylinder head. | | | -
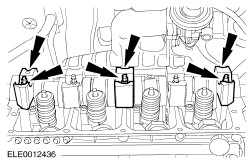
Release the rocker arms. - Loosen the lock nut.
- Unscrew the adjusting screw until the rocker arm rests on the unit injector tappet spring.
| | | -
NOTE:Keep the rocker shafts in order for installation. NOTE:Loosen the rocker shaft retaining bolts starting from the outer bolts, working to the inner bolts. Remove the rocker shafts. | | | -
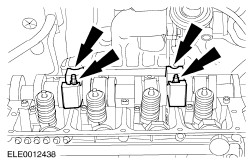
NOTE:Keep the camshaft bearing caps in order for installation. NOTE:Loosen the bolts of the camshaft bearing caps No. 5, No. 1 and No. 3 in pairs. Remove the camshaft bearing caps. | | | -
NOTE:Keep the camshaft bearing caps in order for installation. Loosen the bolts of the camshaft bearing caps No. 2 and No. 4 alternately, working diagonally opposite. - Discard the bolts and the camshaft oil seal.
| Installation | | -
Remove the special tool and rotate the engine against its normal direction 90 degrees. | | | -
Lubricate the running surfaces of the cylinder head and the camshaft with engine oil. | | | -
NOTE:Install the camshaft with the intake and exhaust cam of piston No. 1 pointing upwards. Install the camshaft. | | | -
CAUTION:The crankshaft and the camshaft must not be turned for at least 30 minutes after tightening the camshaft bearing caps. NOTE:Lubricate the running surfaces of the bearing caps with engine oil. Install the bearing caps No. 3 and No. 4 in the location from which they were removed. - Tighten the camshaft bearing caps bolts finger tight gradually and alternately, working diagonally opposite, until the bearing caps lie flat on the cylinder head.
- Tighten the camshaft bearing caps bolts, working diagonally opposite.
- Tighten the bolts in two stages.
| | | -
Coat the bearing caps No. 1 and No. 5 with sealer at the shown mating face. | | | -
NOTE:Lubricate the running surfaces of the bearing caps with engine oil. Install the bearing caps No. 5, No. 1 and No. 3 in the location from which they were removed. - Tighten the camshaft bearing caps bolts in pairs.
- Tighten the bolts in two stages.
| | | -
NOTE:First tighten both of the inner retaining bolts and then the outer retaining bolts finger tight. Install the rocker shafts. - Tighten the bolts in two stages.
| | | -
NOTE:Install new gaskets. Install the vacuum and fuel pump. | | | -
NOTE:Install a new camshaft oil seal. NOTE:Do not coat the sealing lip with engine oil or grease. Using the special tool and a M12 x 100 mm bolt, install the camshaft oil seal. | | | -
NOTE:Do not tighten the camshaft pulley retaining bolts at this stage. Using the special tool, install the camshaft pulley hub together with the camshaft pulley and tighten the camshaft pulley hub. | | | -
Carry out the unit injector basic adjustment. - Rotate the camshaft until the cam of piston No. 1 points to the rocker arm roller.
- Screw the adjusting screw into the rocker arm, until a resistance is felt. Unscrew the adjusting screw 225 degrees.
- Tighten the lock nut to 30 Nm.
| | | -
Rotate the crankshaft in its normal direction 90 degrees and install the special tool. | | | -
NOTE:Install the valve cover within five minutes of applying the sealer. Apply a 5 mm diameter point of sealer to the front and rear camshaft bearing caps. | | | -
NOTE:Inspect the valve cover gasket for damage. Install a new valve cover gasket if damaged. Install the valve cover and tighten the bolts in the sequence shown. | | | -
Install the timing belt. For additional information, refer to Timing Belt - in this section. | | |