ford Workshop Repair Guides

Ford Workshop Service and Repair Manuals

Blower Motor > < Heater Control Valve
Heating and Ventilation - Heater Core and Evaporator Core Housing Ka 1997 (09/1996-)
Removal and Installation

Special Tool(s)

Remover/installer, radiator hose clamp

303-397 (24-003)

Remover, refrigerant line 5/8" (black)

412-081 (34-003)

Materials
Name
Specification
O-rings (green)
 
Adhesive butyl rubber strips (6 off if required)
locally procured 
Sealant (if required)
ESKM-4G245-A 

Removal

Vehicles with air conditioning
  1. Drain the air conditioning system.
    For additional information, refer to: Air Conditioning (A/C) System Recovery, Evacuation and Charging (412-00 Climate Control System - General Information, General Procedures).
All vehicles.
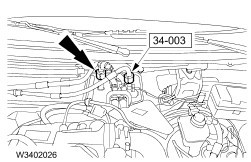
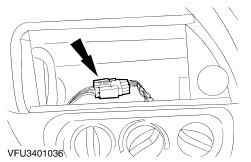
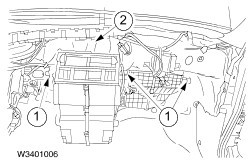
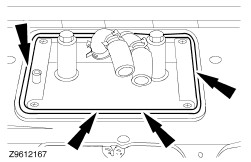
  1. Remove the instrument panel. For additional information, refer to: (501-12 Instrument Panel and Console)
    Instrument Panel - Vehicles Built Up To: 02/2005 (Removal and Installation),
    Instrument Panel - Vehicles Built From: 02/2005 (Removal and Installation).

  1. NOTE:
    NOTE:Do not empty the coolant expansion tank.
    Detach the coolant expansion tank and position it to one side.

  1. NOTE:
    NOTE:Cap the heater core and the coolant hoses to prevent dirt ingress.
    NOTE:
    NOTE:Do not mix the hoses up when fitting them (mark them if necessary).
    Disconnect the coolant hoses from the heater core.
Vehicles with air conditioning

  1. NOTE:
    NOTE:Cap the refrigerant lines and the evaporator core to prevent dirt ingress.
    Disconnect the refrigerant lines from the evaporator core.
All vehicles.

  1. Disconnect the electrical connectors.
    1. Blower motor electrical connector
    1. Air inlet blend door actuator electrical connector
    1. Blower motor resistor electrical connector

  1. Disconnect the electrical connector.

  1. Remove the heater core.
    1. Undo the three nuts.
    1. Release the heater from its bracket.
    • Detach the side air ducts.
    • Release the wiring loom.
    • Pull the air conditioning run-off hose out of the floor panel.

Installation

All Vehicles
  1. Install the heater core.

  1. Thoroughly clean the area around the heater core opening on the bulkhead.
  1. Cut two adhesive butyl rubber strips to 190 mm.
  1. NOTE:
    NOTE:Make sure that the butyl rubber adhesive strips cover both the heater and the panel evenly.
    Apply 270 mm long butyl rubber adhesive strips to the rear edge of the heater opening on the bulkhead.
    • Pull off the protective film from one side of the butyl rubber adhesive strip.
    • Locate the adhesive strip and press it firmly into position.
    • Pull off the protective film from the other side of the butyl rubber adhesive strip.
  1. Apply a 190 mm long butyl rubber adhesive strip on the left-hand side of the heater opening on the bulkhead.
  1. Apply a 270 mm long butyl rubber adhesive strip on the front edge of the heater opening on the bulkhead.
  1. Apply a 190 mm long butyl rubber adhesive strip on the right-hand side of the heater opening on the bulkhead.
Vehicles with air conditioning

  1. NOTE:
    NOTE:Make sure that the plastic rings on the refrigerant lines do not touch the heater core cover.
    Thoroughly clean the area around the refrigerant lines.
  1. NOTE:
    NOTE:Make sure that the adhesive strip completely fills the gap between the refrigerant line and the heater housing cover.
    NOTE:
    NOTE:Lubricate the refrigerant line O-ring seals with clean refrigerant oil before installation.
    NOTE:
    NOTE:Install new refrigerant line O-ring seals.
    Apply adhesive strip around the refrigerant line base.
    • Pull off the protective film from both sides of the butyl rubber adhesive strip.
    • Locate the adhesive strip and press it firmly into position all around the line base.
    • Cut off any excess butyl rubber.
All vehicles.
  1. To install, reverse the removal procedure.

Blower Motor > < Heater Control Valve