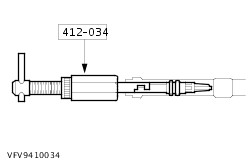
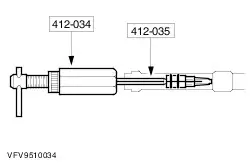
| Removal and Installation Special Tool(s) | | Remover/Installer, Fixed Orifice 412-034 (34-004) | | | Remover, Broken Orifice 412-035 (34-005) | | | Disconnect Tool, Spring-Lock Coupling 1/2" (blue) 412-027 (34-001) | Removal All vehicles | | -
Evacuate the air conditioning (A/C) system.
For additional information, refer to: Klimaanlage entleeren, evakuieren und befüllen (412-00, General Procedures).
| CAUTION:Do not raise the vehicle. | | -
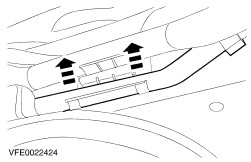
Remove the right-hand suspension strut mount reinforcement cover. | | | -
Remove the right-hand suspension strut nuts. | | | -
Remove the right-hand suspension strut mount reinforcement. - Unclip the engine wiring harness plug from the bracket.
| | | -
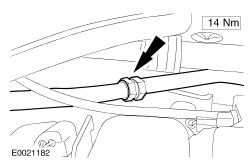
Unclip the fixed orifice tube refrigerant line from the bracket. | Vehicles with screw connection | | -
CAUTION:Seal off the refrigerant line to prevent dirt ingress. Disconnect the fixed orifice tube refrigerant line. - Discard the O-ring seals.
| Vehicles with quick release coupling | | -
Remove the spring clip coupling securing clip. | | | -
CAUTION:Seal off the refrigerant line to prevent dirt ingress. Disconnect the fixed orifice tube refrigerant line using the special tool. - Discard the O-ring seals.
| All vehicles | | -
Using the special tool, remove the evaporator core orifice. - Hook the special tool into the fixed orifice tube, turn it clockwise and remove the fixed orifice tube.
| | | -
NOTE:This step is only necessary if the fixed orifice tube is faulty. Using the special tools, remove the broken evaporator core orifice. | Installation | | -
NOTE:Install new refrigerant line O-ring seals. NOTE:Coat the refrigerant line O-rings with clean refrigerant oil before installation. NOTE:Install new suspension strut nuts. Install the components in the reverse order. | |