ford Workshop Repair Guides

Ford Workshop Service and Repair Manuals

B-Pillar Outer Panel > < Rocker Panel Inner Reinforcement
Side Panel Sheet Metal Repairs - A-Pillar Assembly Mondeo 2007.5 (02/2007-)
Removal and Installation

Removal

NOTE:
NOTE:Equipment:
NOTE:
NOTE: Measurement and alignment angle system
  1.  
    • Replacement parts:
    • A-pillar outer panel
    • A-pillar inner panel
    • A-pillar reinforcement
    • Rocker panel reinforcement
    • NVH elements
  1.  
    • Necessary removal and installation work:
    • Fender Apron Panel Reinforcement
      Refer to: Fender Apron Panel Reinforcement (501-27 Front End Sheet Metal Repairs, Removal and Installation).
    • Front door
      Refer to: Door (501-03 Body Closures, Removal and Installation).
    • Weatherstrip
    • Door hinges
    • A-pillar trim
      Refer to: A-Pillar Trim Panel (501-05 Interior Trim and Ornamentation, Removal and Installation).
    • Rocker panel trim
    • Driver or passenger seat
      Refer to: Front Seat (501-10 Seating, Removal and Installation).
    • Reposition the carpeting and the wiring harness away from the working area.

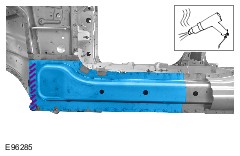
    • Due to the locations of inner reinforcements and NVH elements, it is very important that the dimensions quoted for the separating cuts on the outer A-pillar and on the rocker panel are accurately met.
    • Panel thickness partly 3 mm and graeter.
    • A-Pillar Assembly
    • Cut lines.

  1.  
    • A-Pillar outer
    • Mill out the spot welds.
    • 1) Grind out the MIG brazed joints.

  1.  
    • A-Pillar outer
    • Mill out the spot welds - Bend open metal tabs.

  1.  
    • A-Pillar outer
    • Heat the area (approx. 170 °C) and detach:
    • 1) NVH Elements
    • 2) Adhesive

  1.  
    • A-Pillar reinforcement
    • Mill out the spot welds.

  1.  
    • A-Pillar reinforcement
    • Heat the area (approx. 170 °C) and detach:
    • 1) NVH Elements
    • 2) Adhesive

  1.  
    • A-Pillar - Rocker panel reinforcement
    • Cut lines.

  1.  
    • A-Pillar - Rocker panel reinforcement
    • Mill out the spot welds.

  1.  
    • A-Pillar - Rocker panel reinforcement
    • Heat the area (approx. 170 °C) and detach adhesive.

  1.  
    • A-Pillar - Rocker panel inner reinforcement
    • Cut lines.

  1.  
    • A-Pillar - Rocker panel inner reinforcement
    • Mill out the spot welds - Two panel thickness
    • 1) Mill out the spot welds.
    • 2) Grind out the spot welds.

  1.  
    • A-Pillar inner panel
    • Mill out the spot welds
    • 1) Mill out the spot welds - Two panel thickness
    • 2) Grind out the spot welds.

  1.  
    • A-Pillar inner panel
    • Heat the area (approx. 170 °C) and detach:
    • 1) NVH Elements
    • 2) Adhesive

Installation

  • Before resistance spot welding of body panels with a total panel thickness of 3 mm and greater, the welding equipment instructions contained in sub-section 501-25 must be followed.
    Refer to: Tools and Equipment for Body Repairs (501-25 Body Repairs - General Information, Description and Operation).
  • Sealer or adhesive must not be applied in welding zones. Areas which were bonded or sealed needs to be thoroughly sealed afterwards.

  1.  
    • WARNING:
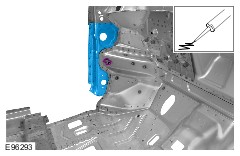
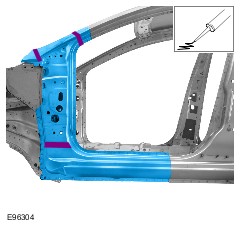
      WARNING: The A-pillar reinforcement is covered with a hot-dip aluminized coating on its entire surface. This coating needs to be fully ground off on the MIG welding flanges on the front using a fibre grinding disc. Any contamination due to parts of the coating in the welding bath will weaken the welded joint.
      A-Pillar reinforcement

  1.  
    • A-Pillar inner panel
    • Apply PU glass adhesive - firmly secure NVH Element in position.
    • Fit in A-Pillar inner panel.

  1.  
    • A-Pillar inner panel
    • Drill holes for puddle welding - One panel thickness.

  1.  
    • A-Pillar inner panel
    • 1) Puddle Weld.
    • Resistance spot weld - Panel thickness partly 3 mm and greater!

  1.  
    • Rocker panel inner reinforcement
    • Drill holes for puddle welding (Ø 10 mm).

  1.  
    • Rocker panel inner reinforcement
    • Resistance spot weld.
    • 1) Puddle Weld.
    • 2) Continuous MIG weld seam.

  1.  
    • Rocker panel reinforcement
    • NOTE:
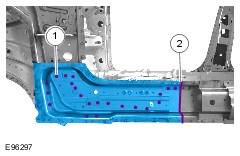
      NOTE: Only tack-weld the rocker panel reinforcement at the top and bottom. The final welded joint is made when the rocker panel is installed.
    • Resistance spot weld - Tack-weld.
    • 1) Continuous MIG weld seam.

  1.  
    • A-pillar reinforcement
    • Drill holes for puddle welding (Ø 10 mm).

  1.  
    • A-pillar reinforcement
    • Apply PU glass adhesive to the NVH element.

  1.  
    • A-pillar reinforcement
    • Resistance spot weld.
    • 1) Puddle Weld.

  1.  
    • A-pillar outer panel
    • Drill holes for puddle welding (Ø 6 mm).

  1.  
    • A-pillar outer panel
    • Apply PU glass adhesive to the NVH element.

  1.  
    • A-pillar outer panel
    • Bend in metal tabs - Resistance spot weld.

  1.  
    • A-pillar outer panel
    • Resistance spot weld.
    • 1) MIG weld (slotted hole).
    • 2) Continuous MIG weld seam.
    • 3) Puddle weld.

B-Pillar Outer Panel > < Rocker Panel Inner Reinforcement