| PINPOINT TEST E : EXCESSIVE NOISE |
| TEST CONDITIONS | DETAILS/RESULTS/ACTIONS |
| E1: CHECK THE TRANSMISSION AT IDLING A) |
| | 1 Ignition switch in position III. |
| | 2 Start the engine. |
| | 3 Depress the clutch pedal fully. |
| | Is the noise apparent when the clutch is operated? Yes No There is a problem with the transaxle. REFER to Symptom Chart(s). |
| E2: CHECK THE TRANSMISSION AT IDLING B) |
| | 1 |
| | Are the noises coming from the pedal box? Yes Go to "Service – Clutch Pedal". No |
| E3: TEST CLUTCH RELEASE BEARING |
| | 1 Check the release bearing for wear and corrosion. |
| | Are there signs of wear or rust? Yes INSTALL a new clutch release bearing. No CHECK the crankshaft for excessive end float.Are there still noises? GO to E5. |
| E4: ENGINE SELECTION – DIESEL ENGINES |
| | 1 |
| | Does the engine have a 1.8L diesel engine or a 2.0L diesel engine? Yes Vehicles with a 1.8L diesel engine GO to E5. Vehicles with a 2.0L diesel engine GO to E13. No |
| E5: CHECK THE ROTATION OF THE SECONDARY MASS OF THE DUAL MASS FLYWHEEL |
| | CAUTION:Do not rework or machine the dual mass flywheel if it is distorted. CAUTION:Do not clean the dual mass flywheel with any kind of liquid. Use only a dry cloth to clean the flywheel. CAUTION:Do not clean the gap between the primary and secondary mass. Only clean the bolt connection surface and the clutch surface. NOTE:Discoloration is not a reason in itself to replace the dual mass flywheel. 1 Remove the clutch disc and clutch pressure plate. |
| | Can the secondary mass be turned freely by more than 15 teeth? Yes INSTALL A NEW dual mass flywheel. No |
| E6: CHECK THE SPRING RESISTANCE |
| | 1 Twist the secondary mass in both directions. |
| | Can spring resistance be felt in both directions? Yes CONTINUE No INSTALL A NEW dual mass flywheel. |
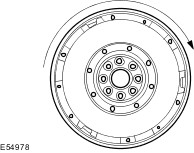
| E7: ROTATION OF THE DUAL-MASS FLYWHEEL |
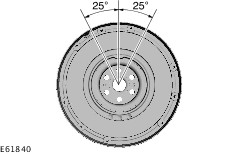
| | 1 Secure the primary side. Twist the secondary side in a clockwise direction until spring resistance is felt and release. Mark the rest position on the primary and secondary sides. Then twist the secondary side in a counter-clockwise direction until spring resistance is felt and release. Mark the new rest position on the primary side. Count the number of teeth between the marks for both directions on the toothed ring. |
| | Are more than 5 teeth counted? Yes INSTALL A NEW dual mass flywheel. No |
| E8: CHECK THE DUAL-MASS FLYWHEEL |
| | 1 Perform a visual inspection of the dual mass flywheel. |
| | Is the dual mass flywheel free of damage? Yes No INSTALL A NEW dual mass flywheel. |
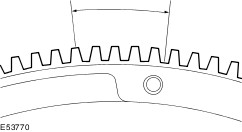
| E9: CHECK THE TOOTHED RING OF THE DUAL-MASS FLYWHEEL |
| | 1 Perform a visual inspection of the toothed ring of the dual mass flywheel. |
| | Perform a visual inspection of the toothed ring of the dual mass flywheel. Yes No INSTALL A NEW dual mass flywheel. |
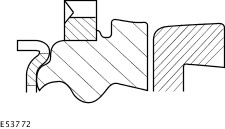
| E10: CHECK THE WELD SEAM OF THE DUAL-MASS FLYWHEEL |
| | 1 Visually inspect the weld seam of the dual mass flywheel to check for loss of grease. |
| | Is a clear loss of grease visible at the weld seam of the dual mass flywheel? Yes INSTALL A NEW dual mass flywheel. No |
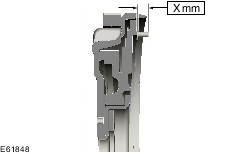
| E11: GUIDE PINS OF THE DUAL-MASS FLYWHEEL |
| | 1 Check the installation of the guide pins of the dual-mass flywheel. |
| | Are the guide pins for the dual mass flywheel present, and do they all have the same length? Yes No INSTALL A NEW dual mass flywheel. |
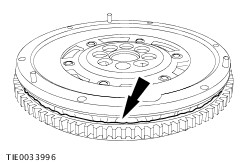
| E12: DISCOLORATION OF THE DUAL MASS FLYWHEEL DUE TO OVERHEATING |
| | 1 Check the dual mass flywheel for discoloration due to overheating. |
| | Is any discoloration evident in the marked area? Yes INSTALL A NEW dual mass flywheel. No The dual mass flywheel is OK. |
| E13: CHECK THE ROTATION OF THE SECONDARY MASS OF THE DUAL MASS FLYWHEEL |
| | CAUTION:Do not rework or machine the dual mass flywheel if it is distorted. CAUTION:Do not clean the dual mass flywheel with any kind of liquid. Use only a dry cloth to clean the flywheel. CAUTION:Do not clean the gap between the primary and secondary mass. Only clean the bolt connection surface and the clutch surface. NOTE:Discoloration is not a reason in itself to replace the dual mass flywheel. 1 Remove the clutch disc and clutch pressure plate. |
| | Can the secondary mass be turned freely by more than 15 teeth? Yes INSTALL A NEW dual mass flywheel. No |
| E14: CHECK THE SPRING RESISTANCE |
| | 1 Twist the secondary mass in both directions. |
| | Can spring resistance be felt in both directions? Yes No |
| E15: CENTER THE FRICTION CONTROL DISC |
| | 1 Secure the primary side with Special Tool 303-254. Gradually turn the secondary side in one direction against the resistance until spring resistance to the force applied by hand is felt on both sides. If it is not possible to reach the spring resistance on both sides, gradually turn the secondary side in the opposite direction in the way described above. |
| | Is it possible to find a middle position with spring resistance on either side? Yes CONTINUE No INSTALL A NEW dual mass flywheel. |
| E16: ROTATION OF THE DUAL-MASS FLYWHEEL |
| | 1 Secure the primary side. Twist the secondary side in a clockwise direction until spring resistance is felt and release. Mark the rest position on the primary and secondary sides. Then twist the secondary side in a counter-clockwise direction until spring resistance is felt and release. Mark the new rest position on the primary side. Count the number of teeth between the marks for both directions on the toothed ring. |
| | Are more than 5 teeth counted? Yes INSTALL A NEW dual mass flywheel. No |
| E17: CHECK THE DUAL-MASS FLYWHEEL |
| | 1 Perform a visual inspection of the dual mass flywheel. |
| | Is the dual mass flywheel free of damage? Yes No INSTALL A NEW dual mass flywheel. |
| E18: CHECK THE TOOTHED RING OF THE DUAL-MASS FLYWHEEL |
| | 1 Perform a visual inspection of the toothed ring of the dual mass flywheel. |
| | Perform a visual inspection of the toothed ring of the dual mass flywheel. Yes No INSTALL A NEW dual mass flywheel. |
| E19: CHECK THE WELD SEAM OF THE DUAL-MASS FLYWHEEL |
| | 1 Visually inspect the weld seam of the dual mass flywheel to check for loss of grease. |
| | Is a clear loss of grease visible at the weld seam of the dual mass flywheel? Yes INSTALL A NEW dual mass flywheel. No |
| E20: GUIDE PINS OF THE DUAL-MASS FLYWHEEL |
| | 1 Check the installation of the guide pins of the dual-mass flywheel. |
| | Are the guide pins for the dual mass flywheel present, and do they all have the same length? Yes No INSTALL A NEW dual mass flywheel. |
| E21: DISCOLORATION OF THE DUAL MASS FLYWHEEL DUE TO OVERHEATING |
| | 1 Check the dual mass flywheel for discoloration due to overheating. |
| | Is any discoloration evident in the marked area? Yes INSTALL A NEW dual mass flywheel. No The dual mass flywheel is OK. |
| E22: ENGINE SELECTION – PETROL ENGINES |
| | 1 |
| | Does the vehicle have a 2.0L petrol engine or a 2.5L petrol engine? Yes |
| E23: CHECK THE ROTATION OF THE SECONDARY MASS OF THE DUAL MASS FLYWHEEL |
| | CAUTION:Do not rework or machine the dual mass flywheel if it is distorted. CAUTION:Do not clean the dual mass flywheel with any kind of liquid. Use only a dry cloth to clean the flywheel. CAUTION:Do not clean the gap between the primary and secondary mass. Only clean the bolt connection surface and the clutch surface. NOTE:Discoloration is not a reason in itself to replace the dual mass flywheel. 1 Remove the clutch disc and clutch pressure plate. |
| | Can the secondary mass be turned freely by more than 15 teeth? Yes INSTALL A NEW dual mass flywheel. No |
| E24: ROTATION OF THE DUAL-MASS FLYWHEEL |
| | 1 Secure the primary side. Twist the secondary side in a clockwise direction until spring resistance is felt and release. Mark the rest position on the primary and secondary sides. Then twist the secondary side in a counter-clockwise direction until spring resistance is felt and release. Mark the new rest position on the primary side. Count the number of teeth between the marks for both directions on the toothed ring. |
| | Are between 1 and 3.5 teeth counted? Yes No INSTALL A NEW dual mass flywheel. |
| E25: CHECK THE DUAL-MASS FLYWHEEL |
| | 1 Perform a visual inspection of the dual mass flywheel. |
| | Is the dual mass flywheel free of damage? Yes No INSTALL A NEW dual mass flywheel. |
| E26: CHECK THE TOOTHED RING OF THE DUAL-MASS FLYWHEEL |
| | 1 Perform a visual inspection of the toothed ring of the dual mass flywheel. |
| | Perform a visual inspection of the toothed ring of the dual mass flywheel. Yes No INSTALL A NEW dual mass flywheel. |
| E27: CHECK DUAL MASS FLYWHEEL FOR GREASE LEAKAGE |
| | |
| | 1 Visually inspect the weld seam of the dual mass flywheel to check for loss of grease. |
| | Is a clear loss of grease visible at the weld seam of the dual mass flywheel? Yes INSTALL A NEW dual mass flywheel. No |
| E28: GUIDE PINS OF THE DUAL-MASS FLYWHEEL |
| | 1 Check the installation of the guide pins of the dual-mass flywheel. |
| | Are the guide pins for the dual mass flywheel present, and do they all have the same length? Yes The dual mass flywheel is OK. No INSTALL A NEW dual mass flywheel. |
| E29: CHECK THE ROTATION OF THE SECONDARY MASS OF THE DUAL MASS FLYWHEEL |
| | CAUTION:Do not rework or machine the dual mass flywheel if it is distorted. CAUTION:Do not clean the dual mass flywheel with any kind of liquid. Use only a dry cloth to clean the flywheel. CAUTION:Do not clean the gap between the primary and secondary mass. Only clean the bolt connection surface and the clutch surface. NOTE:Discoloration is not a reason in itself to replace the dual mass flywheel. 1 Remove the clutch disc and clutch pressure plate. |
| | Can the secondary mass be turned freely by more than 15 teeth? Yes INSTALL A NEW dual mass flywheel. No |
| E30: ROTATION OF THE DUAL-MASS FLYWHEEL |
| | 1 Secure the primary side. Twist the secondary side in a clockwise direction until spring resistance is felt and release. Mark the rest position on the primary and secondary sides. Then twist the secondary side in a counter-clockwise direction until spring resistance is felt and release. Mark the new rest position on the primary side. Count the number of teeth between the marks for both directions on the toothed ring. |
| | Are more than 8 teeth counted? Yes INSTALL A NEW dual mass flywheel. No |
| E31: CHECK THE DUAL-MASS FLYWHEEL |
| | 1 Perform a visual inspection of the dual mass flywheel. |
| | Is the dual mass flywheel free of damage? Yes No INSTALL A NEW dual mass flywheel. |
| E32: CHECK THE TOOTHED RING OF THE DUAL-MASS FLYWHEEL |
| | 1 Perform a visual inspection of the toothed ring of the dual mass flywheel. |
| | Perform a visual inspection of the toothed ring of the dual mass flywheel. Yes No INSTALL A NEW dual mass flywheel. |
| E33: CHECK THE WELD SEAM OF THE DUAL-MASS FLYWHEEL |
| | 1 Visually inspect the weld seam of the dual mass flywheel to check for loss of grease. |
| | Is a clear loss of grease visible at the weld seam of the dual mass flywheel? Yes INSTALL A NEW dual mass flywheel. No |
| E34: GUIDE PINS OF THE DUAL-MASS FLYWHEEL |
| | 1 Check the installation of the guide pins of the dual-mass flywheel. |
| | Are the guide pins for the dual mass flywheel present, and do they all have the same length? Yes The dual mass flywheel is OK. No INSTALL A NEW dual mass flywheel. |