| Removal and Installation Special Tool(s) | | Remover, refrigerant line 5/8" (black) 412-038 (34-003) | Materials Name Specification O-rings (green) Adhesive butyl rubber strips (6 off, if required) 1 048 729 Sealant (if required) 1 625 966 Removal All vehicles | | -
Disconnect the battery ground cable.
For additional information, refer to: Battery Disconnect (414-01 Battery, Mounting and Cables, General Procedures).
| Vehicles with air conditioning | | -
NOTE:Health and Safety Precautions.
For additional information, refer to: Health and Safety Precautions (100-00 General Information, Description and Operation).
Drain the air conditioning system.
For additional information, refer to: Klimaanlage entleeren, evakuieren und befüllen (412-00, General Procedures).
| All vehicles | | -
Remove the instrument panel.
For additional information, refer to: Instrument Panel (501-12 Instrument Panel and Console, Removal and Installation).
| | | -
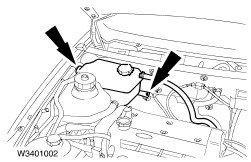
Detach the coolant expansion tank. - Unhook the coolant expansion tank from its bracket.
| | | -
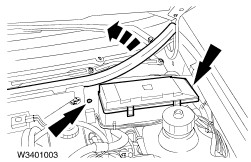
Remove the bulkhead extension. - Unclip the cover of the central junction box (CJB).
| | | -
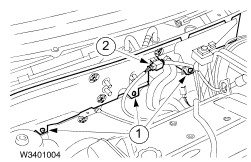
Remove the bulkhead extension (continued). - Remove the retaining bolts.
- Unclip the connector.
| | | -
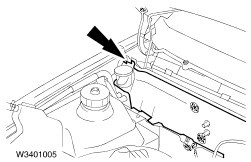
Remove the bulkhead extension (continued). | Vehicles with air conditioning | | -
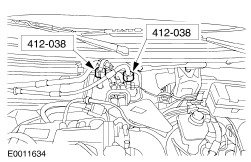
NOTE:Plug the evaporator and the refrigerant lines. Disconnect the A/C refrigerant lines. | All vehicles | | -
NOTE:Plug the heat exchanger. Pull off the connector and detach the coolant hoses. - Separate the electrical connector of the heater control valve.
- Undo the clamps and detach the coolant hoses.
| | | -
Separate/disconnect the multiplugs. - Blower motor
- Air recirculation flap actuator
- Blower motor resistor
| | | -
Remove the heater core housing. - Pull off the air guides at the side.
- Unscrew the three nuts.
- Free the heater from its retainer.
| Vehicles with air conditioning | | -
Disconnect the air conditioning drain hose. | Installation All vehicles NOTE:Perform steps 2 to 9 only to eliminate water entering through the heater on the bulkhead. | | -
Thoroughly clean the area around the heater opening in the bulkhead. | | | -
Cut two adhesive butyl rubber strips to 190 mm (see “Materials”). | | | -
NOTE:Make sure that the butyl rubber adhesive strips cover both the heater and the panel evenly. Apply 270 mm long butyl rubber adhesive strips to the rear edge of the heater opening on the bulkhead. - Pull off the protective film from one side of the butyl rubber adhesive strip.
- Locate the adhesive strip and press it firmly into position.
- Pull off the protective film from the other side of the butyl rubber adhesive strip.
| | | -
Apply a 190 mm long butyl rubber adhesive strip on the left-hand side of the heater opening in the bulkhead as described in step 4. | | | -
Apply a 270 mm long butyl rubber adhesive strip on the front edge of the heater opening in the bulkhead as described in step 4. | | | -
Apply a 190 mm long butyl rubber adhesive strip on the right-hand side of the heater opening in the bulkhead as described in step 4. | Vehicles with air conditioning | | -
NOTE:Make sure that the plastic rings on the refrigerant lines do not touch the heater cover. Thoroughly clean the area around the refrigerant lines. | | | -
NOTE:Make sure that the adhesive strip completely fills the gap between the tube and the heater housing cover. Apply adhesive strip around the tube base. - Pull off the protective film from both sides of the butyl rubber adhesive strip.
- Locate the adhesive strip and press it firmly into position all around the tube base.
- Cut off any excess butyl rubber.
| | | -
NOTE:Fit new O-rings on the refrigerant pipes before connecting them. Coat the new O-rings with refrigerant oil before fitting them. Install the remaining components in reverse order. | Vehicles without air conditioning | | -
Install the remaining components in reverse order. | All vehicles | | -
Install the instrument panel.
For additional information, refer to: Instrument Panel (501-12 Instrument Panel and Console, Removal and Installation).
| Vehicles with air conditioning | | -
Evacuate and fill the air conditioning system.
For additional information, refer to: Klimaanlage entleeren, evakuieren und befüllen (412-00, General Procedures).
| All vehicles | | -
Fill the cooling system.
For additional information, refer to: Kühlsystem entleeren, mit Kühlmittel auffüllen und entlüften - 1.25L/1.3L Endura-E (HCS)/1.4L/1.6L/1.8L Endura-DE (Lynx) Diesel (303-03, General Procedures).
| | | -
Check the operation of the heating and air conditioning system (if fitted). | |