| Diagnosis and Testing Special Tool(s) | | Terminal probe kit 29-011A | General Equipment Digital multimeter B-10021 (Lowner), 2005/6 Churchill) Inspection and Verification NOTE:If the code is entered incorrectly 3 times, the system will lock out. The component can only be unlocked by the manufacturer. - Verify the customer concern
- Make sure you understand the customer concern; Does concern arise during start-up, with the vehicle in motion, do ambient conditions effect, alter or induce concern.
- Visually inspect for obvious signs of damage. Refer to the following chart:
Visual Inspection Chart | Mechanical | Electrical | - Audio control unit damage.
- Cassette player jammed, not loading.
- Compact Disc (CD) player jammed, not loading.
- Audio entertainment module damage.
- Radio receiver/ cassette player power amplifier damage.
- Antenna/alignment.
- Speakers/water damage.
- Incorrectly mounted.
- Cones damaged.
- Foreign objects contacting cone.
- Accessory installation.
- Trim resonance/ poorly fitted trim.
| - Fuse 36 (15A).
- Fuse 32 (7.5A).
- Fuse FB1 (3A).
- Connectors incorrectly assembled.
- Loose or corroded electrical connections.
- Ground (Suppression) leads.
- Over stressed wiring loom(s) internally damaged/chaffing of wires.
- Circuit corruption via after market accessories.
| - Additional information on electrical connectors is available. Refer to the relevant wiring diagram.
- If the fault is not evident proceed to the Symptom Chart.
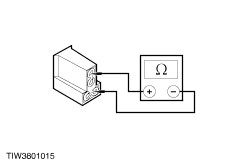
Symptom Chart | Symptom | Possible Sources | Action | | Audio control unit inoperative - incorrect operation | * Fuse(s). * Ground circuit. * Power circuit. * Audio control unit. | * Go to pinpoint Test A. | | Audio control unit display blank - Radio cassette operates | * Audio control unit. | * Remove the audio control unit for repair. Test after repair. | | Poor reception AM only, FM only or both AM/FM | * Antenna. * Antenna connections. * Suppression Equipment. * Audio control unit. | * Go to pinpoint Test B. | | Distorted sound from one or more speakers | * Speaker(s). * Trim resonance. * Wiring to speaker(s). * Audioline cable. * Audio control unit. | * Go to pinpoint Test C. | | No sound from all speakers | * Speaker(s). * Wiring to speaker(s). * Audioline cable. * Audio control unit. | * Go to pinpoint Test D. | | Radio and four speakers working but little or no sound from low frequency unit(s) | * Wiring to low frequency unit(s). * Audioline cable. * Audio control unit. * Audio entertainment module (7000 platinum system). * Radio receiver/cassette player power amplifier (7000 Platinum system). | * Go to pinpoint Test E. | Pinpoint Tests | PINPOINT TEST A : AUDIO CONTROL UNIT - INOPERATIVE - INCORRECT OPERATION | | TEST CONDITIONS | DETAILS/RESULTS/ACTIONS | | A1: CHECK OPERATION OF THE AUDIO CONTROL UNIT | | | 1 Ignition switch in position I. | | | 2 Turn the radio on. | | | Is the display illuminated? Yes No | | A2: CHECK FOR SOUND FROM SPEAKERS | | | 1 Verify that sound is coming from the speakers. | | | Is there sound coming from the speakers? Yes No | | A3: CHECK FUSE BATTERY SUPPLY | | | 1 Ignition switch in position 0. | | | 2 CHECK Fuse 2 (10A). | | | Is the fuse 2 (10A) OK? Yes No INSTALL a new fuse 2 (10A) TEST the system for normal operation. If fuse blows again, GO to A8. | | A4: CHECK FUSES ACCESSORY SUPPLY | | | 1 Ignition switch in position 0. | | | 2 CHECK Fuse 19 (10A). | | | Is the fuse OK? Yes No INSTALL a new fuse 19 (10A). TEST the system for normal operation. If fuse blows again, GO to A8. | | A5: CHECK CIRCUIT 29-MD15/74-MD15 AUDIO CONTROL UNIT SUPPLY | | | 1 Ignition switch in position 0. | | | 2 Disconnect Audio Control Unit (C-7a). | | | 3 Ignition switch in position I. | | | 4 MEASURE the voltages between audio control unit connector C-7a: - pin 1, circuit 29-MD15 (OG/BK) and ground.
- pin 3, circuit 74-MD15 (BU/BK) and ground.
| | | Is the voltage 10 volts or greater? Yes No | | A6: CHECK CIRCUIT 91-MD15 AUDIO CONTROL UNIT GROUND | | | 1 Ignition switch in position 0. | | | 2 Disconnect Audio Control Unit (C-7a). | | | 3 MEASURE the continuity to ground between audio control unit connector C-7a pin 6, circuit 91-MD15 (BK/GN) ground and the audio control unit connector C-7a pin 2, circuit 91-MD15A (BK/GN) and ground. | | | Is the resistance greater the 0.1 ohms? Yes REPAIR circuit 91-MD15/91-MD15A (BK/GN) as appropriate. TEST the system for normal operation. No REPAIR/INSTALL a new audio control unit. | | A7: CHECK CIRCUIT 29-MD15/74-MD15 FOR CONTINUITY | | | 1 Ignition switch in position 0. | | | 2 Disconnect Battery ground cable. | | | 3 Disconnect Audio Control Unit (C-7a). | | | 4 Disconnect Fuse 2 (10A). | | | 5 Disconnect Fuse 19 (10A). | | | 6 MEASURE the continuity between the output side of: - fuse 2 (10A) and the audio control unit connector C-7a pin 1, circuit 29-MD15 (OG/BK).
- fuse 19 (10A) and the audio control unit connector C-7a pin 3, circuit 74-MD15 (BU/BK)
| | | Is the resistance greater than 0.1 ohms? Yes REPAIR circuit 29-MD15 (OG/BK)/ 74-MD15 (BU/BK) as appropriate. TEST the system for normal operation. No CHECK Central Junction Box (CJB) and associated circuits, GO to A8. | | A8: CHECK CIRCUIT 29-MD15/74-MD15 FOR SHORT | | | 1 CHECK resistance between the audio control unit connector C-7a: - pin 1, circuit 29-MD15 (OG/BK) and ground.
- pin 3, circuit 74-MD15 (BU/BK) and ground.
| | | Is the resistance greater than 10,000 ohms? Yes REPAIR/INSTALL a new audio control unit. No REPAIR circuit 29-MD15 (OG/BK)/ 74-MD15 (BU/BK) as appropriate. TEST the system for normal operation. | | A9: RADIO CASSETTE INCORRECT OPERATION | | | 1 Ignition switch in position I. | | | 2 Turn on the radio | | | 3 Using the Audio Guide CHECK the audio control unit features and functions. | | | Does the unit operate correctly? Yes Make sure customer understands operation. Use the Audio Guide, supplied with the vehicle. No REPAIR/INSTALL a new audio control unit. TEST the system for normal operation. | | PINPOINT TEST B : ANTENNA RECEPTION | | TEST CONDITIONS | DETAILS/RESULTS/ACTIONS | | B1: CHECK RADIO RECEPTION - OPERATION | | | 1 Ignition switch in position I. | | | 2 Turn the radio on. | | | 3 Verify the radio is functioning. | | | Is the radio retaining known preset stations and sound coming from the speakers? Yes No | | B2: CHECK ANTENNA GROUND | | | 1 Ignition switch in position 0. | | | 2 Disconnect Audio control unit antenna connector. | | | 3 CHECK the resistance between the antenna screen and ground. | | | Is the resistance less than 1 ohms? Yes No | | B3: ANTENNA CORE RESISTANCE | | | 1 REMOVE the antenna mast. | | | 2 CHECK resistance between the centre pin, on the antenna connector and the antenna mast screw thread. | | | Is the resistance less than 1 ohms? Yes No CHECK in-line connectors. INSTALL a new antenna cable. | | B4: CHECK ANTENNA BASE CONNECTOR RESISTANCE | | | 1 CHECK resistance between the antenna base screen connector and ground. | | | Is the resistance less than 1 ohm? Yes No CHECK and CLEAN antenna screen/ground connections as required. TEST the system for normal operation. | | B5: CHECK ANTENNA FOR SHORT TO GROUND | | | 1 CHECK resistance between the centre pin, on the antenna connector and ground. | | | Is the resistance greater than 10,000 ohms? Yes No | | B6: CHECK ANTENNA CABLE FOR SHORT | | | 1 Ignition switch in position 0. | | | 2 Disconnect Antenna base connector. | | | 3 CHECK resistance between the centre pin, antenna core and antenna screen. | | | Is the resistance greater than 10,000 ohms? Yes INSTALL a new antenna. No INSTALL a new antenna cable. CHECK routing. | | PINPOINT TEST C : DISTORTED SOUND FROM ONE OR MORE SPEAKER | | TEST CONDITIONS | DETAILS/RESULTS/ACTIONS | | C1: CHECK AUDIO CONTROL UNIT CONTROL OF SPEAKER(S) | | | 1 Ignition switch in position I. | | | 2 Turn the radio on | | | 3 With concern evident use fade/balance control to pinpoint which speaker(s) affected. | | | Is distortion present only at high volume? Yes Make sure customers understands operation. Use the Audio Guide, supplied with the vehicle. No | | C2: CHECK SPEAKER CIRCUIT RESISTANCE | | | 1 Ignition switch in position 0. | | | 2 Disconnect Audio Control Unit (C-7b). | | | 3 MEASURE the resistance at the audio unit connector C-7b between pins for the appropriate speaker(s). - Pin 1, circuit 32-MD10 (WH/BK) and pin 2, circuit 33-MD10 (YE/BK). (LHF)
- Pin 3, circuit 32-MDII (WH/VT) and pin 4, circuit 33-MDII (YE/VT). (LHR)
- Pin 5, circuit 32-MD17 (WH/RD) and pin 6, circuit 33-MD17 (YE/RD). (RHF)
- Pin 7, circuit 32-MD18 (WH) and pin 8, circuit 33-MD18 (YE). (RHR)
| | | Is the resistance 4.5 ohms (Rated speaker resistance ± 0,5)? Yes No | | C3: CHECK RESISTANCE OF SPEAKER | | | 1 Disconnect Speaker Connector. | | | 2 MEASURE the resistance between the terminals on the back of the appropriate speaker(s). | | | Is the resistance 4.5 ohms (Rated resistance of speaker)? Yes No INSTALL a new speaker. TEST the system for normal operation. | | C4: CHECK SPEAKER CIRCUIT CONTINUITY | | | 1 MEASURE the resistance between the audio control unit connector C-7b and the speaker connector on the appropriate speaker(s). - C-7b, pin 1, circuit 32-MD10 (WH/BK) and C-326, pin 2, circuit 32-MD28 (WH) (LHF)
- C-7b, pin 2, circuit 33-MD10 (YE/BK) and C-326, pin 1, circuit 33-MD28 (YE) (LHF)
- C-7b, pin 3, circuit 32-MD11 (WH/VT) and C-324, pin 2, circuit 32-MD11 (WH/VT) (LHR)
- C-7b, pin 4, circuit 33-MD11 (YE/VT) and C-324, pin 1, circuit 33-MD11 (YE/VT) (LHR)
- C-7b, pin 5, circuit 32-MD17 (WH/RD) and C-327, pin 2, circuit 32-MD28 (WH) (RHF)
- C-7b, pin 6, circuit 33-MD17 (YE/RD) and C-327, pin 1, circuit 33-MD28 (YE) (RHF)
- C-7b, pin 7, circuit 32-MD18 (WH) and C-325, pin 2, circuit 32-MD18 (WH) (RHR)
- C-7b, pin 8, circuit 33-MD18 (YE) and C-325, pin 1, circuit 33-MD18 (YE) (RHR)
| | | Is the resistance less than 5 ohms? Yes INSTALL a new appropriate speaker. No REPAIR appropriate circuit. TEST the system for normal operation. | | PINPOINT TEST D : DISTORTED SOUND FROM ALL SPEAKERS | | TEST CONDITIONS | DETAILS/RESULTS/ACTIONS | | D1: CHECK SOUND FROM ALL SPEAKERS | | | 1 Ignition switch in position I. | | | 2 Turn the radio on | | | 3 CHECK FADE and BALANCE controls; Fade to each speaker in turn to test. | | | Are all the speakers without sound? Yes No | | D2: CHECK CONNECTORS | | | 1 CHECK the connectors at the back of the audio control unit. | | | Is connector engaged? Yes No CHECK locking tangs and connector terminals engage fully. TEST the system for normal operation. | | D3: CHECK SPEAKER POSITIVE CIRCUIT FOR SHORT TO GROUND | | | 1 Disconnect Audio Control Unit (C-7b). | | | 2 MEASURE the appropriate speaker circuit between; - C-7b, pin 1, circuit 32-MD10 (WH/BK) and ground. (LHF)
- C-7b, pin 3, circuit 32-MD11 (WH/VT) and ground. (LHR)
- C-7b, pin 5, circuit 32- MD17 (WH/RD) and ground. (RHF)
- C-7b, pin 7, circuit 32-MD18 (WH) and ground. (RHR)
| | | Is the resistance greater than 10,000 ohms? Yes No REPAIR the appropriate circuit. TEST the system for normal operation. | | D4: CHECK SPEAKER NEGATIVE CIRCUIT FOR SHORT TO GROUND | | | 1 MEASURE the appropriate speaker circuit between; - C-7b, pin 2, circuit 33-MD10 (YE/BK) and ground
- C-7b, pin 4, circuit 33-MD11 (YE/VT) and ground
- C-7b, pin 6, circuit 33-MD17 (YE/RD) and ground
- C-7b, pin 8, circuit 33-MD18 (YE) and ground
| | | Is the resistance greater than 10,000 ohms? Yes REPLACE audio control unit. TEST the system for normal operation. No | | PINPOINT TEST E : RADIO AND FOUR SPEAKERS WORKING BUT LITTLE OR NO SOUND FROM LOW FREQUENCY UNIT(S) | | TEST CONDITIONS | DETAILS/RESULTS/ACTIONS | | E1: CHECK AUDIO ENTERTAINMENT MODULE SUPPLY | | | 1 Ignition switch in position 0. | | | 2 Disconnect Audio entertainment module connector (C-34). | | | 3 Ignition switch in position I. | | | 4 Measure the voltage between the audio entertainment module C-34, pin 1 (RD) and ground. | | | Is the voltage greater than 10 volts? Yes No | | E2: CHECK AUDIO ENTERTAINMENT MODULE FOR OPEN CIRCUIT | | | 1 Measure the resistance between the audio entertainment module C-34, pin 6 (BN) and ground. | | | Is the resistance greater than 10,000 ohms? Yes REPAIR circuit. (Audio entertainment module C-34 to ground). No | | E3: CHECK AUDIO CONTROL UNIT TO AUDIO ENTERTAINMENT MODULE FOR OPEN CIRCUIT | | | 1 Ignition switch in position 0. | | | 2 Disconnect Audio control unit connector (C-7b). | | | 3 Ignition switch in position I. | | | 4 Measure the resistance between the audio control unit C-7b, pin 7 (BK/OG) and the audio entertainment module C-34, pin 1 (RD). | | | Is the resistance greater than 10,000 ohms? Yes REPAIR circuit. (Audio control unit to audio entertainment module). No | | E4: CHECK AUDIO CONTROL UNIT FOR SUPPLY | | | 1 Ignition switch in position 0. | | | 2 Connect Audio control unit connector (C-7b). | | | 3 Disconnect Audio control unit connector (C-7a). | | | 4 Ignition switch in position I. | | | 5 Measure the voltage between the audio control unit C-7a, pin 7 (BK/OG) and ground. | | | Is the voltage greater than 10 volts? Yes No REPLACE the audio control unit. | | E5: CHECK AUDIO ENTERTAINMENT MODULE FOR CORRECT OPERATION | | | 1 Ignition switch in position 0. | | | 2 Connect Audio control unit connector (C-7a). | | | 3 Ignition switch in position I. | | | 4 Measure the voltage between the audio entertainment module C-34, pin 3 (YE/RD) and ground. | | | Is the voltage between 5 and 7 volts? Yes No REPLACE the audio entertainment module. | | E6: CHECK CIRCUIT RADIO RECEIVER/CASSETTE PLAYER POWER AMPLIFIER TO AUDIO ENTERTAINMENT MODULE FOR OPEN CIRCUIT | | | 1 Ignition switch in position 0. | | | 2 Disconnect Radio receiver/cassette player power amp (C-31b). | | | 3 Disconnect Audio entertainment module connector (C-34). | | | 4 Ignition switch in position I. | | | 5 Measure the resistance between the radio receiver/cassette player power amplifier C-31b, pin 5 (YE/RD) and the audio entertainment module C-34 pin 2 (YE/RD). | | | Is the resistance less than 5 ohms? Yes No REPAIR circuit. (Radio receiver/ cassette player power amplifier to audio entertainment module). | | E7: CHECK RADIO RECEIVER/CASSETTE PLAYER POWER AMPLIFIER SUPPLY | | | 1 Ignition switch in position 0. | | | 2 Connect Audio entertainment module conector (C-34). | | | 3 Disconnect Radio receiver/cassette player power amp (C-31a). | | | 4 Ignition switch in position I. | | | 5 Measure the voltage between the radio receiver/cassette player power amplifier C-31a pin 4 (RD), 5 (RD), 6 (RD) and ground. | | | Is the voltage greater than 10 volts? Yes No REPAIR circuit 30-HB11. | | E8: CHECK RADIO RECEIVER/CASSETTE PLAYER POWER AMPLIFIER GROUND FOR OPEN CIRCUIT | | | 1 Measure the resistance between the radio receiver/cassette player power amplifier C-31a, pin1 (BN), pin 2 (BN), pin 3 (BN) and ground. | | | Is the resistance less than 5 ohms? Yes No REPAIR circuit. (Radio receiver/cassette player power amplifier to ground). | | E9: CHECK SUPPLY CIRCUIT RADIO RECEIVER/CASSETTE PLAYER POWER AMPLIFIER TO LOW FREQUENCY UNITS | | | 1 Ignition switch in position 0. | | | 2 Disconnect LH rear low frequency unit connector(C-328). | | | 3 Disconnect RH rear low frequency unit connector(C-329). | | | 4 Ignition switch in position I. | | | 5 Measure the resistance between the radio receiver/cassette player power amplifier connector C-31a, pin 7 (WH/BN) and the LH rear low frequency unit connector C-328, pin 3 (WH/BN) and between the radio receiver/ cassette player power amplifier connector C-31a, pin 7 (WH/BN) and the RH rear low frequency unit connector C-329, pin 3 (WH/BN). | | | Is the resistance less than 5 ohms? Yes No REPAIR the appropriate circuit. (Radio receiver/cassette player power amplifier to low frequency unit). | | E10: CHECK RETURN CIRCUIT RADIO RECEIVER/CASSETTE PLAYER POWER AMPLIFIER TO LOW FREQUENCY UNITS | | | 1 Measure the resistance between the radio receiver/cassette player power amplifier connector C-31a, pin 8 (YE/BN) and the LH rear low frequency unit connector C-328, pin 4 (YE/BN) and between the radio receiver/ cassette player power amplifier C-31a, pin 8 (YE/BN) and the RH rear low frequency unit C-329, pin 4 (YW/BN). | | | Is the resistance less than 5 ohms? Yes No REPAIR circuit. (Radio receiver/cassette player power amplifier to low frequency unit). | | E11: CHECK LOW FREQUENCY UNIT FOR CORRECT OPERATION | | | 1 Measure the resistance between the LH low frequency unit C-328, pin 3 and pin 4 and between the RH low frequency unit C-329 pin 3 and pin 4. | | | Is the resistance between 6 and 8 ohms? Yes No REPLACE the appropriate low frequency unit. | | E12: CHECK RADIO RECEIVER/CASSETTE PLAYER POWER AMPLIFIER FOR CORRECT OPERATION | | | 1 Ignition switch in position 0. | | | 2 Disconnect Radio receiver/cassette player power amp (C-31a). | | | 3 Ignition switch in position I. | | | 4 Measure the resistance between the radio receiver/cassette player power amplifier output connector C-31a, pin 7 (WH/BN) and pin 8 (YE/BN). | | | Is the resistance less than 4 ohms? Yes REPLACE the radio receiver/cassette player power amplifier. No System OK. | | |