
Ranger 4WD V6-3.0L VIN U (1997)
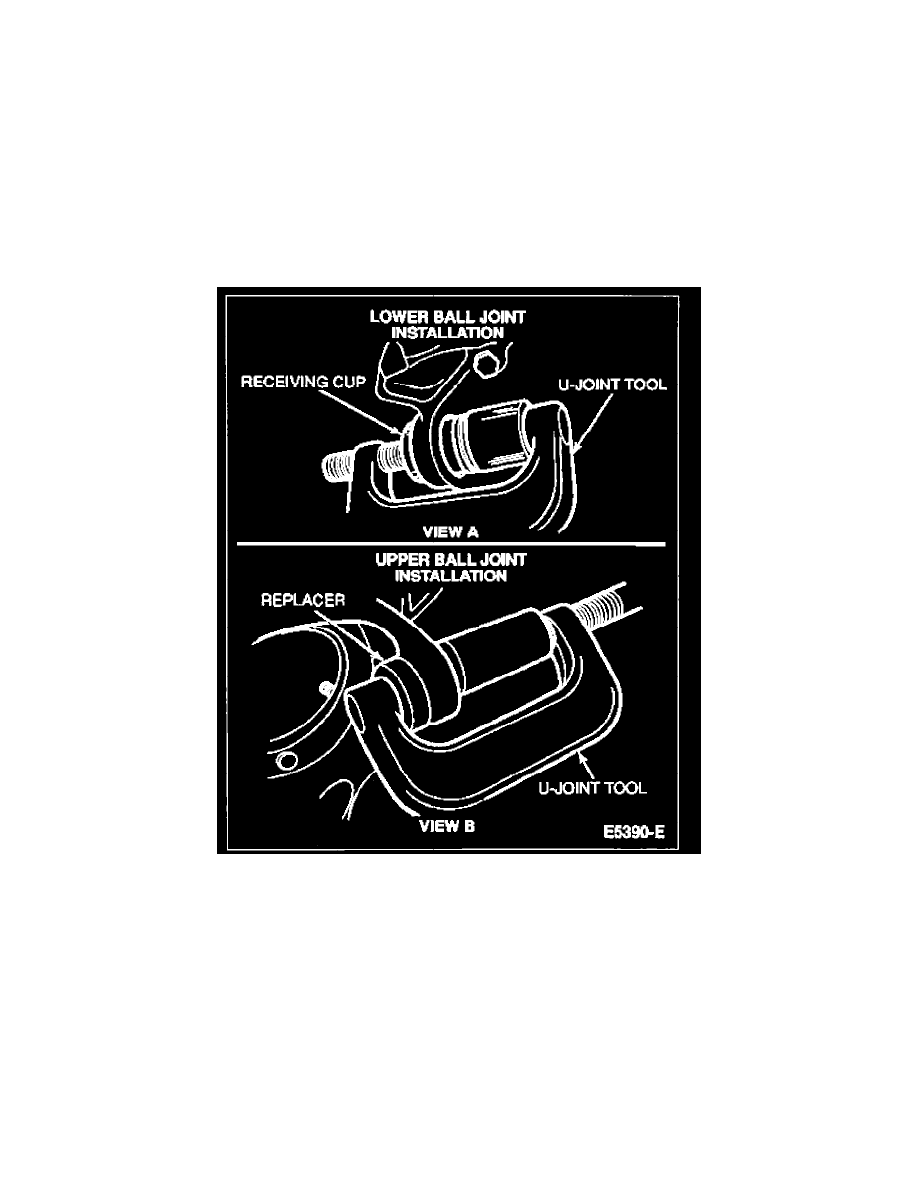
1. NOTE: The front suspension lower arm ball joint must always be installed first.
Clean the steering knuckle bore and insert front suspension lower arm ball joint in knuckle as straight as possible.
2. Assemble U-Joint Tool T74P-4635-C and Receiver Cup to install the front suspension lower arm ball joint
3. Turn the forcing screw clockwise until the front suspension lower arm ball joint is firmly seated.
4. NOTE: If the ball joint cannot be installed to the proper depth, realignment of the receiver cup and C-Frame tool will be necessary.
Install the snap ring on the front suspension lower arm ball joint.
5. To install the front suspension upper ball joint, install the U-Joint Tool T74P-4635-C and Replacer T80T-3010-A3 in the knuckle.
6. Turn the forcing screw clockwise until the ball joint is firmly seated.
7. Position the knuckle in the axle arm and install the camber adjuster into the support arm. Position the slot in the original position.
8. NOTE: Nut on lower ball joint stud must be tightened before pinch bolt or binding of the steering system will result. Install a new lower ball joint
nut on the bottom ball joint stud. Tighten the lower ball joint nut to 129-149 Nm (95-110 lb-ft) minimum. Then tighten to align to the next slot in
the lower ball joint nut with the hole in the stud. Install a new cotter pin.
9. Install the snap ring on the upper ball joint stud.
10. Install the upper ball joint pinch bolt and tighten to 88-115 Nm (65-85 lb-ft).
11. Connect the steering linkage to the steering arm. Install the steering linkage to steering arm nut and tighten to 70-100 Nm (52-74 lb-ft).
12. Install the front wheel spindle and shaft and arm assembly.