| Removal and Installation Measurement and alignment angle system | | -
Replacement parts - Outer side member with apron panel
- Strut tower reinforcement
- Longitudinal member flange plate
| Removal | | -
General information - The apron panel reinforcement needs to be removed before the repairs can be started.
- Necessary removal work: Radiator, engine/transmission unit, crash padding and A-pillar trim.
- Reposition the carpeting and the wiring harness away from the working area.
| | | -
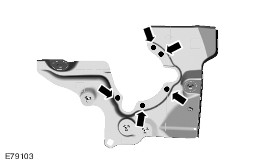
Apron panel - Mill out the spot welds.
- Mill out the spot welds (two panel thicknesses).
| | | -
Strut tower reinforcement - Mill out the spot welds (two panel thicknesses).
- Mill out the spot welds.
| | | -
Strut tower reinforcement - Heat the area (approx. 170° C) and release the NVH element.
| | | -
Side member, bottom - Mill out the spot welds.
- Mill out the spot weld (two panel thicknesses).
| | | -
Bulkhead, inner - Mill out the spot welds (two panel thicknesses).
| | | -
NOTE:In order to enable removal of the complete side member with apron panel, a partial section needs to be cut out at the apron panel. Bulkhead, inner | | | -
Bulkhead, inner - Heat the area (approx. 170° C) and release the NVH element.
| Installation - Fit the outer side member with the apron panel and the inner side member and secure them with the alignment angle.
- Accurate positioning of the suspension strut turret is necessary for subsequent alignment of the axle geometry.
- Before resistance spot welding of body panels with a total panel thickness of 3 mm and greater, the welding equipment instructions contained in sub-section 501-25 must be followed.
| | -
Outer side member with apron panel - Drill holes for puddle welding.
| | | -
Inner side member - Drill holes for puddle welding.
| | | -
NOTE:In order to enable installation of the inner side member, a partial section needs to be cut out at the apron panel. Side member with fender apron panel | | | -
NOTE:Use a measuring and alignment system to ensure accurate positioning of the suspension strut turret. Mounting points for the suspension strut | | | -
Bulkhead, inner - Apply PU glass adhesive to the NVH element.
| | | -
NOTE:By drilling out the holes it is possible to weld all three layers of metal together. Bulkhead, inner - Drill out by one panel thickness.
| | | -
NOTE:In order to ensure that complete sealing is achieved, the remaining openings on the mounting tube for the instrument panel bracket need to be sealed with body sealant. Bulkhead, inner - Continuous MIG weld seam.
| | | -
NOTE:By drilling out the holes it is possible to weld all three layers of metal together. Apron panel - Drill out by one panel thickness.
| | | -
Suspension strut turret - Surface grind the MIG spot welds.
| | | -
Strut tower reinforcement - Drill holes for puddle welding (10 mm diameter).
| | | -
NOTE:Working from the inside, insert the NVH element at the suspension strut turret reinforcement using PU window adhesive and secure it with the plastic clip. Strut tower reinforcement - Apply PU glass adhesive to the NVH element.
| | | -
Strut tower reinforcement - Puddle weld.
- Resistance spot weld.
| | | -
NOTE:Fit the longitudinal member flange plate using the straightening angle. Longitudinal member flange plate | | | -
Longitudinal member flange plate | | |