| Removal and Installation Special Tool(s) | | Separator, Ball Joint 13-006 | | | Expander, Teflon Seal 13-015 | Removal All Vehicles | | -
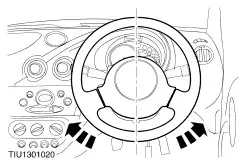
NOTE:Make sure that the road wheels are in the straight ahead position. Centralize the steering and lock it in position. | | | -
Remove the front wheels and tires.
For additional information, refer to: Wheel and Tire (204-04 Wheels and Tires, Removal and Installation).
| | | -
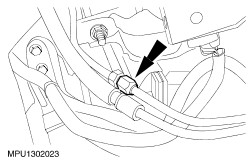
Disconnect the fluid cooler pipe union and drain the power steering fluid. - Allow the fluid to drain into a suitable container.
| | | -
Loosen the tie-rod end retaining nut on both sides. - Remove and discard the tie-rod retaining nut split pin.
- Loosen the tie-rod retaining nut.
| | | -
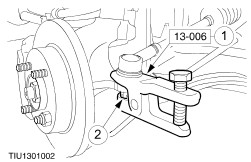
CAUTION:Protect the ball joint seal using a soft cloth to prevent damage. Using the special tool, detach the tie-rod end from the wheel knuckle on both sides. - Release the tie-rod end.
- Remove and discard the tie-rod retaining nut.
| | | -
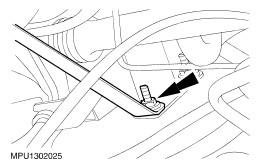
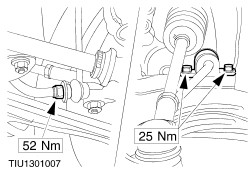
Detach the flexible coupling from the pinion shaft. - Remove and discard the pinch bolt.
- Slide the flexible coupling off the pinion shaft.
| | | -
CAUTION:Make sure that the pressure check valve does not fall out of the valve body high-pressure port when removing the steering gear power steering pipe unions. Disconnect the steering gear power steering pipe unions (right-hand drive shown). - Remove the pipe clamp retaining screw.
- Disconnect the power steering pipe unions.
- Allow the fluid to drain into a suitable container.
| | | -
Detach the driver side stabilizer bar. - Remove the stabilizer bar to connecting link retaining nut.
- Remove the stabilizer bar to mounting bracket bolts.
| Right-hand drive vehicles | | -
Detach the driver side mounting bracket/lower arm assembly. - Remove the bolts.
- Loosen the rear mounting bolt four turns to support the lower arm assembly.
| Left-hand drive vehicles | | -
Detach the driver side mounting bracket/lower arm assembly. - Remove the bolts.
- Loosen the rear mounting bolt four turns to support the lower arm assembly.
| All Vehicles | | -
Slacken the brake booster bracket retaining nut (if fitted). | | | -
Remove the steering gear support brackets. - Remove the bracket to body retaining nuts.
- Remove the bracket to steering gear retaining bolts.
| | | -
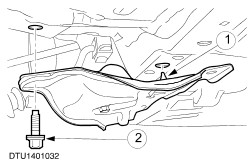
CAUTION:Make sure that the pressure check valve does not fall out of the valve body high-pressure port when removing the steering gear. Remove the steering gear. - Unhook the steering gear.
- Remove the steering gear from the driver side.
| Installation All Vehicles | | -
NOTE:If the steering gear is being renewed the unions that are supplied fitted to the steering gear should be removed and retained for future use. Using the special tool, install new O-ring seals. - Push the O-ring seal onto the tool.
- Locate the tool onto the union and push on the O-ring seal.
| | | -
Position the steering gear. | | | -
CAUTION:Make sure that the brake booster support bracket is in place before installing the steering gear support brackets (if fitted). Install the steering gear support brackets | | | -
Tighten the brake booster support bracket retaining nut (if fitted). | | | -
Align the mounting bracket/lower arm assembly. - Locate the assembly.
- Install the aligning bolt.
| Left-hand drive vehicles | | -
Attach the driver side mounting bracket/lower arm assembly. | Right-hand drive vehicles | | -
Attach the driver side mounting bracket/lower arm assembly. | All Vehicles | | -
Attach the driver side stabilizer bar. | | | -
Connect the steering gear power steering pipe unions (right-hand drive shown). | | | -
Connect the fluid cooler pipe union. | | | -
WARNING:Install new split pins. Failure to follow this instruction may result in personal injury. Attach the tie-rod ends to the wheel knuckles. | | | -
WARNING:Make sure that a new bolt is installed. CAUTION:Make sure that the steering is in the straight ahead position. Install a new pinch bolt. | | | -
Install the front wheels and tires.
For additional information, refer to: Wheel and Tire (204-04 Wheels and Tires, Removal and Installation).
| | | -
Fill and bleed the power steering system. For additional information, refer to: (211-00 Steering System - General Information) Power Steering System Filling (General Procedures), Power Steering System Bleeding (General Procedures). | | | -
Check the toe setting and adjust as necessary. For additional information, refer to: (204-00 Suspension System - General Information) Specifications (Specifications), Specifications - Convertible (Specifications), Front Toe Adjustment (General Procedures). | |