| Removal and Installation Removal | | -
Remove the passenger air bag module.
For additional information, refer to: Passenger Air Bag Module (501-20B Supplemental Restraint System, Removal and Installation).
| | | -
Remove the steering column.
For additional information, refer to: Steering Column (211-04 Steering Column, Removal and Installation).
| | | -
Remove the instrument cluster.
For additional information, refer to: Instrument Cluster (413-01 Instrument Cluster, Removal and Installation).
| | | -
Remove the front seats.
For additional information, refer to: Front Seat (501-10 Seating, Removal and Installation).
| | | -
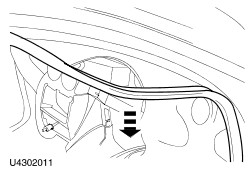
Remove the door opening weatherstrip on both sides. | | | -
Detach the A-pillar trim panels on both sides. - Detach the A-pillar trim panel from the top of the A-pillar.
- Detach the A-pillar trim panel from the instrument panel.
| | | -
Remove the A-pillar trim panel on both sides. - Disconnect the A-pillar trim panel retaining strap on both sides (if equipped).
| | | -
Prise off the side blanking covers (2 each side). | | | -
Detach the fuse box (2 clips). - Pull off the fuse box door.
- Remove the fuse box securing screws.
| | | -
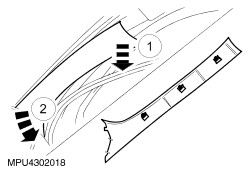
Remove the left and right-hand side lower cowl trim panel retaining screws (right-hand side shown). | | | -
Unclip the left and right-hand side lower cowl trim panels (right-hand side shown). | | | -
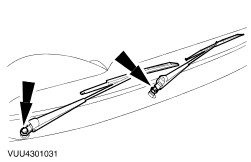
Remove both windscreen wiper arm assemblies. | | | -
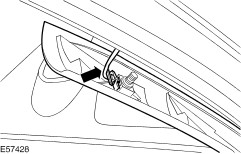
Disconnect the washer jet supply pipe. | | | -
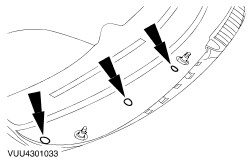
Remove the left and right-hand side upper cowl trim panels retaining screw covers and screws (right-hand side shown). | | | -
Remove the left and right-hand side upper cowl trim panels (right-hand side shown). | | | -
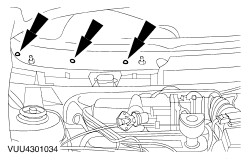
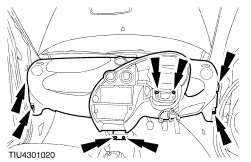
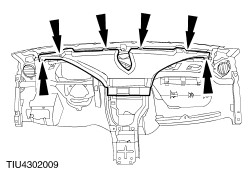
Remove the instrument panel retaining nuts. | | | -
Release the instrument panel. - Disconnect the multiplug.
- Lift the instrument panel back and off the bulkhead.
- Cut the cable ties as necessary at the back of the instrument panel.
| | | -
Remove the sound insulation. | | | -
Disconnect the passenger air bag deactivation (PAD) switch electrical connector (PAD switch shown removed for clarity). | | | -
Disconnect the cigar lighter multiplug and lamp. | | | -
Disconnect the clock electrical connector. - Clock removed for clarity.
| | | -
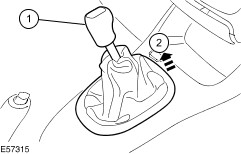
Remove the gearshift lever boot. - Remove the gearshift lever knob.
- Detach the gearshift lever boot from the floor covering.
| | | -
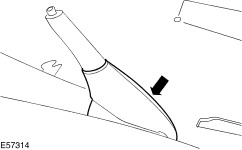
Remove the parking brake control lever boot. | | | -
CAUTION:The bolt securing the safety belt lower anchor is held captive by a fibre washer. The bolt, spacer and fibre washer must remain on the safety belt lower anchor at all times when the safety belt is detached or removed. Detach the safety belt lower anchor from the floor pan on both sides. - Remove the safety belt lower anchor retaining bolt.
- Detach the safety belt lower anchor from the floor pan.
| | | -
Detach the rear seat cushion from the rear floor pan. - Remove the rear seat cushion retaining screws.
| | | -
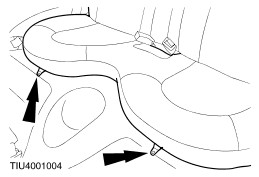
With the aid of another technician remove the floor covering. | | | -
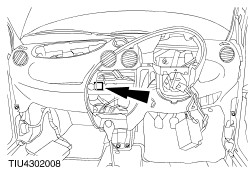
Disconnect the air bag electronic control module multiplug. - Press the locking tag upwards.
- Pivot the retaining strap over to pull the multiplug out of the module.
| | | -
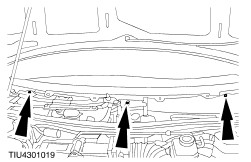
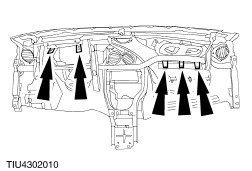
Remove the instrument panel retaining bolts. | | | -
Remove the heater ducting (8 screws) (instrument panel shown removed to show location of screws). | | | -
Release the wiring loom (instrument panel shown removed to show location of cable retainers). - Detach the 2 cable retainers (five clips).
- Cut the cable ties as necessary.
| | | -
Remove the instrument panel. | Installation | | -
To install, reverse the removal procedure. | | |