Thunderbird V8-302 5.0L HO (1992)

Radius Arm: Service and Repair
Tension Strut
REMOVAL
1. Raise and support vehicle.
2. Remove tire and wheel assembly.
3. Hold tension strut on flats with wrench. Remove front sub-frame attaching nut and insulator.
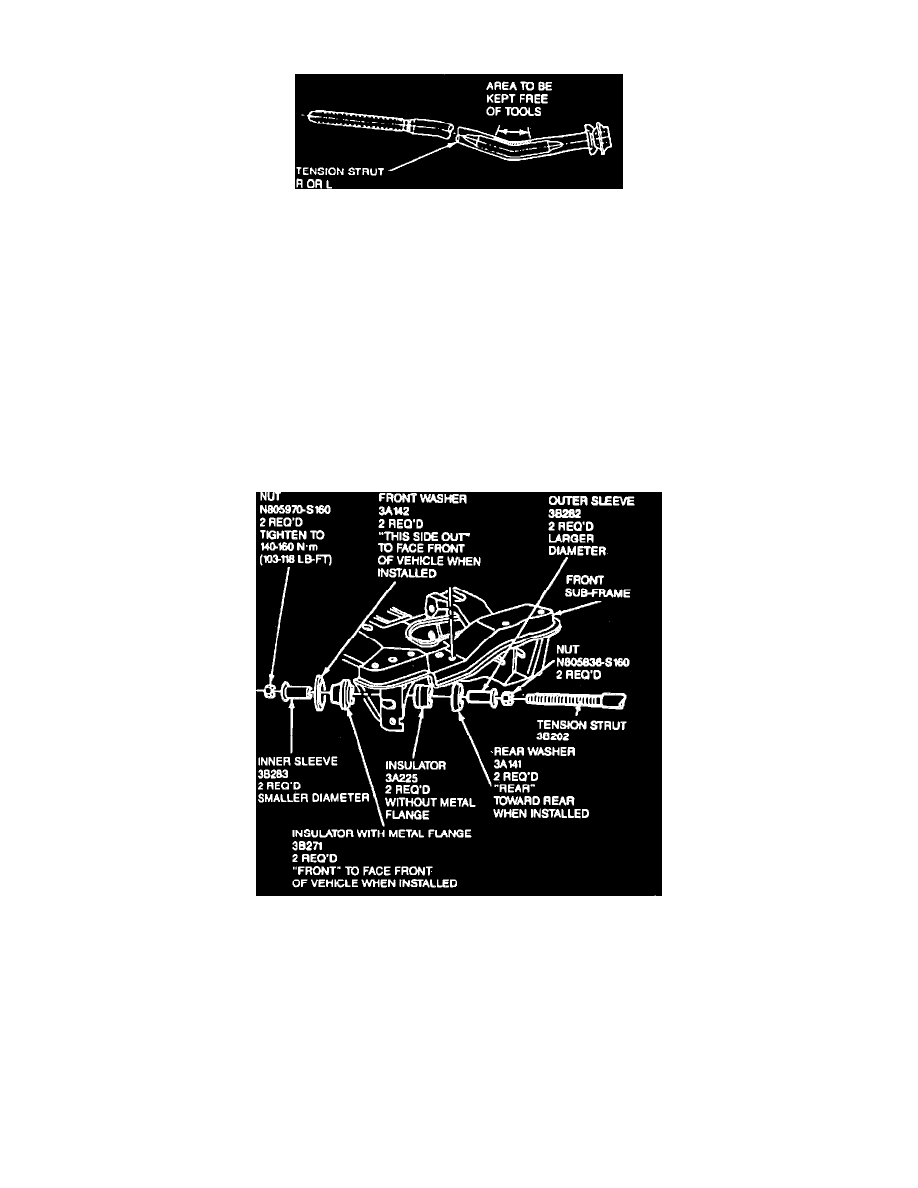
CAUTION: Do not hold strut or damage surface in area shown in Fig. 11, damage to tension strut may result.
4. Mark position, or note number of visible threads at tension strut rear sub-frame nut.
5. Back off tension strut rear sub-frame nut.
6. Remove tension strut to lower control arm attaching nut.
7. Remove lower shock bolt and nut.
8. Remove brake hose bracket to body attaching bolt.
9. Remove ABS sensor attaching bolt and position sensor out of the way.
10. Pry lower control arm rearward and remove tension strut.
Tension Strut Installation
INSTALLATION
1. If front tension strut insulators were removed, de-burr insulator sleeves before reassembly. If new sleeves are used, inner sleeve must be shorter
than outer sleeve. Cut up to 1/4 inch off inner sleeve if necessary, Fig. 12.
2. Install tension strut retaining nut all the way down on threads. Install with nylon insert facing forward.
3. Install outer sleeve and rear washer. Word REAR must face outward.
4. Install rear insulator (without metal flange) with large end toward sub-frame.
5. Install tension strut in sub-frame.
6. Install front insulator, with the word FRONT toward front of vehicle and metal flange toward sub-frame.
7. Install front washer, with the words ``THIS SIDE OUT'' toward front of vehicle.
8. Install inner sleeve, loosely install front nut.
9. Install front washer and insulator on rear of tension strut, cup to face away from insulator.
10. Install tension strut into lower control arm.
