| In-vehicle Repair Special Tool(s) | | Preload Gauge 205-067 (15-041) | | | Flange Holding Wrench, Universal 205-072 (15-030A) | | | Installer, Drive Pinion Oil Seal 205-077 (15-047A) | | | Remover, Crankshaft Rear Oil Seal 303-336 (21-151) | | | Remover, Mainshaft Double Lip Oil Seal 308-151 (16-055) | General Equipment Materials Name Specification Grease SAM-1C-9111-A SAE 75W-140 High performance rear axle lubricant WSL-M2C192-A Removal | | -
NOTE:The brake drums must be removed to prevent drag during drive pinion bearing preload adjustment. Remove the brake drums. | | | -
NOTE:Mark the position of the driveshaft flange in relation to the drive pinion flange. Detach the driveshaft from the drive pinion flange and position it to one side. | | | -
WARNING:Driveshafts without a sliding joint protective boot must have the rear section of the driveshaft removed to prevent accidental seperation of the sliding joint. Failure to follow this instruction may result in personal injury. Remove the rear section of the driveshaft if necessary. | | | -
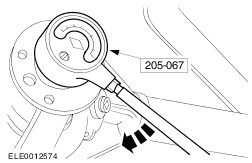
Using the special tool, determine the drive pinion bearing turning torque. - Turn the drive pinion smoothly with the preload gauge and note the value.
| | | -
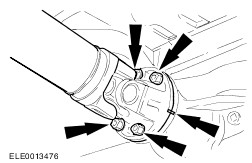
Using the special tool, remove the drive pinion flange. | | | -
Using the special tools, make pilot holes in the drive pinion seal. | | | -
Using four suitable screws, install the special tool. | | | -
Using a suitable two leg puller, remove the drive pinion seal. - Discard the seal and the collapsible drive pinion spacer.
| Installation | | -
NOTE:Install a new drive pinion seal and a new drive pinion flange collapsible spacer. NOTE:Pack the cone of the drive pinion seal with grease. Using the special tool, install the drive pinion seal. | | | -
NOTE:Install a new drive pinion flange locknut. NOTE:Do not fully tighten the drive pinion flange locknut at this stage. Using the special tool, install the drive pinion flange. | | | -
CAUTION:Do not exceed the specified torque. If excess preload is applied, a new drive pinion flange collapsible spacer and a new drive pinion flange locknut must be installed. Using the special tool, tighten the drive pinion flange locknut to the previously determined torque plus 0.3 Nm. | | | -
NOTE:Make sure that the arrows are aligned. Install the rear section of the driveshaft if necessary. | | | -
CAUTION:Install new bolts. NOTE:Align the mark on the driveshaft flange with the mark on the drive pinion flange. Attach the driveshaft to the drive pinion flange. | | | -
With the vehicle on a level surface fill the rear axle until the oil level is 6-14 mm below the bottom of the filler hole. | | |