Sprinter 3500 L5-2.7L DSL Turbo (2004)
Fuel Injector: Service and Repair
Removal and Installation
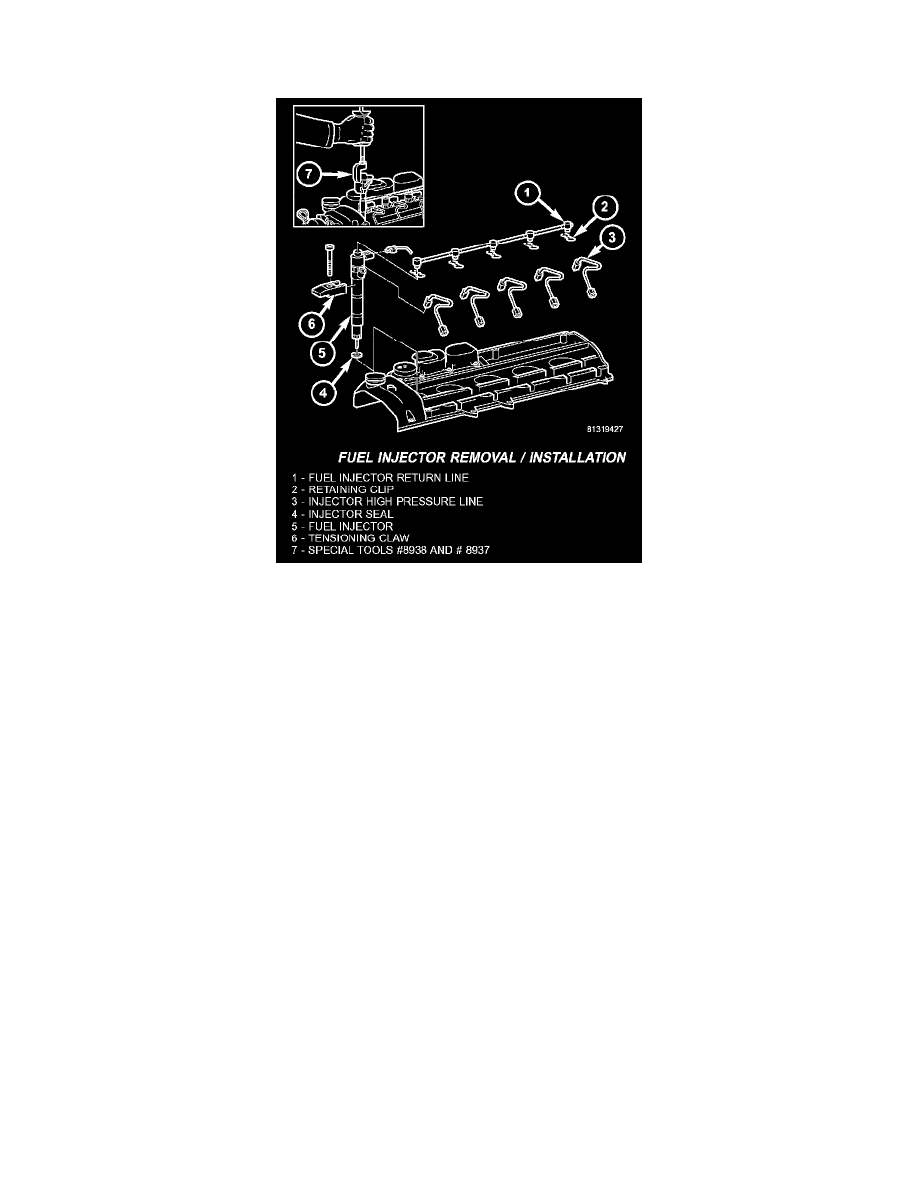
Fuel Injector Removal/Installation
REMOVAL
WARNING: NO SPARKS, OPEN FLAMES OR SMOKING. RISK OF POISONING FROM INHALING AND SWALLOWING FUEL. RISK
OF INJURY TO EYES AND SKIN FROM CONTACT WITH FUEL. POUR FUELS ONLY INTO SUITABLE AND APPROPRIATELY
MARKED CONTAINERS. WEAR PROTECTIVE CLOTHING.
NOTE: When removing injectors, the seal rings and retaining stretch bolts must always be replaced. Coat the injector body with the anti- seize
compound before installing. Keep lubricant away from the injector nozzle.
1. Disconnect negative battery cable.
2. Remove engine cover (Refer to ENGINE - REMOVAL).
3. Remove the fuel return hose locking clamps at the injector and remove return hose.
4. Disconnect the injector electrical connector.
NOTE: Counterhold injection lines with wrench socket at threaded connections of injectors.
5. Disconnect fuel injector high pressure line .
6. Remove fuel injector retaining bolt and tension claw, then remove the injector and seal.
NOTE: If injectors are tight, remove with extraction claw in place of tensioning claw. If extraction claw contacts cylinder head cover, remove cylinder
head cover. If necessary, remove injectors with threaded adaptor and discard injector.
8. Clean injectors and recesses (Refer to FUEL SYSTEM/FUEL INJECTION/FUEL INJECTOR - STANDARD PROCEDURE).
INSTALLATION
WARNING: NO SPARKS, OPEN FLAMES OR SMOKING. RISK OF POISONING FROM INHALING AND SWALLOWING FUEL. RISK
OF INJURY TO EYES AND SKIN FROM CONTACT WITH FUEL. POUR FUELS ONLY INTO SUITABLE AND APPROPRIATELY
MARKED CONTAINERS. WEAR PROTECTIVE CLOTHING.
NOTE: When removing injectors, the seal rings and retaining stretch bolts must always be replaced. Coat the injector body with the anti- seize