
Suburban 3/4 Ton 4WD V8-305 5.0L (1986)
Distributor: Service and Repair
Distributor Service
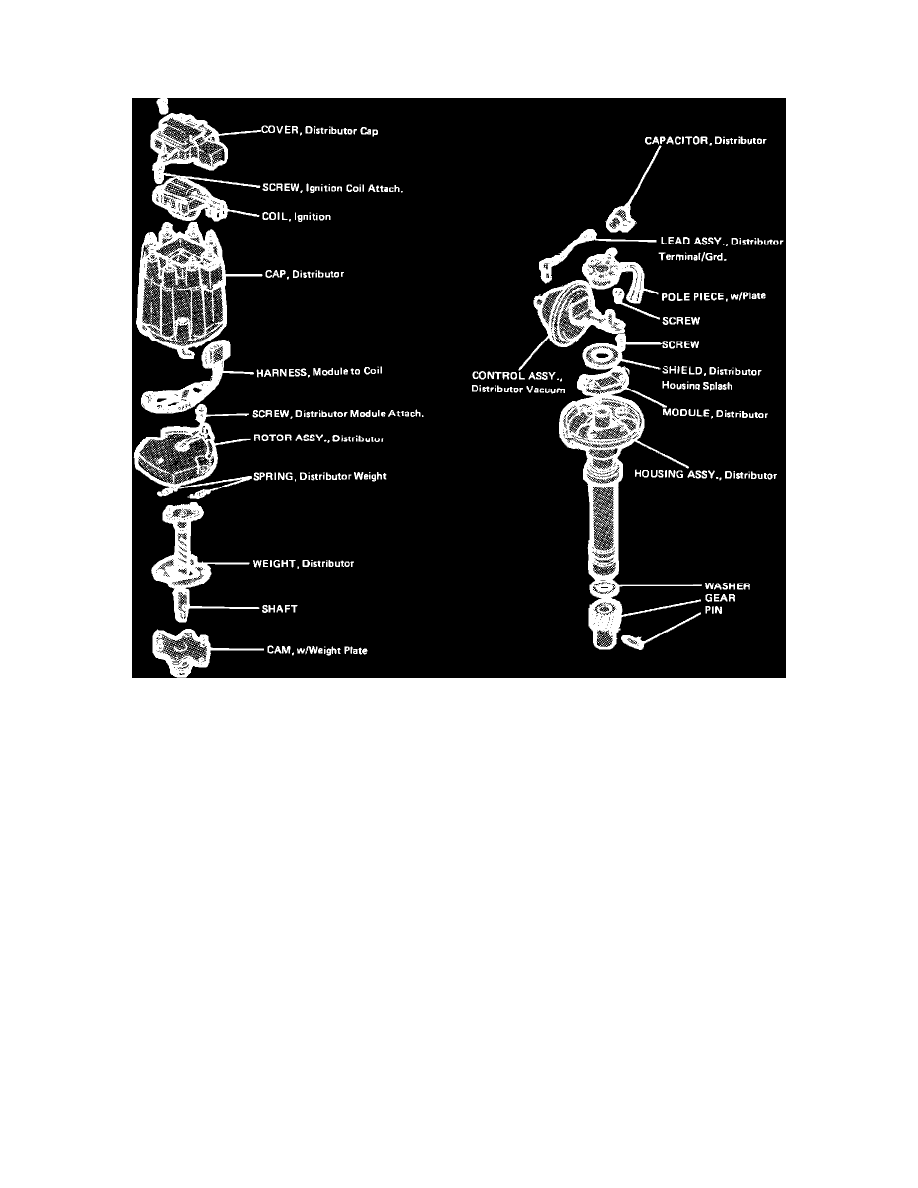
Fig. 15 Typical High Energy Ignition (HEI) distributor exploded view
DISASSEMBLY
1.
Remove distributor as outlined, then remove rotor, Fig. 15.
2.
Remove advance springs and weights (if equipped).
3.
Remove module retaining screws and move module to a position where connector may be removed.
4.
Remove wires from module terminals.
5.
Support distributor gear so that distributor shaft will not be damaged, then remove roll pin by driving it out with a punch.
6.
Remove gear, shim and tanged washer from shaft. Remove any burrs that may have been caused by removal of roll pin. Some distributors do not
use a shim or tanged washer.
7.
Remove distributor shaft and magnet assembly.
8.
Remove pole piece retaining screws, pole piece, magnet and pickup coil.
9.
Remove lock ring from top of housing, pickup coil retainer and felt washer.
10.
Remove vacuum advance unit (if equipped).
11.
Remove capacitor and wiring harness from distributor housing.
ASSEMBLY
1.
Install vacuum advance unit (if used) and secure with two screws, Fig. 15.
2.
Place felt washer over lubricant reservoir at top of housing.
3.
Position pick up coil retainer onto housing with vacuum advance arm over actuating pin of vacuum advance mechanism and secure with lock ring.
4.
Install pick up coil magnet and pole piece. Loosely install the three retaining screws.
5.
Install distributor shaft and rotate to check for even clearance all around between pole piece and shaft projections.
6.
Move pole piece to provide even clearance and secure with three retaining screws.
7.
Install drive onto shaft with teeth facing up. Drive gear has a dimple on one side next to drive pin hole. Align drive gear so that dimple is on same