
Suburban 3/4 Ton 4WD V8-305 5.0L (1986)
Pinion Bearing: Service and Repair
Dana/Spicer
9 3/4 Inch Ring Gear
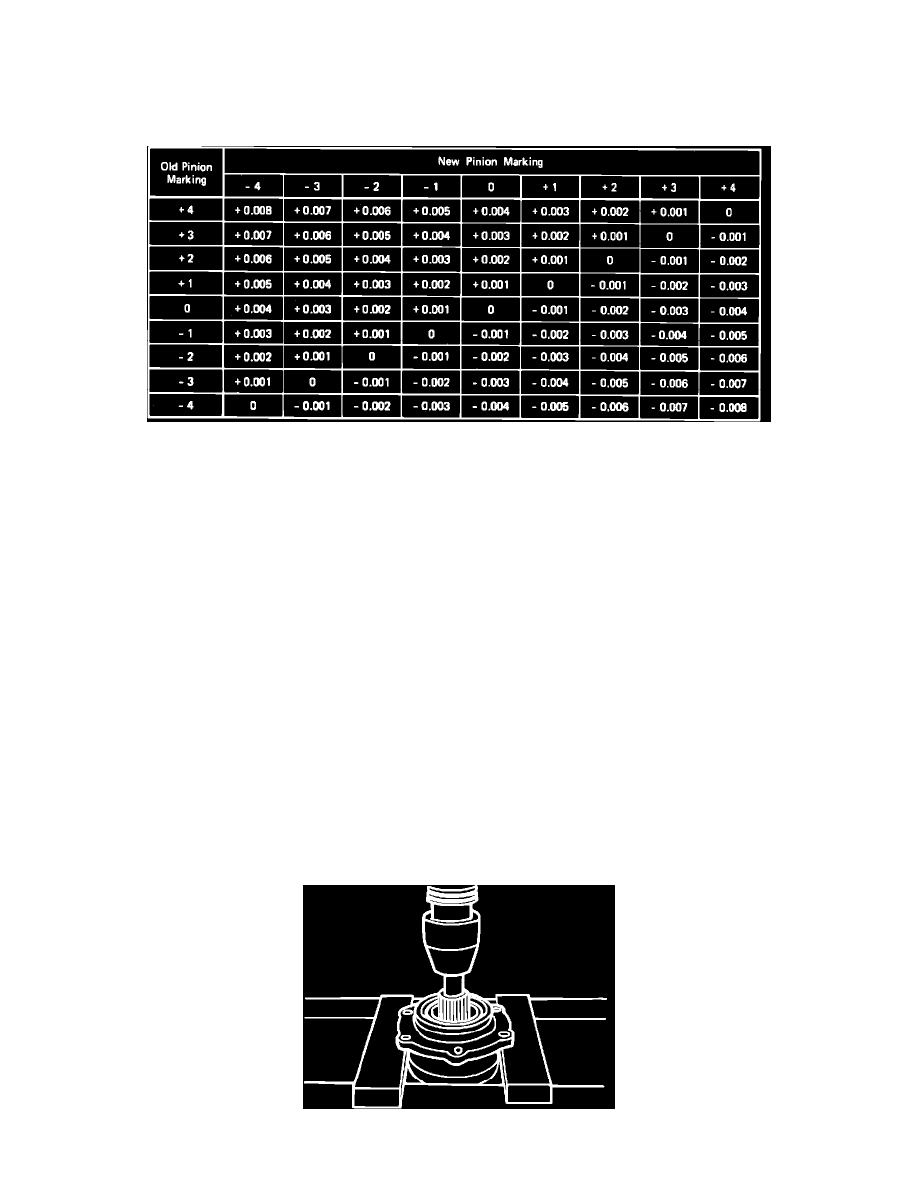
Fig. 5 Pinion Setting Chart
If original ring gear and pinion assembly are to be reused, measure original shim pack and build a new shim pack to the same dimension. If baffle is in
the axle assembly, it is considered part of the shim pack.
Ring gears and pinions are supplied in matched sets only. If a new gear is being used, verify numbers on pinion and ring gear before proceeding with
assembly.
On the button end of the pinion there is a +, - , or 0 number which indicates the best running position for each particular gear set. This position is
controlled by shims installed behind the inner bearing cup. If baffles or oil slingers are used, they are considered part of the adjusting shim pack.
If a new gear set is being installed, note the plus or minus mark on both old and new pinions and adjust thickness of shim pack to compensate for the
difference between these two numbers. Refer to chart, Fig. 5, when determining shim size.
1.
Install inner shim pack and, on 9-3/4 inch ring gear axle, the oil slinger in inner or rear cup bore, then drive cup into position using suitable tool.
2.
Add or remove an equal amount to the outer shim pack as was added to the inner shim pack.
3.
Drive outer cup into carrier bore, then press rear pinion bearing onto pinion shaft.
4.
Install drive pinion and bearing into differential carrier.
5.
Install shims and outer or front pinion bearing.
6.
Install companion flange, then the washer and nut on pinion shaft.
7.
Measure rotating torque of pinion shaft. Rotating torque should measure 10-20 inch lbs. with original bearings installed, or 20-40 inch lbs. with
new bearings installed, discounting torque required to start turning shaft.
8.
If rotating torque is not within specifications, adjust shim pack as necessary. Increase outer shim pack to reduce torque, or decrease shim pack to
increase torque.
9.
Remove nut, washer and companion flange from pinion shaft.
10.
Install oil slinger, gasket (if equipped) and oil seal onto pinion shaft.
11.
Install companion flange, washer and nut and torque as described is step 7.
Disassembly
Fig. 9 Drive Pinion Removal