
Suburban 3/4 Ton 4WD V8-305 5.0L (1986)
Pinion Gear: Service and Repair
Timken/Rockwell - 12 Inch Ring Gear
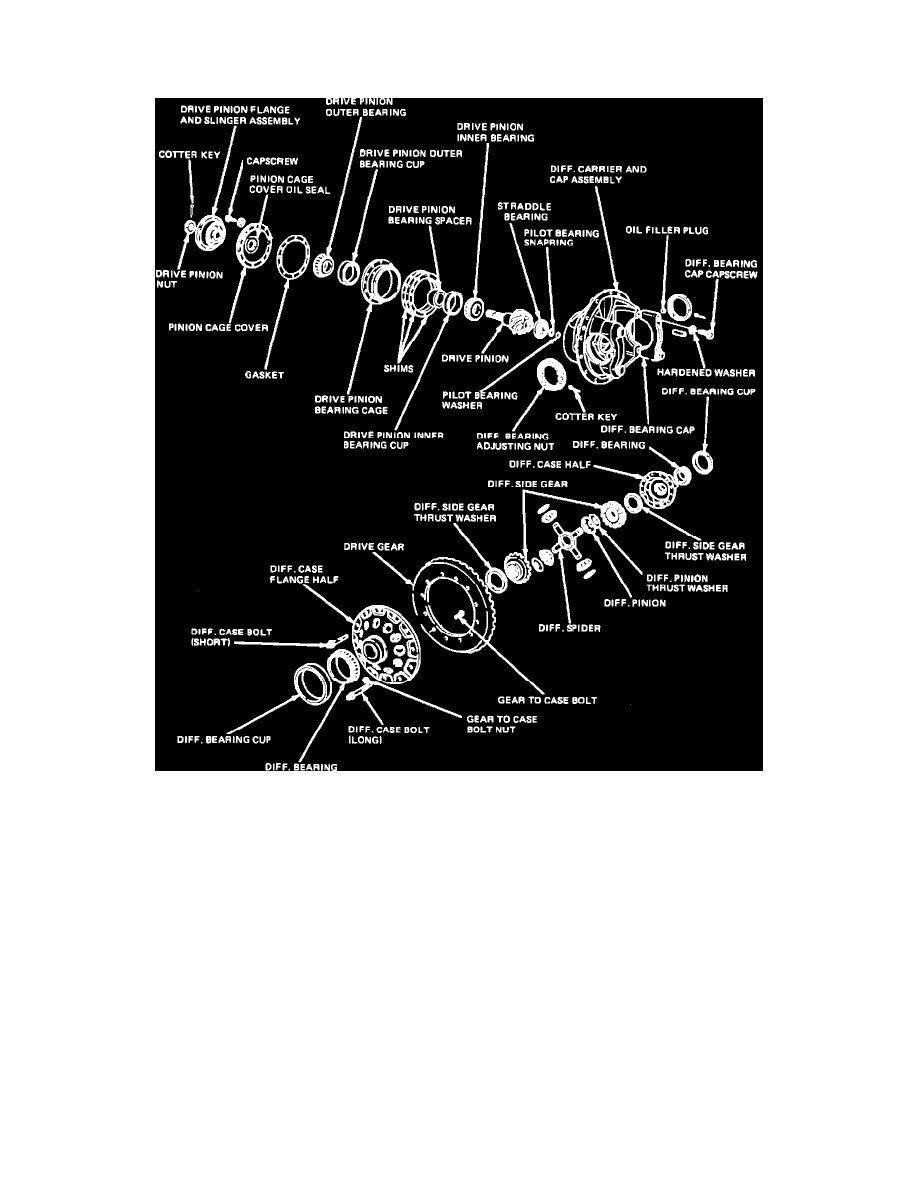
Fig. 1 Exploded View Of Timken/Rockwell Drive Axle With 12 inch Ring Gear
DISASSEMBLY
1.
Tap or press pinion from cage, taking care not to damage shaft threads, then remove outer pinion bearing, Fig. 1.
2.
Remove spacer from pinion, then the inner bearing, using suitable separator and press or puller.
3.
If straddle bearing must be replaced, remove snap ring and washer, then the bearing, using suitable puller.
4.
If bearings are to be replaced, press outer races from bearing cage, taking care not to distort cage.
5.
Inspect components as outlined, and replace as needed, keeping components in order for assembly.
ASSEMBLY & PRELOAD
1.
When installing new cups, press them firmly against pinion bearing cage shoulders.
2.
Lubricate bearings and cups with suitable lubricant.
3.
Press rear thrust and radial bearings firmly against pinion shoulders, using suitable sleeve that will bear only on bearing inner race.
4.
Install radial bearing lock ring, then squeeze ring into pinion shaft groove.
5.
Insert pinion and bearing assembly in pinion cage and position spacer or spacer combination over pinion shaft.
6.
Press front bearing firmly against spacer.
7.
Rotate cage several revolutions to assure normal bearing contact.
8.
Press flange or yoke against forward bearing and install washer and pinion shaft nut.
9.
Place pinion and cage assembly over carrier studs, hold flange with suitable tool and torque pinion shaft nut to 240 ft. lbs.
10.
Check pinion bearing preload torque. If rotating torque is not within 5 to 15 pound inches, disassemble, adjust spacer, reassemble, and recheck
preload torque. Use thinner spacer to increase or thicker spacer to decrease preload.